
Compiling with Scrivener: Manuscript preparations
Manuscript preparations
You can click on the Compile option any time you are curious to see what the ‘finished’ product will look like.
It makes sense though, to make sure your manuscript is as good as it can be, and ‘clean’ enough to export.
What’s a ‘clean’ manuscript?
By clean, I mean no typographical errors, typos for short: wrong spellings, missing or misplaced punctuation …
As well as reading it through, out loud preferably, you could use an editing tool such as ProWritingAid to polish your words. Or, there’s AutoCrit or Grammarly.
By clean, I also mean well structured and formatted.
Well structured?
When we reach the Compilation option of Formatting, how your manuscript is structured will make a difference to the end product.
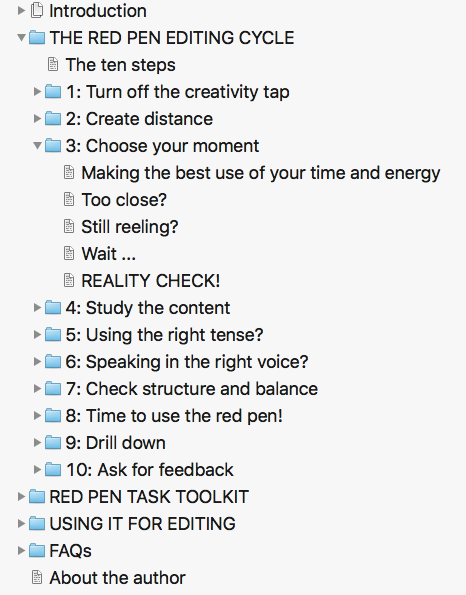
In your Binder, you have folders and within those, more folders or text documents. This what mine looks like for EDITING the Red Pen Way.
I’ve expanded 3: Choose your moment so you can see what’s within that section.
Each blue icon represents a folder. The image of a page with a turned corner represents a text document.
All icons that are lined up will be treated as being at the same ‘level’ when we reach the formatting stage, as you will see in a blog post next week.
So, you need to make sure you’ve adopted a structure which suits the information in your manuscript. That’s what I mean by ‘well structured’.
Formatted?
The choices of which font and size of text etc. will be decided within the Formatting tab of the compilation options. However, this might not produce the results you expect if you have applied some formatting to your manuscript already.
To see what’s actually there, select Format / Options / Show Invisibles. This will reveal some extra blue characters.
Each dot is a space. Each backward-P marks the end of a paragraph. These are examples of non-printing characters which are not printed (!) but do affect how the text is formatted.
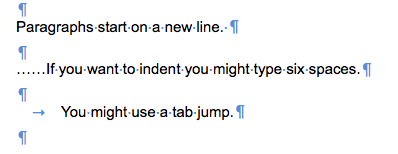
Indentation is achieved within the Formatting tab so any attempt you have made to indent (using extra spaces at the start of the line or a tab jump) needs to be deleted ahead of compilation.
Also, delete any spaces at the end of a paragraph before the backward-P character.
And, if you are as old as me, you might be putting two spaces after a full stop. Nowadays, we only need one.
Next week, we’ll dive into the Compilation Options. Have a good weekend!
Meanwhile, if you have any questions about compiling, or using Scrivener at all, book a Simply Scrivener Special.
The ScrivenerVirgin blog is a journey of discovery:
a step-by-step exploration of how Scrivener can change how a writer writes.
To subscribe to this blog, click here.
Also … checkout the Scrivener Tips
on my ScrivenerVirgin Facebook page.
Pingback:Scrivener Advent Calendar: I is for ... - ScrivenerVirgin
18 December 2024 at 06:52