
Centre-stage for NaNoWriMo: Scrivener’s Outliner view

Using the Outliner to track progress
I use the corkboard for outlining (see this post), so what do I use the Outliner for?
Lots of things … but, during NaNo, the Outliner view in the Editing pane comes into its own.
Using the Outliner during NaNoWriMo
The Outliner shows my progress in writing the scenes of my novel. (For me, each text document is a scene.)
So, when I’m thinking what to write next, a quick glance at the Outliner shows me where I need to focus attention. The next scene/document that has no words so far!

The progress bars
The progress bars are coloured according to the proportion of words I’ve written, against my target words for that scene.
These progress bars appear in the Outliner (as above) but also, for each document, at the bottom of the Editing pane.![]()
![]()
![]()
If you have yet to set a target for a document, you’ll see this instead.
![]()
Click on the bull’s eye and you can set the target for that document.
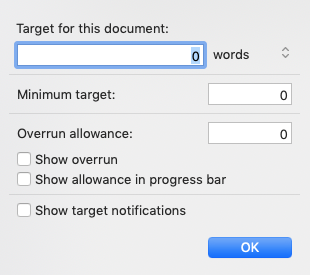
I set mine (arbitrarily) as 500, but only because I guess I need at least 100 scenes and, for NaNo, I’m aiming to write 50,000 words. 50,000 divided by 100 equals 500.
How can you do the same?
To set up the Outliner like I have, there are two things you have to do:
- Set up targets for each scene (as above)
- Set up the outliner columns to reveal the progress in reaching your target.
Setting up the outliner columns
The default setting for the columns in the Outliner include the columns you need, but some extras too.
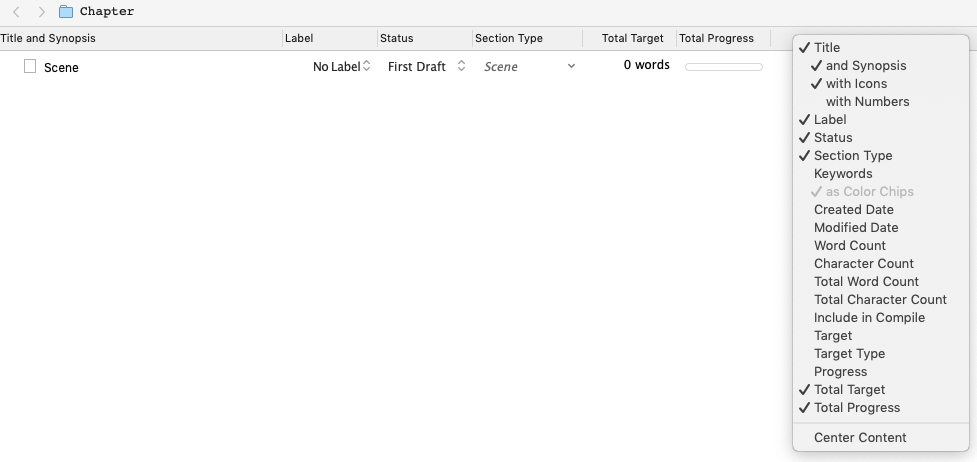
To tidy up the columns, right click on the column headings bar and select / deselect so you achieve the effect you want. I deselected Label, Status and Section Type as I’m not interested in them until I reach the editing stage of this novel.
Customising the colours of the progress bar
If you don’t like the default colours of the progress bar, you can choose your own. Select Scrivener / Preferences / Appearance and click on Target Progress Cars.

Enjoy!
Questions? Need a helping hand? Want a demo?
To watch me go through the process of writing a novel or to ask any questions, book a Simply Scrivener Special.
To help me to prepare, you could also complete this short questionnaire.
The ScrivenerVirgin blog is a journey of discovery:
a step-by-step exploration of how Scrivener can change how a writer writes.
To subscribe to this blog, click here.
Also … check out the Scrivener Tips
on my ScrivenerVirgin Facebook page.
No Comments