

Scrivener for non-fiction writers
How to write non-fiction using Scrivener
Whether you’re writing a text book to help students on an examination course, or a how-to book sharing your expertise, Scrivener provides all the tools you need – from blank page to published book – for the non-fiction writer.
Choose the non-fiction template
Scrivener’s non-fiction project template is the place to start.
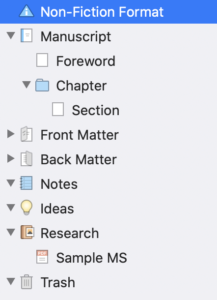
The non-fiction template structure has Chapters with Sections, and a Foreword which appears ahead of the first Chapter.
There are no Character Sketches or Setting sketches that you’d find in the Novel format; you don’t need them!
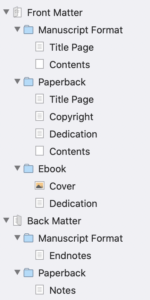
The Front Matter is the same as that provided for the Novel template, but the Back Matter is new. It includes Endnotes for the Manuscript format and Notes for the paperback format. Perfect!
Creating a skeleton in the Binder
Whatever the subject of your non-fiction book, one of the first challenges is to decide the scope.
- What topics will your book cover?
- What will be excluded?
How you go about this task depends on what you are aiming to produce and what constraints are imposed by others eg an examination board.
Creating a text book skeleton
For a text-book, the examination specification will determine what’s required. Unsurprisingly, there is very little wiggle-room.
The syllabus is always broken down into main topics, and within that, subtopics, and within those, sufficient details to show teachers what has to be taught if the students are to pass this exam.
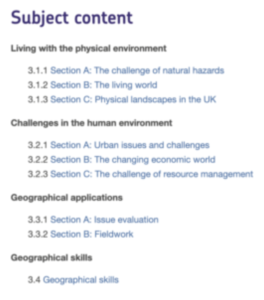
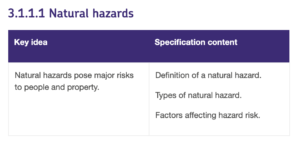
I’ll use here, as an example, the syllabus for AQA’s Geography GCSE. As we shall see, such a syllabus determines precisely what needs to be included in the text book.
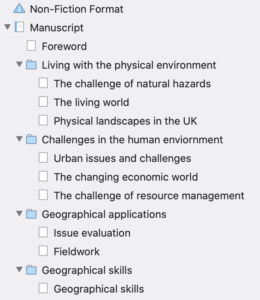
Using the specification then, the content can be mapped out in the Binder, simply by mirroring the specification supplied by the examination board. It’s up to you whether you copy their numbering. Some teachers might prefer you to do so; some students might find it intimidating. A style decision!
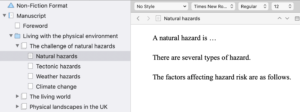
Then, as more detail is offered by the examination specification, this skeleton can be improved. Looking at the specification in more detail ….
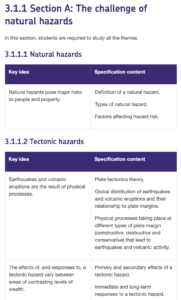
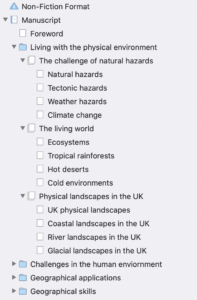
… each section within each chapter can be expanded upon so that the subsections are defined.
Because the examination board provides so much information, right down to what is required to be known, the exercise of setting up the structure is therefore straightforward.
You need to know how to add new folders and documents, and how to drag documents within folders. If you are not sure how to do this, check out this Literature and Latte video.
It also helps if you understand what the various icons mean. This post explains all.
Creating a how-to book skeleton
If you plan to write a how-to book, what you know and what you think your reader needs to know will determine the scope of your book.
 Let’s take as an example ‘How to make the best use of Facebook’.
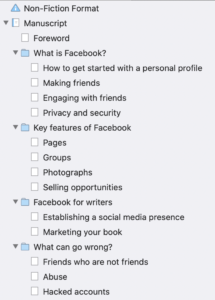
Using the non-fiction template, I would start creating folders and documents in much the same way as you might create a mind map.
After only a few minutes, I have the beginnings of a structure.
- Four chapter headings
- Several topics within each chapter
No doubt it can be improved upon, but it’s a start. And there’s enough here for me to feel I could start writing.
As with the text book example above, to get this far, the only Scrivener know-how needed is how to add new folders and documents, and maybe the ability to drag items within the Binder. So, if you are not sure how to do this, check out this Literature and Latte video.
Information dumping into the Editor
At this stage, for both books, I’d start writing …
For the Geography book, I would start by ‘filling the gaps’. The examination syllable specifies what the student has to know.
So, I would put my cursor in the Editing pane for the Natural Hazards document and start writing.
Note: I did teach Geography to second-formers in 1980, and that was only because my timetable could not be filled with the subject I was qualified to teach – Maths. At this moment in time, I have no idea how to complete the section on natural hazards but, by a bit of Googling, I am sure I shall arrive at something which, hopefully, will not offend too many Geography teachers who happen to read this blog!
First though, a Scrivener feature that will prove invaluable for both books, my sample Geography text book and the Facebook guide..
Show Titles in Scrivenings
Because the document titles (and folder titles) will appear on the page – they will be the headings in the book – it helps me while writing – while filling the gaps – to see those titles within the Editing pane.
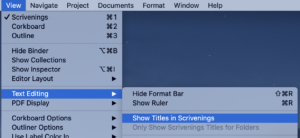
To achieve this, select View / Text Editing / Show Titles in Scrivenings. I use this feature all the time as my titles, even if they are not destined for the page, remind me what I had planned to write for that scene/section.
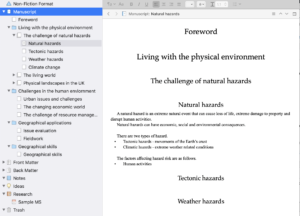
The net result is that my Editing pane resembles the text on the page in the printed book.
NB It is with thanks to this site https://www.bbc.co.uk/bitesize/guides/zxh4wxs/revision/1 that I was able to fill the gaps for the Natural Hazard section. Not only does the examination board provide the syllabus, the BBC provides the material you need to know!
With Scrivener, you can fill the gaps any which way
One of the best features of Scrivener for me is that I can write what I like, when I like. I literally fill the gaps.
Viewing Scrivenings in the Editing pane, gives me the whole manuscripts and I can dip in anywhere the mood take me, write a few gems of information and move on. If I run out of steam on a topic, I can start somewhere else.
Once I think I have a first draft, editing starts and I’ll work out what’s maybe in the wrong place (and move it), and where I have more to write (and write it).
Splitting documents
Sometimes, I realise I need to split a document, and to create more headings (ie more subsections). If I failed to anticipate this when setting up the Binder, it’s easy to fix later in the writing process.
First, type the heading that applies to the following text and highlight it. The select Documents / Split / with Selection as Title.
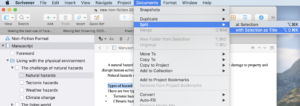
Scrivener creates a new document with the title I highlighted, but it’s at the same level as the original. I will fix that but, first, I have a second split to perform. 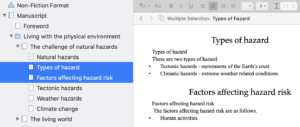
I then highlight the two new sections and drag them into the section above. And delete the dummy text I typed in for the headings.

There are alternative ways of achieve the same effect. You could just use Documents / Split, and type the title into the new document created by Scrivener. You still have to drag it into position. Or, you could be better at anticipating the structure!
Heading styles for non-fiction books
Scrivener uses (by default) progressively smaller fonts as you create more and more levels within your Binder. I don’t waste time thinking about imposing my own styling decisions until I have finished writing at least the first draft.
Why? Two reasons:
 Some styling decisions are based on what’s written and I haven’t written it yet. For example, it’s poor style to have a heading run on to two lines. So, I need to know my maximum heading length for each level of heading, before I can decide the size of the font for any level of heading.
- I’m aware that, at this stage, it’s the quality of my writing that should be at the forefront of my mind, that I include what’s needed and express myself as clearly as possible. I shouldn’t be worrying about the visual impact on the page. That would be like the author who dwells on the cover design a tad early!
When the time comes, I will take a look at a compiled version of my book, to see what the Scrivener defaults look like, and then decide if and how I might change them. I will achieve that through Formatting the headings for the Section types within Compile.
Can’t wait? To change the appearance of the Scrivener titles in the Editing pane, select Scrivener / Preferences / Appearance / Scrivenings. Enjoy!
Questions? Need a helping hand? Want a demo?
To watch me demonstrating the various Scrivener features mentioned in this blogpost or to ask any questions about the features that serve poets, short story writers – and so on – so well, book a Simply Scrivener Special.
To help me to prepare, you could also complete this short questionnaire.
The ScrivenerVirgin blog is a journey of discovery:
a step-by-step exploration of how Scrivener can change how a writer writes.
To subscribe to this blog, click here.
Also … check out the Scrivener Tips
on my ScrivenerVirgin Facebook page.
Tormod V. Burkey
14 February 2025 at 15:55There might be two kinds of endnotes for a book: references/literature cited and comments. Scrivener has the ability to insert both Comments, Footnotes, and Bibliography/Citations. In my last book, the notes at the end of the book did not distinguish between what were strictly citations, and what were my own notes and extended comments that didn’t fit in the flow of the main text. Is there a smart way to mark these differently and direct one class to a references section at the end of the book, and one class to a separate notes/comments section also at the end of the book?
Anne Rainbow
15 February 2025 at 14:17Scrivener supports two notes streams – inline and Inspector linked footnotes – either of which can be used to form endnotes and the numbering of these are also handled during the Compile process.
Once they are output via Compile, the note streams only differ in position:
Footnotes appear within the text (inline) or (for linked) at the foot of the page on which the relevant text appears.
Endnotes appear at the end of the book, or at the end of chapters, or wherever you want – Scrivener lets you decide.
Check out the details in this post: https://www.scrivenervirgin.com/2020/08/inspector-skills-snapshots-comments-and-footnotes/
Graham Bull
17 September 2021 at 10:34Do you know if scrivener would allow me to have endnotes and after endnotes References section, Index Section, about the author section ?>
Anne Rainbow
18 September 2021 at 06:56Hi Graham. I already answered this query which you also raised as a comment on another post. This is what I wrote: You can order the material in your Binder however you like. Positioning of the Endnotes is controlled through a placeholder. Go to Help in the main menu and choose List All Placeholders. Scroll down till you get to the section on Comments, Footnotes & Layout. Then see the placeholder which tells the compiler where to place the endnotes. If this placeholder is not present, the endnotes will get placed at the end – this placeholder just provides a way to customise the placement of the endnotes. Hope this helps!