

Compiling: Section types
 In this mini-series of posts. I focus on three aspects of compiling:
- Last time it was output options.
- This time: section types
- Next time: placeholders, headers and footers
I’ve already published a series of posts on compiling with Scrivener 3, that I recommend you read:
- Compiling with Scrivener 3: An Introduction
- Compiling with Scrivener 3: Outputting to PDF
- Compiling with Scrivener 3: Section layout assignment
- Compiling with Scrivener 3: Text tidying of spacing
- Compiling with Scrivener 3: Outputting an eBook
- Compiling with Scrivener 3: Creating a Cover
- Compiling with Scrivener 3: Contents page for an eBook
- Compiling with Scrivener 3: Style tweaking
- Compiling with Scrivener 3: Outputting to Kindle
- Compiling with Scrivener 3: Autonumbering
I explain in Compiling with Scrivener 3: An Introduction that there are three decisions to make:
- What will be compiled? (which was covered in the first post of that series)
- What output route will you take?’ (and that’s what I focused on last time)
- How will the material look after compiling?
Today’s blog post addresses the third question.
How will the material look after compiling?
This is an easy question to answer (partially): you will not want it all to look the same! And that’s where section types come in.
- Sections types are applied to all documents and folders.
- Section types provide a way of labelling your material – your folders and documents that contain this material – so that different types of material can be made to look different after compiling.
Section types provide a way of typifying components of your book; it’s a way of categorising elements of your work.
- These documents/folders need a page break before; these don’t.
- These documents need a title; these don’t.
- These titles need to be in 20pt; these ones need to be 16pt; these need to be 14pt.
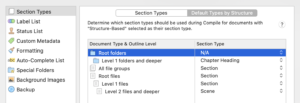
Scrivener uses terms like ‘chapter’, ‘section’, and ‘scene’ as section types (which might serve you well) based on the structure in your binder.
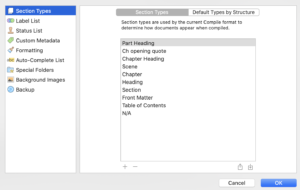
If you click the other tab, Section Types, you’ll see the complete list and the + sign (bottom left) allows you to create your own section types. Choose a name that is meaningful!
The formatting for each section type can then be edited (in Compile) to suit your specific requirements for that category of material.
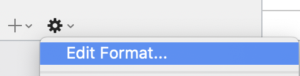
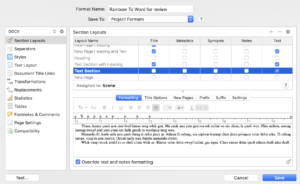
First, you opt to edit the Project format and then, within that, the section layouts for each of the section types.
Choose the Section Layouts tab, and then, within the Section Layouts pane, choose a row for the section type you want to format. Notice that Scrivener has its own Layout names, but it also tells you to which section types these are assigned. The Layout names that are in bold are the ones you have used.
The important thing is, having identified a section type to match any specific combination of formatting requirements, you need to apply that section type to all the documents/folders that you want formatted in that way.
How many section types do you need?
The Scrivener manual provides an example of how many different section types might be needed in a non-fiction book.
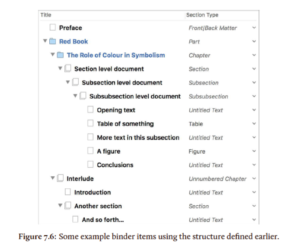
The ones in italic are default section types. When you choose to start a new project and select a template, section types are assigned to the parts, chapters, scenes, sections. The others (not in italic) can be created by the user.
These are the section types for my Dead Wood novel.
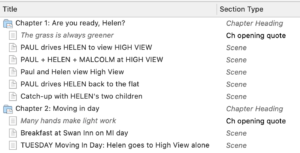
I am using only three section types: ‘Chapter Heading’ and ‘Scene’ are Scrivener defaults; I created ‘Ch opening quote’.
Recommended strategy
I recommend the usual strategy: one step at a time, trial and error …
- Starting with the Scrivener defaults, assign one of them to a section layout that meets your requirements (eg for page breaks before)
- Edit the formatting of this section type to suit you.
- Assign this section type to all documents/folders that require this formatting.
- Compile your manuscript and make sure you are happy with progress so far.
- Repeat 1-4 for more Scrivener default section types as necessary.
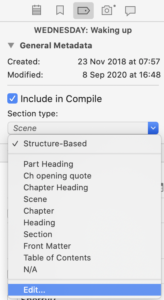 Create any additional section type that you need by editing the section types in the Inspector.
- Edit the formatting for this new section type to suit you.
- Compile your manuscript and make sure you are happy with progress so far.
- Repeat 6-8 for more more additional section types as necessary.
An essential part of this process is for you to have a clear idea of how you want the material to look, in terms of the questions posed at the start.
- Does this material need to start on a new page?
- Does this material needs its title to appear?
- What font style/size do I want for this material?
Further refinements (like paragraph indentation and separators between scenes) are not linked to ‘section types’; see below for how these are achieved.
How does my material look when compiled?
This is how the beginning of each of my chapters look when compiled.
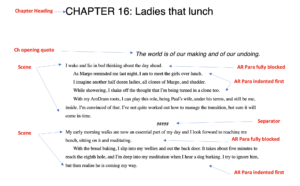
Each chapter starts on a new page because I chose a section type that had a page break.

The labels on the left hand side are my section types, and these serve to distinguish between my three ‘types’ of text.
- My chapter heading: left aligned, large font, bold – on a new page
- My opening quote: right aligned, italic
- My scenes …
So, section types apply to folders and documents – one section type for each. What about my paragraphs, within the scenes?
Paragraph formatting
Within my scenes, I have paragraphs and I’ve set up named styles so that I can have the first paragraph of every scene fully blocked but all other paragraphs indented on the first line.
The labels on the right point to the paragraphs with the two named styles and my separator (a row of five hash marks between scenes).
For more information on named styles, read these posts:
- https://www.scrivenervirgin.com/2019/02/named-styles-scrivener/
- https://www.scrivenervirgin.com/2019/03/scrivener-essential-styles/
For more information on separators, read this post: https://www.scrivenervirgin.com/2019/05/compiling-style-tweaking/.
Questions? Need a helping hand? Want a demo?
To watch me demonstrating how to set up and format a section type or to ask any questions, book a Simply Scrivener Special.
To help me to prepare, you could also complete this short questionnaire.
The ScrivenerVirgin blog is a journey of discovery:
a step-by-step exploration of how Scrivener can change how a writer writes.
To subscribe to this blog, click here.
Also … check out the Scrivener Tips
on my ScrivenerVirgin Facebook page.
Bala Subramanian
14 September 2020 at 19:23After the arrival of Scrivener3, there has been a revolution in the dark world of self-publishing. I ( also a writer on Scrivener), have run into labyrinths of “compiling” and am sorry to notice that Scrivener does not offer a solution as regards POD ( Print-on-demand). While compiling for epub works smoothly, POD is a nightmare for KDP, Ingramspark, BN etc. When I was confronted with the problem and asked Scrivener for help on how to compile for POD, I was (not even politely) told to take the issue up with the publishers.
I found a way to extricate myself from Scrivener’s ” proposed solutions” and to publish on Amazon KDP POD.
I will be more than willing to show how I overcame Scrivener’s impediments but I am just a well-versed user and not a software analyst.
Let me just state that none of the compile formats on Scrivener is accepted by KDP or Ingramspark POD.
Anne Rainbow
15 September 2020 at 09:45I’ve not tried POD but Gwen Herndandez (author of Scrivener for Dummies) published this guide way back, so I’d be very surprised if the PDF output from Scrivener – as described by her in this article, wouldn’t fit the bill. https://gwenhernandez.com/2016/08/29/using-scrivener-for-mac-to-compile-a-pdf-for-print-on-demand/ It was published ahead of the release of Scrivener 3 for the Mac, but that shouldn’t mean it can’t be done.