

Formatting tools: The formatting bar
 The formatting bar offers quick access …
The many options that affect the appearance of your manuscript onscreen and on the page are controlled through the formatting bar.
In this post, I’m focusing first on formatting onscreen. However, the same strategy works when you are setting up the format for your section types within Compile, and that’s covered too within this blog post.
The formatting bar onscreen
Your formatting bar which appears above the Editing pane might look like this.
![]()
If your window width is a bit wider, it changes to reveal the Style.
![]()
Let’s look at this tool bar, one section at a time.
On the Formatting bar: Style, font face, font variant and point size
These four controls, when changed, act on any selected text. If no text is selected, the changes apply to the current caret position onwards.


Styles
Clicking on the first down arrow reveals your formatting presets – your styles.
Notice there are two types:
- The backward P indicates a paragraph style. This kind of preset includes any ruler settings (discussed in the previous blog post) as well as alignment and line-spacing (both covered below).
- The a indicates a character attribute, like bold, italic, underline, etc.
Notice also that I have set up three styles in addition to the default ones provided by Literature & Latte. These three styles are what I call the essential styles.
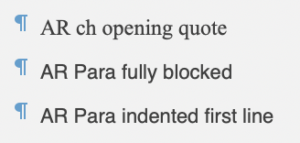
In particular, ‘AR Para fully blocked’ and ‘AR Para indented first line’ provide styles to give a professional finish to your manuscript.
I apply ‘AR Para fully blocked’ to all paragraphs that appear at the start of a scene (document) and ‘AR Para indented first line’ to all other paragraphs. When it’s time to compile, if I were to change my mind and preferred a blocked style (no indents but a space line between paragraphs), I would need only to tweak the styles within Compile. The important thing is that I have distinguished between those paragraphs which start a section of text and those that follow.
Font face
The next field shows Times New Roman, which is the name of a font family. If you click on the arrows to the right of it, the whole list of available font families is revealed.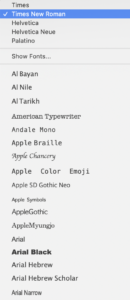
At the top, the font families I’ve used are listed. There is then a ‘Show Fonts ..’ option, and this is followed by an alphabetical list of all available fonts, and how they look.
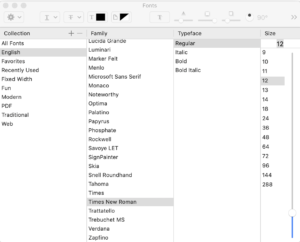
If you click on Show Fonts, a window opens which also lists the typeface options for this font family. So, you can select that within this window or via the toolbar control.
You can also control the size here, or via the toolbar control.
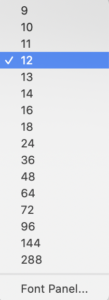
If you click on the arrows to the right of the toolbar control for size, its dropdown menu also offers Font Panel which reveals the window shown above. There are always lots of ways of achieving the same end result!
Typeface
For each font family, there might be as many as four typefaces available. For Times New Roman, these are shown in the Font Panel, but also if you click on Regular, all four are revealed.
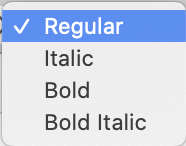
Not all font family offer multiple options.
For example, Microsoft Sans Serif only has Regular typeface available.

On the Formatting bar: Character attributes and text alignment
The next two sections of the formatting toolbar feature symbols that appear in most word processing software.
![]()
The first three are toggle buttons for bold (B), italic (I) and underscore (U). More than one of these may be applied to selected text.
From the next four icons, only one can apply to a paragraph as they are mutually exclusive. From left to right, they offer left-align (which is the default), centred, right-align and fully justified. You don’t have to select a whole paragraph to apply the alignment option – just click anywhere within the paragraph.
On the Formatting bar: Text colour and highlighting
 These two allow you to control the colour of the text, and to apply highlighting.
The default colour for text is black but, if you right click on this, the whole spectrum of colours is made available.
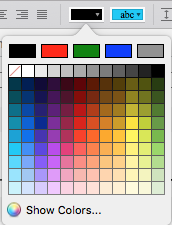
You are offered the same choice for highlighting too.
On the Formatting bar: Spacing and bullets
The next option allows you to control line spacing. Mine is set at 1.5.
![]()
If you click on the two arrows beside your current setting a range of options is revealed. 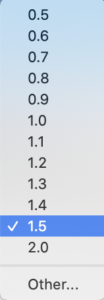
If you select Other, then a new window appears giving you lots more options.
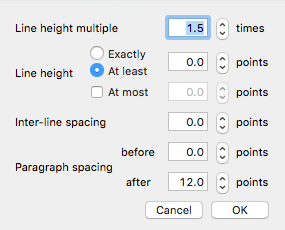
Notice that the spacing is in points, while the line height is ‘times’.
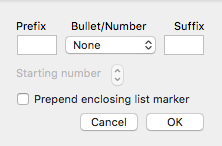
Then, last but not least, bullets.There are lots of style options for the bullet point itself, including numbers and letters. Clicking on Other from its drop-down list opens this window.
If you use the option to create a bullet list then notice what tab jumps are applied to your text.
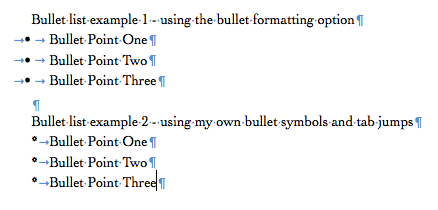 This will affect how your list will appear when you export to the page. So, be aware of those additional tab jumps ahead of the bullet point.
Formatting in Compile
If you have set up essential styles as suggested, once you are ready to Compile, you can fine tune the formatting for each setting to suit the destination: ebook, PDF, paperback, etc.
Go through the usual route:
- File / Compile
- Select which format you want this time and click on the cog wheel so you can edit it
- Click on Styles in the left hand pane
You’ll then see this window.
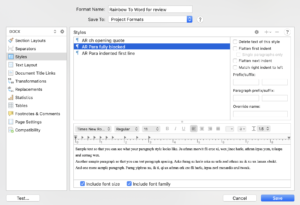
Select whichever style you want to reformat and use the Formatting bar to fine tune your settings.
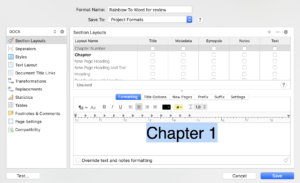
Formatting headings in Compile
You can also format your headings. These will the the text in the Binder entries (for folders and documents) where you have ticked the title column.
For example: if you want Scrivener to use the text that you typed in for the folder titles, tick the box for Title and then format it however you wish. 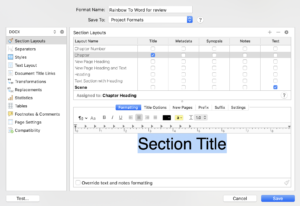
If you’d rather have Scrivener automatically number your chapters, do not tick that Title box. Instead, go to the Title Options pane and type in any text and the placeholder (ie tag) you require.
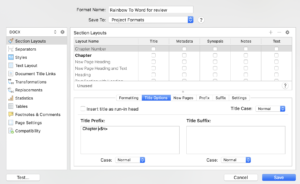
When you go back to the Formatting pane, Scrivener shows what will appear and you can format that heading, using the formatting bar.
Questions? Need a helping hand? Want a demo?
To discuss how best to use formatting tool bars in Scrivener, or to ask any questions about Scrivener features, book a Simply Scrivener Special.
To help me prepare, you could also complete this short questionnaire.
The ScrivenerVirgin blog is a journey of discovery:
a step-by-step exploration of how Scrivener can change how a writer writes.
To subscribe to this blog, click here.
Also … check out the Scrivener Tips
on my ScrivenerVirgin Facebook page.
John
4 November 2022 at 17:19My updated version ( Scrivener 3) for Windows does not show the Formatting toolbar – at all. I’m trying to determine IF it still exists and HOW to make the Formatting tool bar show up.
Sidebar Suggestion: Identify early on in your posts whether you using the WINDOWS version or IOS/Apple version of Scrivener – because they are differnt. Thx
Anne Rainbow
4 November 2022 at 22:49With there being two main platforms (Mac and Windows), I don’t think it takes much to work out I am on a Mac. However, I try to provide generic advice as to how to make the best use of Scrivener. If you cannot see your toolbar, check the View menu option. On a Mac, if you go to View / Text Editing, there is an option to Show/Hide toolbar. Maybe it’s the same on Windows. If I go to Help and type ‘toolbar’, it leads me to options to hide/Show toolbar. Use Help. It might help you?