

Second-fix self-editing with Scrivener: Checking the content
 Editing is a series of fixes
Once a first draft is written, my strategy is to apply a first-fix approach as explained in this series of posts. In brief, I apply the RedPen Editing cycle to individual scenes, identifying four types of tasks and leaving myself comments including the key words:
- TASK GLOBAL
- TASK LOGIC
- TASK RESEARCH
- TASK STYLE
Searching on these key words allows me to set up collections of scenes that need my attention. Addressing all these comments is a painstaking task which can take longer than the time spent writing the manuscript in the first place. And, having completed the first-fix round of self-editing, in theory, I have a clean manuscript that I could consider sharing with feedback partners.
However, my next stage is to apply the RedPen Editing cycle once again, this time focusing more on the whole manuscript. I call this second-fix editing.
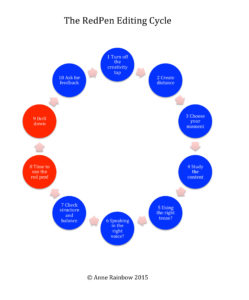 In this post, I’m looking at Steps 1-3 and how I prepare for step 4. Later posts in this series will look at how I use Scrivener to complete Steps 4 through 10.
Second-fix editing: Steps 1-3
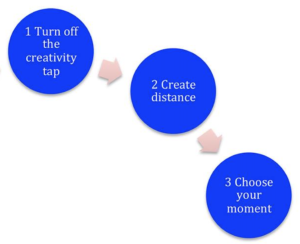
In the RedPen Editing Cycle, Steps 1, 2 and 3 serve to provide distance, and prepare for a concerted period of editing. I tend to put a first-fix-edited manuscript to one side for several months before revisiting it.
Your deadlines might not allow for this!
It’s important though to be sufficiently removed from any previous work done on your manuscript to be able to see it afresh. Not only will this provide clarity, you might also have progressed between times as a writer, and discovered new and better ways of expressing yourself through attending courses or reading articles or books about writing craft.
I can recommend the Wednesday Writers Online creative writing workshops that I host with guest presenter Kerry Hadley-Price. These recommence on 2 February; full details here.![]()
You might also enjoy a few days away with a group of writers? There are spaces on the Hope Cove Writers’ Retreat!

Second-fix editing: Step 4

For the second-fix editing stage, I interpret Step 4 ‘Study the content’ as ‘Study the content in relation to the synopsis’. My goal at this stage is to make sure my story hangs together, that there are no plot holes, and that I deliver the story to my reader in the best order possible. So, I undertake a ‘stock check’ of what’s there … and utilise Scrivener’s metadata features to make life as simple as possible, while being as thorough as possible!
Checking each scene synopsis
I start by reading each scene and checking that my synopsis reflects what’s there, and vice versa. Because I am (nowadays!) a planner, each synopsis (what I had planned for that scene) was written in the early planning stages. Once I’m immersed in the writing stage, often I get carried away, so I fail to match what I’d written in the synopsis. That doesn’t matter while I’m writing; I only use the synopsis as a prompt. But now, while I am working towards creating my outline, it does matter that they match!
In Scrivener, the synopsis can be seen in the Inspector, on the Corkboard cards and in Outliner view. To view the synopsis at the same time as the Scrivenings, the simplest way is to open the Inspector and click on the first icon.
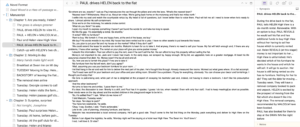
I then have the text in the Editing pane and can study the content and compare it with my synopsis.
- Sometimes, this results in me tweaking the synopsis.
- Sometimes, I realise I need to add more content. I might do this straight away, or leave myself a comment.
Checking (or writing) chapter synopses
Having completing the first pass for all scenes, I focus on one chapter at a time and check that the chapter synopsis summarises all that appears in the scene synopses for that particular chapter.
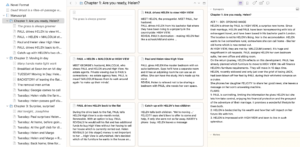
To view the synopsis of the whole chapter in the Inspector while viewing, in the Editing pane, the Corkboard with the scene synopses, adopt this strategy.
- In the Binder, click on the Chapter folder.
- In the Editing pane, choose Scrivenings and scroll up to see the blank area at the top which represents the empty chapter folder. Click within this blank area.

- Open the Inspector – you should now see the synopsis for the Chapter. Or it may be blank if you’ve yet to write one!
- Split the Editing pane so you have two versions of the text for the whole chapter.
- For one of the two panes, select Corkboard, and then make this a single pane.
To be honest, often, it’s only at this stage that I write the chapter synopses … I don’t worry about grouping into chapters until all the scenes have been written and I’m (almost!) sure I have them in the correct order.
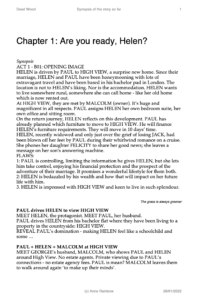
And, for this novel, I also applied the Save The Cat structure so this opening chapter served as the start of the first of the 15 beats in the novel. Hence my ‘B01: Opening image’.
Up to now, I’ve been working on screen, and if I’ve identified gaps in the story, I might add some text. But then I need to move to hard copy for much of what follows.
Compiling the synopses to create an outline
When I’m happy with all the synopses for all the chapters, I use File/Compile to produce an outline of my novel: outputting only the chapter titles, chapter synopses, document titles and document synopses. I explain how in this blog post.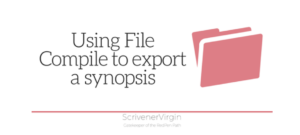
Notice that the document titles are only for my benefit; they will not be printed in the final manuscript. The outline runs to 50+ pages … and will provide a valuable reference for when I read the entire manuscript. This is page 1 …
Reading the manuscript alongside the synopsis
With my outline completed, and printed out for reference purposes, I need to read the whole manuscript through. To make it different from all the reading I’ve done to date, I adopt this strategy.
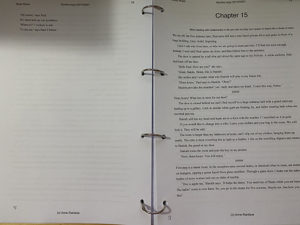
- I print my manuscript on paper, double sided so it has the feel of a book, albeit in A4 format.
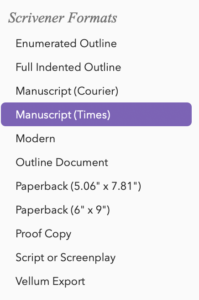
- I choose a font (typeface) which is different from the sans serif font (Helvetica usually) I have onscreen. So, I’ll opt for Times Roman. Fortunately, Scrivener provides a default project format which saves me time: Manuscript (Times).
- I use 1.5 line spacing so there is room to annotate the proofs, but I don’t waste too much paper.

- Once it’s printed, I use my heavy duty Rapesco four-hole punch and metal rings to bind the manuscript.
 Then, I embark on a heavy hardcopy edit. I’ll explain the process in subsequent posts in this series, and how Scrivener is still an important tool, even though I’m working on paper.
Questions about Scrivener?
Need a helping hand? Want a demo? Book your own Simply Scrivener Special session with me, at a time to suit you.
Need a helping hand with editing? Check out my online self-editing courses. Join RedPen Editing and enjoy a 5-day editing taster course for free.
The ScrivenerVirgin blog is a journey of discovery:
a step-by-step exploration of how Scrivener can change how a writer writes.
To subscribe to this blog, click here.
Also … check out the Scrivener Tips
on my ScrivenerVirgin Facebook page.
No Comments