
DIY Book Formatting with Scrivener: Page Settings
 Wrong shaped spoon?
Adrian Frutiger says:
If you remember the shape of your spoon at lunch, it has to be the wrong shape.
He explains:
The spoon and the letter are tools; one to take food from the bowl, the other to take information off the page… When it is a good design, the reader has to feel comfortable because the letter is both banal and beautiful.
Every decision you make regarding book formatting is crucial in creating the product you want to put before your audience. Your decision-making is not what the reader needs to ‘see’. Or, writing that sentence differently: it’s what the reader mustn’t notice. Going back to the spoon analogy, if the reader spends time thinking about your design, it’s the wrong design. They should, instead, be reading your words and becoming absorbed in whatever you’ve put on the page.
Scrivener: the DIY publishing tool
 In task 2 of the homework I set last time, I asked you to look at a page in a book of your choice and identify a number of design features. As an example, I offered a page from a collection of short stories, Dress Your Family in Denim and Corduroy by David Sedaris, a paperback I have on my bookshelf.
Relevant to today’s blog are these features:
- The trim size of the page (width and height)
- The white space above the header
- The white space at the top of the page between the header and the story title
- The white space after the story title and before the text starts
- The width of the left and right margins (they differ!)
- The white page between the end of the block of text and the page number
- The white space between the page number and the footer
- The white space below the footer
In summary, in this blog, the focus is on page settings. Let’s consider three items from our original list in the previous blog.
- Setting the trim size: the width and hight of your page
- Setting your margins: the space around your text on each page
- Setting the spacing above and below the story title (padding)
Page Settings tab
There’s a tab called ‘Page Settings’ in Compile. To reach this point, you need to File / Compile, select your Project Format and, via the cogwheel, opt to edit it. Then, click on Page Settings, second to last in the list on the left.
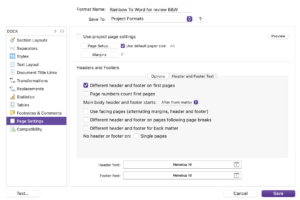
This tab covers more than we need for this topic, and I’ll return to some of the other controls in the lower half in later blogs in this series. For now, focus first on the top section.
Page settings: Setting the trim size
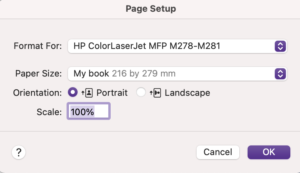
When you are outputting to PDF to create a paperback or hardback book, this is where you will specify the trim size. Click on Page Setup to open the Page Setup window.
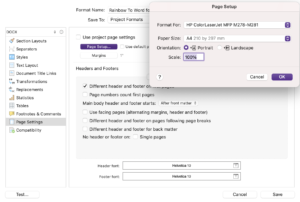
Then click on the up/down arrow beside Paper Size.
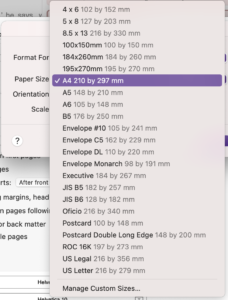
Scrivener provides a long list of options from which to choose. A4 is highlighted as that’s the one I use most of the time. One of the standard sizes could work for you, or you can customise the page …
Remember: The trim size is the width and height of a book. Having looked at other books similar to the one you are planning to publish, it’s advisable to choose a trim size which fits ‘the norm’.
In the US, most novels have a trim size of 6” x 9”. For nonfiction books, it’s 5.5” x 8.5”. Converting the inches to millimetres:
- 6” x 9” is 152.4mm x 228.6mm.
- 5.5” x 8.5” is 139.7mm x 215.9mm.
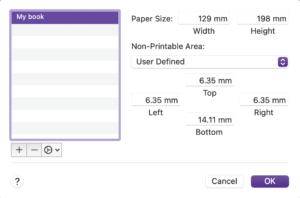
In the UK, the standard trim size for a paperback is 198mm (height) x 129mm (width).
None of these trim sizes are on the list offered as defaults be Scrivener, so click on Manage Custom Sizes.
Then, click on the + sign in the bottom left corner to set up a paper size. I’ve called mine ‘My book’. Scrivener autofills but once you’ve decided what trim size suits you, enter the dimensions in the first line of the window.
Page settings: Printable area
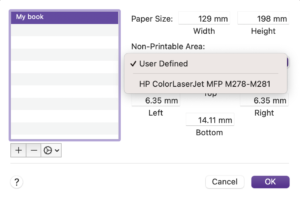
The next bit of this window refers to ‘Non-Printable Area’. The printable area of a document is the portion where a printing device can write. It includes all space except, maybe, due to inaccuracies while printing, the extreme edges of the document and is determined by your make of printer. Those extreme edges are the ‘non-printable area’.
Again, Scrivener provides some defaults. If I click on the options, Scrivener already knows I have a printer, and the defaults revert to zero.
Now, if you are producing a book and you expect it to be printed from a PDF that you prepare, you need to follow the guidelines provided by whoever is doing your printing for you.
In my experience – to allow for tolerance – I’m encouraged to avoid placing text too close to the edge of the page and allow maybe 5mm or more.
Notice also that once you click OK, there’s an option to specify orientation: portrait or landscape. Most paperback novels would be portrait.
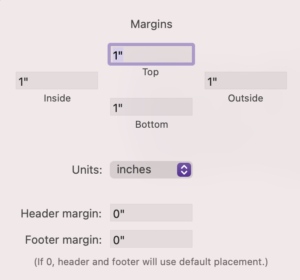
Page settings: Margins
The next challenge is to set margins. There are three outside margins (top, bottom and outer side) and another closest to the spine of the book, called the gutter. The outside margins would normally be the same size (for a balanced look) but the gutter needs to be bigger, otherwise the reader might have trouble reading to the end of each line of text without breaking the spine of the book.
As an example, a 6″ x 9″ book might have margins of 0.5″ and a gutter of 0.75″; or 0.75″ for the margins and 1″ for the gutter; or … The choice is yours, and you may decide to tweak this later to bring the page count down.
- Narrower margins require fewer pages.
- Wider margins will push the page count up.
Where do you set the margins? On the Page Settings tab.
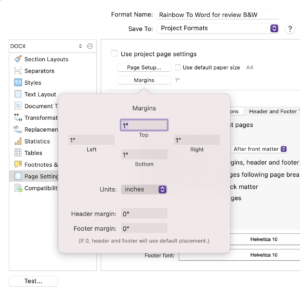
Notice that you can alter the Units (inches, centimetres or points). This is also where you set the Header margin (white space above the header) and Footer margin (white space below the footer).

One more thing: if you want the gutter to be different from the outer margin, you need to tick a box in the lower area: Using facing pages.
As soon as you do that, go back to the Margins window. Instead of Left/Right, the labels read Inside/Outside.
Padding
While margins set up an area within which your text will appear, padding controls the spacing within that defined area.
The padding above the story title (or any heading that will start on a new page) is set on the New Pages tab in the lower half of the section layout window. Select the section layout for the story title/heading and then choose how many lines you want for padding.

The depth of each line of padding will be determined by the point size of the heading. We discuss what point size to use in the next post. For now, you might want to leave the setting as 0, and tweak it later, once you can see the effect of all your design decisions.
The padding below the story title / heading can be controlled in the Title Options tab within the Title Prefix section. As above, select the section layout for the story title/heading and then, within the Title Prefix box, Press return for however many lines you want for padding. How deep a space will depend on the point size of your heading.
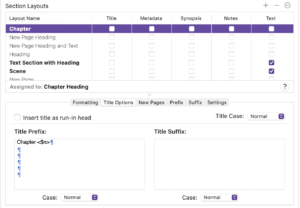
In the screen grab above, I’ve set up my chapters to be automatically numbered by Scrivener with the word ‘Chapter’ before the number. If you want the story title instead, use the placeholder <$title>.

As with padding above the story title, you might want to delay inserting those additional returns until you’ve made further design decisions regarding font size of the body text in particular. Indeed, at this point, if you just aim to become aware of what you can tweak and where … that will serve you well. There are so many factors (design decisions) which affect costs, even if you make decisions now, in good faith, you might find yourself changing them later, to reduce the page count and hence how much you will pay to print your book.
What next?
In this post, we addressed the 8 items in red.
- The size of the page (width and height)
- The white space above the header
- The content of the header, its position (centred), font style and size
- The white space at the top of the page between the header and the story title
- The position (left aligned), font style and size of the story title
- The use of capitals in the story title
- The white space after the story title and before the text starts
- The paragraph style: indentation for the second paragraph, but none for the first
- The large W on the first line of the opening paragraph
- The use of capitals for the first five words in the opening paragraph
- The font style and size of the body text
- The line spacing of the body text
- The justification of the body text (fully justified)
- The widow at the bottom of the page (single line of text separated from the rest of that paragraph which falls on the next page)
- The white space between the final line of body text and the page number
- The position (centred), style and size of the page number
- The white space between the page number and the footer
- The content, position (centred), text style and size of the footer
- The white space below the footer
- The width of the left and right margins (they differ!)
Next time, I’m focusing on the body text – the three items in blue.
Questions about Scrivener?
Need a helping hand with Scrivener features? Want a demo? Book your own Simply Scrivener Special session with me, at a time to suit you.
And, if you’re not ready for book formatting but need a steer on self-editing, check out my RedPen Editing course. Join RedPen Editing and enjoy a 5-day editing taster course for free.
The ScrivenerVirgin blog is a journey of discovery:
a step-by-step exploration of how Scrivener can change how a writer writes.
To subscribe to this blog, click here.
Also … check out the Scrivener Tips
on my ScrivenerVirgin Facebook page.
Britt Malka
1 January 2024 at 18:14I spent all day messing with those margins.
Why do Scrivener call them “margins” everywhere? I had no idea which margin did what and no matter what I tried, my manuscript looked horrible.
Finally, I found your guide.
Wow! Thank you for setting it online.
Anne Rainbow
1 January 2024 at 18:20Glad my explanation worked for you. Onwards and upwards!