

Images in a Scrivener project: Overview
An image can paint a thousand words, so they say.
An image within a text document
And there are several circumstances where you might consider including images in a Scrivener project.
- An image within a text document
- An image in a character brief
- An image for a book cover
Sourcing your images
There are several sources of images.
- You might take a photo using your camera, iPhone or IPad and upload it to your Mac. (NB I am on a Mac, and cannot advise those of you using a Windows machine.)
- You might take a screen grab of all or part of the screen.
- You might right click on an image on an internet page and choose the Save As option.
Whichever route you take, you’ll end up with the image stored as a file somewhere on your computer.
File your images where you can find them!
I have a folder called IMAGES and, within that, I categorise the images according to content, eg headshots, book covers, etc. and also use a filename that makes sense to me.
Resize your images?
Having overlarge images takes up valuable space within a project, and – if displayed on a website – can adversely affect the time it takes to load a page.
So, as soon as you capture a new image, give a thought to the resolution and the dimensions and consider changing the image characteristics.
And, be aware that if you publish high-resolution images, they might be captured by someone else.
Placing your images in a Scrivener project
Having sourced your image, the next step is to place it.
Images in text documents
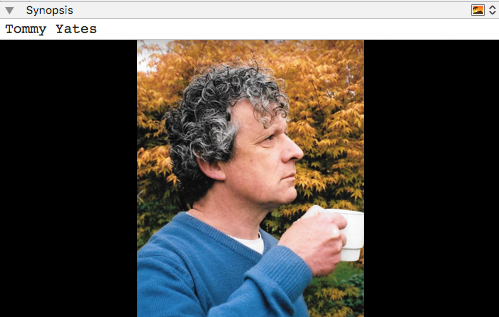
Friend Paul Dodgson, playwright and writer, who I’ve cast as Tommy in Lucinda’s Legacy
You have two options when pulling in an image to a text document.
- You can place the image itself, in which case the image is treated like a character of text. The image size will affect the size of your project.
- If you might want to update that image prior to publication, you can put in a link to it. In this case, the image remains stored outside the Scrivener project – not within it – and has little effect on the size of your project file.
Image in a character brief
Suppose you decide to assign famous actors – or friends! – to your cast of characters as a source of inspiration while you are writing.
Again, there are two options.
- You could place the image within the character brief document itself like I did in my Safari Supper novel.
- You could display the image on the corkboard card, by placing it in the Inspector where the synopsis is usually displayed – as I’ve done for Tommy Yates in Lucinda’s Legacy.
Image as a book cover
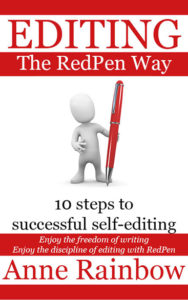
Book cover for EDITING The RedPen Way
If you plan to publish an eBook or in the Kindle format, you’ll need to set up your own book cover within the Scrivener project, so that it is exported along with the text.
This image needs to be already imported into the Research folder, ready for when you specify what cover to use within the Compile options.
How you create the book cover is up to you. I use InDesign as mine are pretty straightforward. If you want something more elaborate, you probably need to hire a designer to do it for you.
So … there are circumstances where you might include an image … and I’ll explain more in the next post.
Questions about Scrivener? Need a helping hand? Want a demo?
To watch me go through the process of including images in a Scrivener project or to ask any questions, book a Simply Scrivener Special.
To help me to prepare, you could also complete this short questionnaire.
The ScrivenerVirgin blog is a journey of discovery:
a step-by-step exploration of how Scrivener can change how a writer writes.
To subscribe to this blog, click here.
Also … check out the Scrivener and RedPen Editing Tips
on my ScrivenerVirgin Facebook page.
No Comments