
Upgrading from Scrivener 2 to Scrivener 3: Who moved my cheese?
Managing change is a skill.
For those of us who had reached the comfortable stage with Scrivener 2, to be confronted with Scrivener 3 is more than a challenge!
Literature & Latte released the upgrade in the middle of November when many writers were busy with NaNoWriMo and I for one have only just about found time to have a serious look at it.
The user interface – and knowing where everything is – is a learnt skill. It becomes second nature. You don’t have to think about it. And now – with Scrivener 3 – we have to start all over.
A bit like when supermarkets decide to move stuff around, the weekly shop takes twice as long because you have to hunt for every single item.
So what has moved? This post looks at three basic tools and compares where they are in Scrivener 2 with where they are in Scrivener 3.
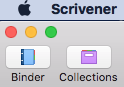
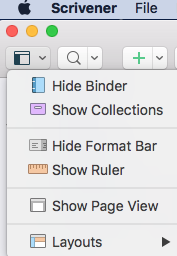
Managing change: Binder / Collections
In Scrivener 2, there are two separate icons on the far left of the toolbar. Each toggles between Show and Hide.
In Scrivener 3, they are combined into one drop-down option. You can still Show/Hide as you wish, but there are other features incorporates into this dropdown – which we’ll discuss in a later post.
Managing change: Search
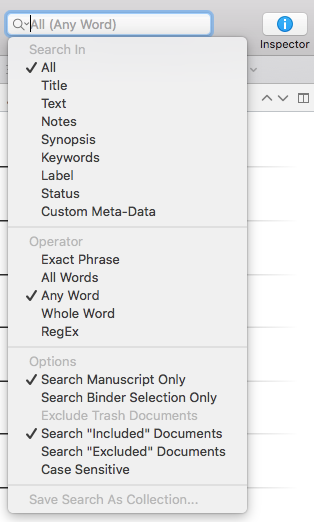 In Scrivener 2, the Search tool is on the right-hand side, next to the Inspector toggle button. When you click on the magnifying glass, you can customise your search.
For more details on how to use the Search tool in Scrivener 2, check out this series of blog posts:
- 7 August 2017 = Search options in Scrivener: An Introduction
- 15 Aug 2017 = Search options in Scrivener: Project search
- 21 Aug 2017 = Search options in Scrivener: Project search options
- 28 Aug 2017 = Search options in Scrivener: Document search
- 4 Sept 2017 = Search options in Scrivener: Format search
In Scrivener 3, the magnifying glass identifies the Search tool and it is on the left, just beside the new Binder / Collections icon.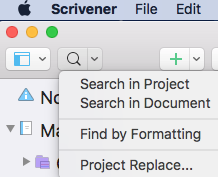
If you choose ‘Search in Project’ you get the Scrivener 2 version of the Search tool appearing beneath the tool bar, with very similar controls:
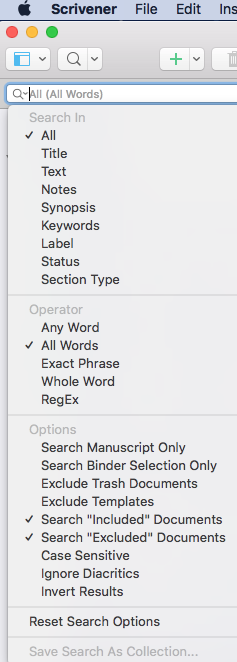
I’ll look more closely at the ‘new’ or ‘moved’ controls in a later post …
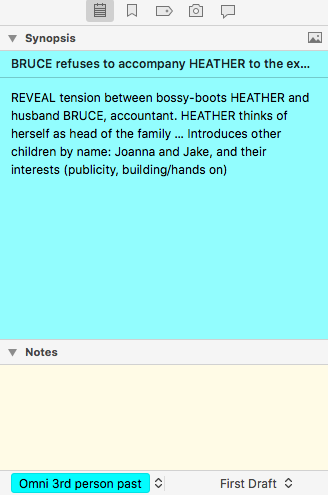
Managing change: Label and Status
In Scrivener 2, the Label and Status are displayed within the Inspector area.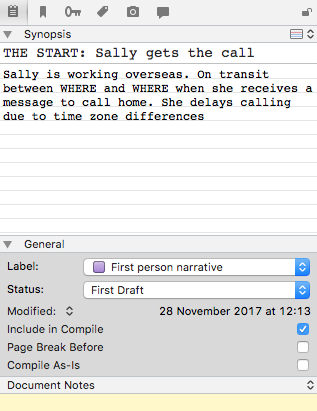
In Scrivener 3, this information appears at the bottom of the window.
Next time, I’ll be looking at what’s been moved within the menus …
Questions about Scrivener? Need a helping hand? Want a demo?
To watch me go through the process of including images in a Scrivener project or to ask any questions, book a Simply Scrivener Special.
To help me to prepare, you could also complete this short questionnaire.
The ScrivenerVirgin blog is a journey of discovery:
a step-by-step exploration of how Scrivener can change how a writer writes.
To subscribe to this blog, click here.
Also … check out the Scrivener Tips
on my ScrivenerVirgin Facebook page.
Linda
1 April 2021 at 19:42How do get my stories from scrivener 2 into scrivener 3?
Thank you
Anne Rainbow
1 April 2021 at 19:56Install S3. Open S3 and from that, open the S2 project. Scrivener will warn you that the S2 project is an older version and will offer to make a copy of it, and to update it for you. The updated version is then a S3 project. Good luck!