
Scrivener user interface: The writer’s workspace

Make it your own!
The user interface – whether you are using Scrivener 2 or Scrivener 3 – is also the writer’s workspace. It’s where you write your manuscript.
The default interface is fine – it works – but Literature & Latte recognise that no two writers will want to work in the same way. So, there are choices you can make. You can see what you want to see. You, the writer, can choose your writer’s workspace – to suit you.
In the past few posts, I’ve compared the Scrivener 2 interface with the new Scrivener 3 interface. Now let’s see how you – the writer – can make it your own.
The Scrivener workspace
 The basic workspace can be separated into three panes:
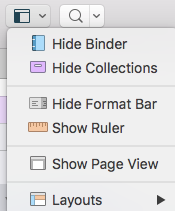
- The Binder on the left – this (and Collections) can be shown or hidden. Click on the ‘View’ icon to see your options. Depending on what is currently on show, the top two options ‘toggle’ between the show and hide. (Notice the option for Page View also; that gets another mention later in this post.)
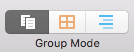
- The Editing pane in the centre – this can be used to view Scrivenings, or the Corkboard, or the Outliner. Choose by clicking on the appropriate icon in the Group Mode icon.
The Editing pane can also be split in two … check out this post for how useful this option can be, and how to achieve the effect that suits you best as a writer. - The Inspector on the right – this can be shown or hidden – just by clicking on the Inspector icon.

There are then some additional options though, and I’ll look at two today:
- Composition mode and, for Scrivener 3 users, the new Typewriter Scrolling option.
- Page View – new in Scrivener 3
Composition mode – the distraction-free writer’s workspace
Composition mode provides a distraction-free workspace so you, the writer, can focus on writing.
For Scrivener 2 users, this blog post explains how it works. It’s similar in many ways in Scrivener 3.
Composition mode is accessed through View / Enter Composition Mode. (To escape from it, click the ESC key!)
The controls appear, as in Scrivener 2, at the bottom of the screen, to the left, and right, of the middle area, when you hover the cursor in that area.
The controls have been somewhat redesigned (eg a slider for Paper Position rather than a drop down) but the fundamental functionality is as before.

![]()
The big change is the Typewriter Scrolling option.
Typewriter Scrolling
It seemed strange (to me!), since typewriters belong in bygone days, that Literature & Latte provided this option. In some ways, it’s a backward step? But no. Read on!
When you opt for Composition Mode, you get this warning message.
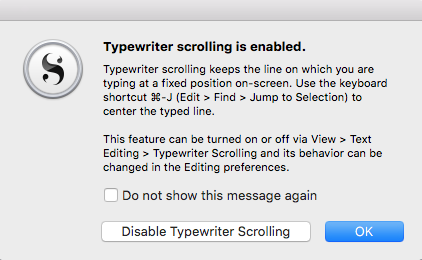
If you click OK, wherever your cursor was, that text line will appear mid-screen. So, it’s at eye level (assuming you’ve positioned your screen ergonomically) and therefore emulates how a typewriter works – you seeing only the line you are typing, and there’s a sense of the blank page still to fill.
![]()
 When not in Composition mode, you can also turn on Typewriter Scrolling, using the icon. Again, it keeps the line on which you are typing mid-screen.
And it’s a toggle button; click it to turn on; click it to turn off. The green tick reminds you which state you are in.
Page View
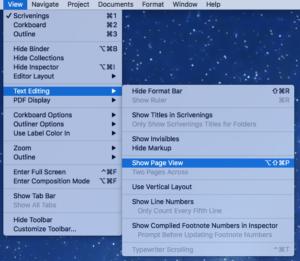 For writers who want to see their text ‘on a page’, Page View is available through View / Text Editing / Show Page View. It’s also one of the options available in the drop-down list from the View icon.
So, instead of looking at continuous ‘Scrivenings’ text, the words are set on a ‘page’ with a background.
There is also a two-page option. Select View / Text Editing / Two Pages Across
These options may appeal to those coming from Word to Scrivener … According to the manual though: Page view is not intended to be used as a layout mechanism, though it can provide a reasonable estimate of how your pages will look under certain conditions, once printed. If you want to have a more accurate view of the printed page, you need to make sure you’ve set up the page dimensions correctly – and read Chapter 16 of the manual!
For me, since Compile is so quick, I inclined to export and see what it looks like for real.
Questions about Scrivener? Need a helping hand? Want a demo?
To watch me go through the process of customising the writer’s workspace, and all the features mentioned above, or to ask any questions, book a Simply Scrivener Special.
To help me to prepare, you could also complete this short questionnaire.
The ScrivenerVirgin blog is a journey of discovery:
a step-by-step exploration of how Scrivener can change how a writer writes.
To subscribe to this blog, click here.
Also … check out the Scrivener Tips
on my ScrivenerVirgin Facebook page.
No Comments