

Editing tools: Revision Mode
 Revision mode is Scrivener’s TrackChanges
Editors who are Scrivener lovers but using Word and the TrackChanges facility to provide feedback to their clients should be delighted to discover Scrivener’s Revision Mode. Together with Annotations, it replicates the functionality of TrackChanges.
Authors keen to self-publish will also be delighted if/when editors provide editorial services in Scrivener, instead of the current ‘industry standard’ Word.
This post explains the process for the editor and, then, how the author can respond to the suggestions – all within Scrivener. No exporting to Word. No trying to process suggestions visible in Word, when the author needs the master version of their manuscript to remain in Scrivener.
For the editor: How does Revision Mode work?
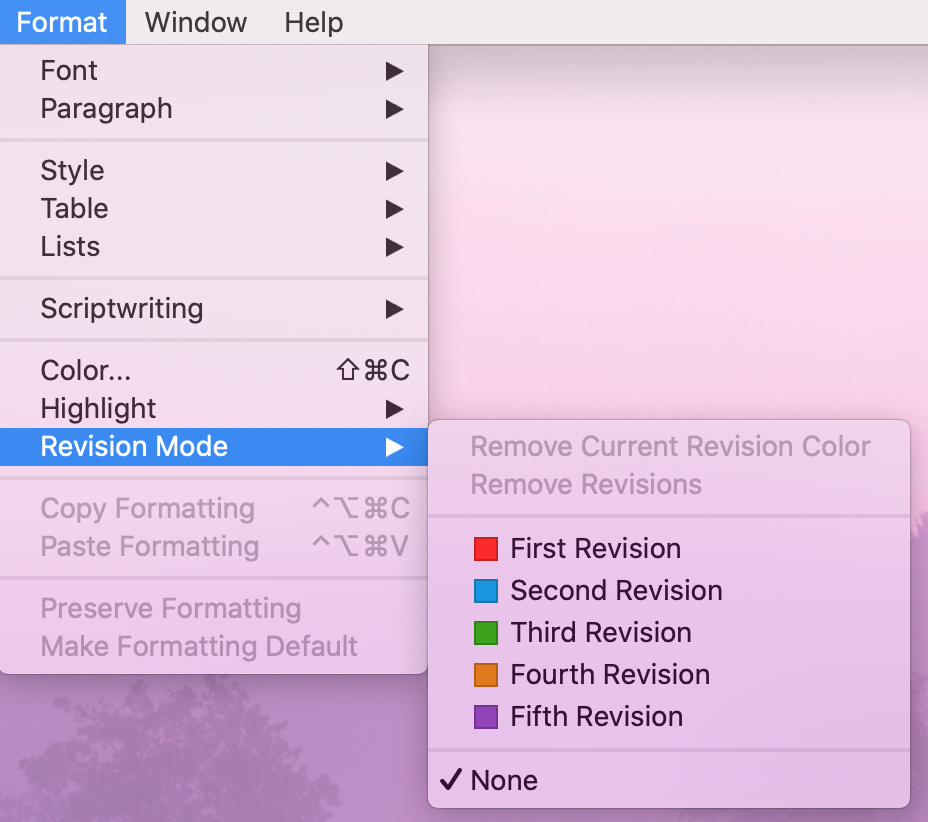
Scrivener’s Revision Mode is accessed via Format / Revision Mode.
- Turn Revision Mode on by selecting one of the five colours: one for each revision: red, blue, green, orange, purple.
- Turn Revision Mode off by selecting None.
When you type, text usually appears in black (or whatever other colour you have chosen). In Revision Mode, any text (words or punctuation) inserted into a document appears in your chosen revision colour.
My recommendation is that an editor (developmental or otherwise), selects a colour according to the progress made to date with a project.
- The first time you receive a project, choose red/First Revision Mode.
- The second time, blue …
- And so on.
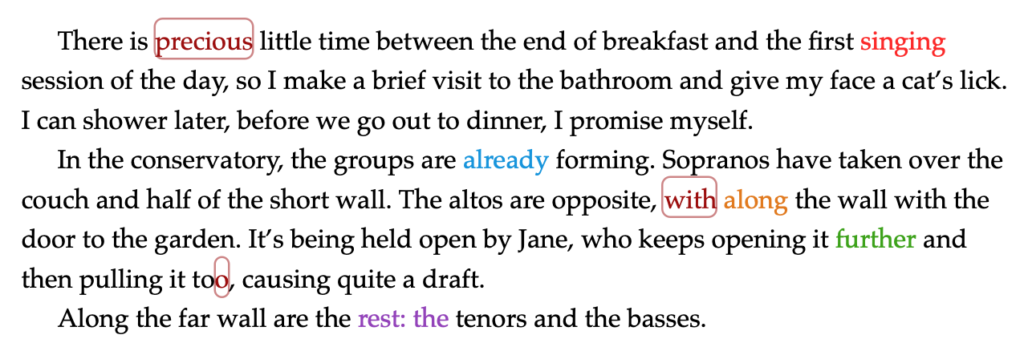
Depending on what the author does to the text between times, the net result might be a multi-coloured text, with any deletions (marked as Annotations) enclosed in bubbles.
This is how the manuscript might look in the Editor:
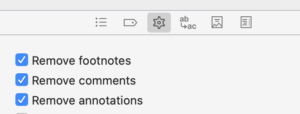
When this material is compiled, the coloration shows within the text.
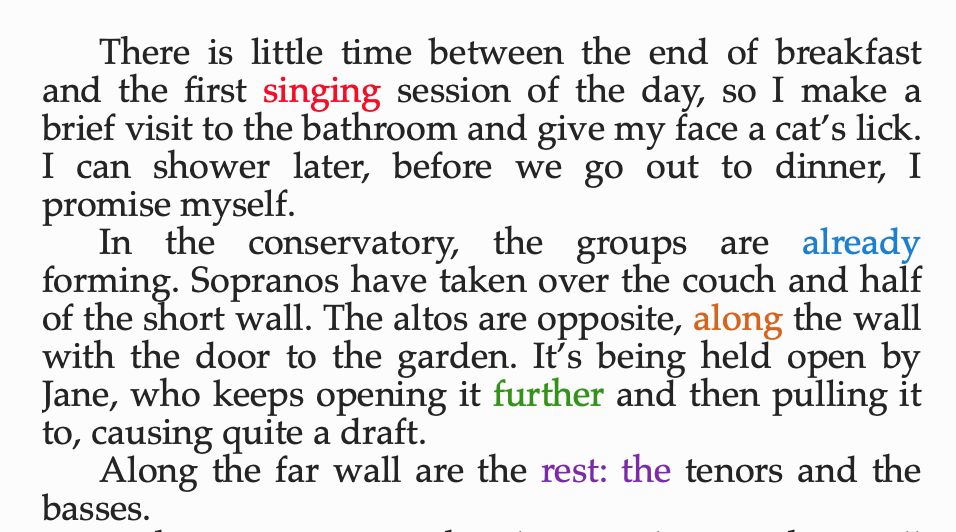
That multi-coloured effect doesn’t matter, yet …
Notice also that the annotations need not be output. Within compile, there is an option to ‘Remove annotations’. And, since the annotations represent text that should/could be deleted, not seeing them is not a problem.
Authors may need more time to process all the suggestions marked up and, provided it’s done before final publication, there’s no rush.
For the author: How to remove colouration in Revision Mode
When the editor returns a project to the author, and author sees what the editor has suggested, it’s decision time: to accept each suggestion, or reject it. (This is the same as Accept/Reject in TrackChanges.)
- To accept a single suggestion, highlight the coloured text, and select Format / Revision Mode / Remove Revisions. The text ‘singing’ reverts to black.

- To accept all revisions in a single colour, select Format / Revision Mode and the colour you wish to accept. then select Format / Revision Mode / Remove Current Revision Color. All suggestions in the chosen colour will revert to black. (There is also the option to Remove All Revisions, not just the current revision colour.)
- To reject a suggestion, the author (with Revision Mode set at None), types whatever they want to appear, maybe deleting whatever the editor has inserted.
It’s as simple as that!
For the author: How to process suggestions made using Revision Mode
Rather than considering suggestions and going through the process of removing the revision colour of those that are accepted, and amending those that are not, I recommend this strategy.
- Start at the beginning of the manuscript and find the first instance of a suggestion from your editor.
- Make a decision:
If you are not happy with the suggestion, (with Revision Mode set to None) change the text to suit yourself and remove all trace of the editor’s suggestion.
If you are happy with the suggestion, do nothing. - Find the next instance of a suggestion from an editor and return to Step 2.
- When there are no more suggestions to consider, go back to the beginning of your manuscript and scan each of the (remaining) revisions to double check you are happy with all of them. (Fix any that you are not happy with.)
- Select Format / Revision Mode and the colour used by the editor.
Select Format / Revision Mode / Remove Current Revision Color – and this completes the processing of this batch of suggestions, reverting them all to black.
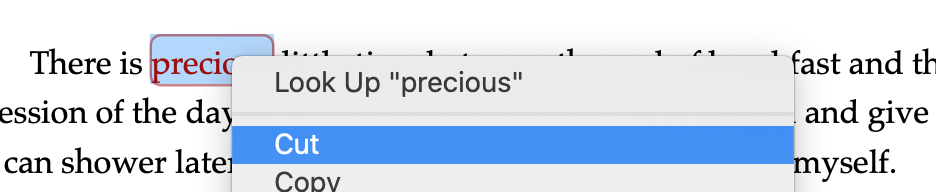
How to process suggested deletions
Suggested deletions will appear as text (or punctuation marks) within annotations. Work through them one at a time.
- If you are happy to delete whatever the editor suggests, highlight the annotation. Right click and select Cut.
 Or, position the cursor at the righthand end and delete characters, one by one.
 - If you are not happy to delete whatever the editor suggests, highlight the annotation. Use the keyboard combination cmd/shift-A to remove the annotation formatting and reinstate your original text.
Any questions? Need a helping hand?
I’m happy to explain more about my use of Scrivener for developmental editing and to answer your questions. Book a Simply Scrivener Special.
To help me to prepare for the webinar, please also complete this short questionnaire.
The ScrivenerVirgin blog is a journey of discovery:
a step-by-step exploration of how Scrivener can change how a writer writes.
To subscribe to this blog, click here.
You can also find links to blogs of specific topics in the Scrivener index.
Also … check out the Scrivener Tips.
PS If you are a member of Lynda.com or have access to the Learning module within LinkedIn, this short video provides an overview of the essentials.
David Lari
27 January 2022 at 04:33While this is the best ‘workaround’ for the deficiencies in Scrivener’s change tracking, it’s still a kluge. The problem is, even if I could convince my editor to use this, she’ll take longer to edit than she does with Word’s track changes. And since she charges by the hour, that’s money out of my pocket. To me, L&L really needs to address this. They could probably increase Scrivener sales 10X if they put in proper change tracking.
Anne Rainbow
27 January 2022 at 06:54My Scrivener mindset allows me to see this, not as a workaround but as a better, more efficient way of working. For both the writer and the editor. As an editor myself, I know the benefits of my receiving the writer’s Scrivener project file. I see more than just the manuscript. I too charge by the hour; my clients get a more thorough job than if I worked only from the Word version and it takes me no longer. The only extra time your editor might need is in acquiring the skills of using Scrivener. I have those already. Maybe your editor’s reluctance is due to the hurdle of changing the way he/she works? As I mention in one fo the blogs, there was the same resistance when editing became possible electronically rather than on paper. For you, you do have a choice: You could look for an editor, one who has Scrivener skills. His/her charges would be the same as your current editor, but you’d see more for your investment.
Monica
18 October 2021 at 13:42I’ve been playing with this and have run into a large problem. How do I reject deletions (in annotation bubbles) without retyping the text? If the bubble surrounds a paragraph or two, this seems anti-productive and prone to error.
I’m using Scrivener 3.0.1.0 for Windows.
Josh Reid
22 September 2021 at 00:58Hi,
Thanks for much for this article. I am an author using Scrivener for many years but I was hesitant to us the revision feature until I read your article.
I have a query around how the deleted text is shown. In your article you mention that the deleted text is shown as annotations (with a box around the text in the revision colour). “Depending on what the author does to the text between times, the net result might be a multi-coloured text, with any deletions (marked as Annotations) enclosed in bubbles.” But when I delete text in revision mode is simply deletes/removes the text, with no indicator of it being recorded as deleted. No annotation box.
I am using Scrivener Version: 3.0.1.0 (1274136) 64-bit – 28 Apr 2021 for Windows.
I am wondering if I am missing a step, or have a setting wring, or if something has changed in Scrivener since writing this article?
Would appreciate any help.
Kind regards,
Josh
Anne Rainbow
22 September 2021 at 08:37Hi Josh. You are right in that, if you delete text, it just disappears. Instead, as the editor, I turn text I would delete into an annotation, so it appears in a bubble. The the writer with whom I am working can see what I recommend they delete. If they agree they delete the annotation; if they disagree, they turn it back into text (removing the annotation formatting). Working on your own piece, you can just delete? Take a snapshot before and after if you want to compare what you had before with whatever you have after editing. Hope this helps!
Josh Reid
22 September 2021 at 20:16Hi Anne,
Thanks so much for clarifying. That is very helpful.
I really like the workflow you mentioned using both revision mode for suggested additions, and annotations for suggested deletions. I can see that if I received this back from an editor, or my first reader (my wife) that it would be easy to work through to reject/accept changes. And great to be able to do this within Scrivener!
My workflow for deleting text which I think I might want to keep (maybe for a later piece or just because it seems like too large a chunk to throw away, is to cut and paste it into a subfolder called spare writing.
Thanks again for replying to my query for quickly, and for this wonderful website.
Kind regards,
Josh