

Formatting for printed output
 Formatting is best done within Compile
Within the Compile function, there is the option to set up different formats for different output streams – called project formats – and outputting to PDF or to .doc can both result in material on the printed page.
However, I hear you ask:
- What about printing using File / Print Current Document?
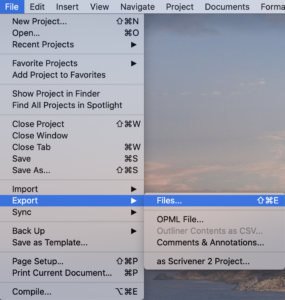
- What about using File / Export / Files?
Okay, so let’s see what those options provide and maybe, just maybe, I can convince you to make Compile your first go-to?
Printed output using File / Print Current Document?
There is an option to print your current document. (It’s five entries down from ‘Export’ in the screen grab above.)

However, the results might not quite suit what you want.
I highlighted my Chapter 10 folder and its subdocuments.
And then selected File / Print Current Document.
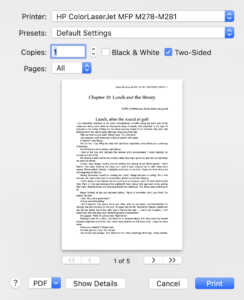
The preview reveals that the output includes a right-aligned header:
Dead Wood as at 2021 01 04 – 09/02/2021, 14:46 / 1
This is the name of my Scrivener project file, Dead Wood as at 2021 01 04, plus today’s date and time (when I wrote this post), plus a page number.
The printout will also include the Chapter title (as typed into the Binder entry for that folder) plus the scene titles (as typed into the Binder entry for each document within that folder). This happens because I had chosen to view titles in Scrivenings … View / Text Editing / Show Titles in Scrivenings.
Turning that option off gives this result (which still includes that header).
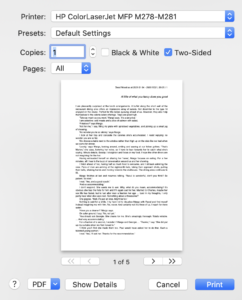
Now I have no scene headings and no chapter headings. I don’t want the scene headings – they are there only to guide me as to what that scene achieves. But I do want a chapter heading!
And, I’d quite like to have a more informative, reader-friendly header!
For me, File / Print Current Document lacks finesse. I can (see far below) create precisely what I want, using Compile. First though …
What about using File / Export / Files?
Using File / Export / Files for my Chapter 10 results in a new folder being created using the name I offered for the export.
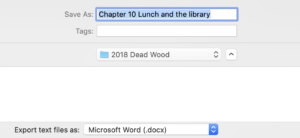
In this folder, there are four files, each holding a single scene.

So, to access the text for this chapter, I need to open four Word files. Imagine how many of these Word files I’d have to open if I output my entire manuscript. Right now, that would be 275 documents … that’s never going to happen when I have the option to Compile and produce a single .doc file.
Anyway, let’s see what Export produces. Opening just one of the four files, this is what I see.
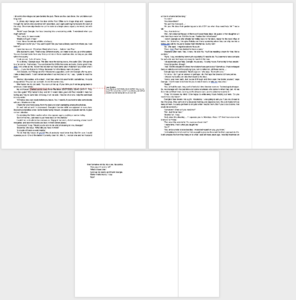
Oh dear! This scene has a comment and it’s been exported along with the text. If I were to use Compile, I’d have the option not to output comments
So … to have complete control of page headers, chapter titles and document titles, and comments and to create just one file, I use Compile to output to print.
Using Compile for printed output
I have a project format called ‘Rainbow To Word for review’.
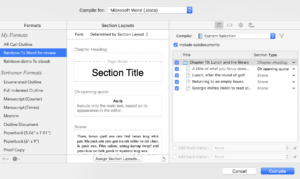
Compiling just the Chapter 10 selection produces this result.
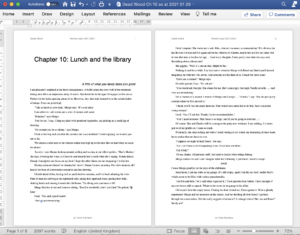
Notice that I have a row of five hashmarks to show the separation between scenes. This is achieved by setting the separators within Compile.

Notice that I have set up headers and footers so my reviewer knows what they are reading today.
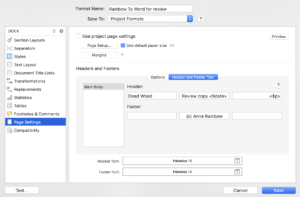
It’s not tricky to set up a project format which precisely matches your requirements for a particular output stream. Once done, you can use it over and over again, with confidence.
Questions? Need a helping hand? Want a demo?
To discuss how best to create printed output using Compile, or to ask any questions about Scrivener features, book a Simply Scrivener Special.
To help me to prepare, you could also complete this short questionnaire.
The ScrivenerVirgin blog is a journey of discovery:
a step-by-step exploration of how Scrivener can change how a writer writes.
To subscribe to this blog, click here.
Also … check out the Scrivener Tips
on my ScrivenerVirgin Facebook page.
CarolSue Ayala
16 March 2021 at 20:48Thank you, Anne. I learn so much from you!
Anne Rainbow
17 March 2021 at 07:41My pleasure CarolSue. In writing the blog I learn a lot too, and, over the past years, have built quite a useful resource. for me as well as others. enjoy!