

Formatting with S3: All projects, this project, this document
 Formatting: know where to start!
Literature & Latte provide options for you to control formatting at three levels:
- For all your projects
- For this project
- For this document
Before you start using Scrivener (bit late, Anne!), or at least before you start a new project, it will save you time and frustration if you think about what formatting you want. Even if you leave this decision-making until later, after you’ve written your manuscript all is not lost … you can format whatever is in your project. Trust me!
Formatting for all your projects
You have the option to customise the default settings for all your projects.
Select Scrivener / Preferences / Editing / Formatting to reveal this pane.
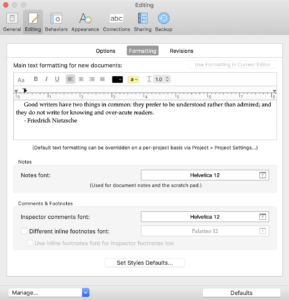
These settings determine the formatting for the main text for all new documents in this project and all other projects. You can also control the font for Notes and Comments & Footnotes here.
The formatting settings are managed via a toolbar

and/or a ruler.
![]()
As formatting tools, the toolbar and ruler turn up in other places too (in the Editing pane and in Compile) and I explain the settings which apply to them all in subsequent blog posts in this series.
Notice that the Formatting pane reminds you:
![]()
Formatting for this project
If you want to control the formatting for just this project, but you don’t want it to apply to all your projects, the route is Project / Project Settings / Formatting.
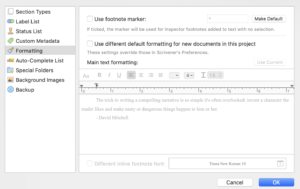
On arrival, the formatting tools are greyed out, so you must tick the box: Use different …
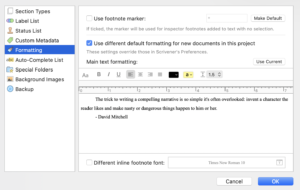
Notice that Scrivener warns you.

Again, this settings only affect new documents – and only those in this project.
And the formatting settings are managed via the toolbar and/or the ruler, both of which I explain in later posts in this series.
Formatting for this document only
You can also apply formatting at a document level and this allows you to override the other two higher level settings.
The tools are the same: the formatting toolbar and the ruler – and these are explained in later posts in this series.
Why would you want different formatting for a single document?
There are two reasons why you might think you want to apply formatting at document level (rather than the two higher levels).
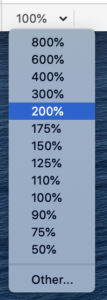
- While editing your manuscript, you might find the font size too small to read onscreen.
Rather than changing the font size, Literature & Latte offer a Magnification control. It’s positioned in the bottom left corner of the Editing pane. Click on the ∨ to reveal the options. (If you want all the screen enlarged, you’ll need to tweak the Apple Preferences.) - The document could contain text which you want to lay out in a particular way and you think you’d rather do this in the Editing pane, where you can see (using Page View) how it looks on the page.
Literature & Latte allow for this. In Compile, there is an option to format As Is. If you have just one page that has ‘weird’ formatting, use this route. However, if you have many documents with this formatting requirement, you’d be better advised to set up a style (or several styles as necessary) and control the formatting through Compile. This allows you to change your mind about the end result through a simple tweak in Compile, rather than having to amend every instance in the manuscript.
Remember: what appears in the Editing pane is not necessarily what appears when you output your manuscript. Compile includes the option to set up different project formats for different output streams. It therefore make more sense to determine the settings in Compile – even if you currently only have one intended output route – and not worry about how the text looks in the Editing pane.
So, that’s formatting in a nutshell, but …
My project is a mess of formatting. Help!
Often what happens is you get partway through a project and then realise you don’t like the formatting settings.
As described above, you have two options:
- Change them for all your projects
- Change them for this project
This will set the formatting for all new documents … But what about all those documents you already have – and in which you have a mix of formatting styles?
How to change the formatting for all existing documents
Having set the formatting for all projects / this project, to bring the old documents into line, this is the process.
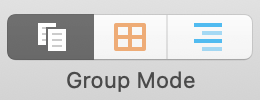
- In the Binder, select the Manuscript / Draft.
- In the Editing pane, check that you are viewing the entire manuscript. Your Group mode setting should be Scrivenings.
- Place your cursor within the Editing pane, click and then Select All. (Edit / Select All or CmdA) All of your text will be highlighted.
- Make the changes to the formatting using the formatting bar and/or ruler to match your decisions made at project level or all-project level.
How to avoid the formatting getting in a mess from here on?
Formatting goes wrong if/when you import text from elsewhere (eg Word) because the text brings with it its own formatting information.
To avoid this situation, always use Paste and Match Style. There are three ways of achieving this.
- Right click and choose Paste and Match Style
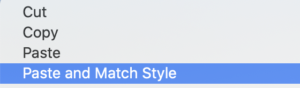
- Select Edit / Paste and Match Style.
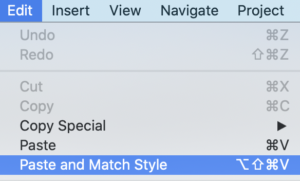
- Use the Keyboard shortcut: Option/Shift/Command V.
Questions? Need a helping hand? Want a demo?
To discuss how best to use Scrivener, or to ask any questions about Scrivener features, book a Simply Scrivener Special.
To help me to prepare, you could also complete this short questionnaire.
The ScrivenerVirgin blog is a journey of discovery:
a step-by-step exploration of how Scrivener can change how a writer writes.
To subscribe to this blog, click here.
Also … check out the Scrivener Tips
on my ScrivenerVirgin Facebook page.
Pingback:Scrivener Advent Calendar: F is for ... - ScrivenerVirgin
6 December 2024 at 11:03