

2021 NaNoWriMo: Using Scrivener to write your novel
Three weeks to go
NaNoWriMo starts on 1 November. Until then, we can’t start writing for real, but now is an excellent time to start planning that next novel.
And, if you are keen to use Scrivener, now is the time to start learning how to create the perfect writing space.
What is NANO?
NANO, short for NaNoWriMo, is the National Novel Writers Month. Writers all over the world spend the 30 days of November writing the first 50K words of a novel. The NaNoWriMo website opens its doors in October and then the fun starts.

Meanwhile, we have time to plan what to write, and – for those of you who’ve not used Scrivener before – to consider diving in. I explain how a novelist might use Scrivener here.
What’s the point in planning?
In NaNo circles, the terms pantsers and plotters are often used to describe opposite ends of a spectrum of types of writers.
- Pantsers do absolutely no planning. They start to write at midnight on October 31 and just trust their creativity to carry them through November.
- Plotters spend ages ahead of 1 November … planning. They rely on their plan to provide a supportive structure to their writing.
Scrivener features are designed to suit both ends of this spectrum and everywhere between, too.
Depending where you think you are, this blogpost explains which features of Scrivener might suit you, the novelist, best.
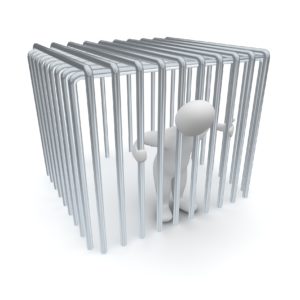
Having started life as a pantser and then realised the usefulness of planning, I’m now more into planning ahead of time, but not to the point where I feel too restricted.
The plan should provide a framework, not become a straightjacket, or a cage!
What’s in the plan?
In a recent workshop led by Kerry Hadley-Pryce, the Wednesday Writers looked at how to plan a novel. According to Curtis Brown, Kerry advised us, there are 10 aspects to planning.
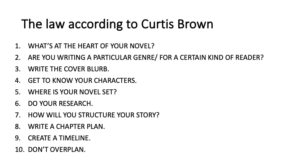
The benefit of the plan is to provide a reminder of where you thought your novel would be going, so that when you start to flag (which you most certainly will!), you can remind yourself, and maybe revise the plan to make it work for you even better, and to re-energise your creativity.
There’s a lot to write, over and above the manuscript itself:
- The plan … an outline, a beat list, or a chapter plan
- A time line
- Character sketches
- Setting sketches
- Research notes
- Marketing material such as a tag line, cover blurb, elevator pitch … and your personal bio!
Why I use Scrivener to write my novels
Scrivener is a sophisticated tool that provides an ideal writing environment, for novels and lots of other writing too.
I use Scrivener for novel writing mainly because it lets me see my novel from the top down, from the bottom up, from each character’s point of view, and from the reader’s perspective too. I feel I have total control of all aspects.
But why should you use Scrivener? A good question! There are four quick answers:
- Scrivener will make the planning of your novel, ahead of the first day of writing on, 1 November, easier.
- The planning that you do will make the writing during NaNo a doddle. Enjoyable. An indulgence!
- Editing, once you’ve completed that first draft, will be a breeze. Trust me!
- Self-publishing, when you are ready, via the Compile option, is set up for a multitude of exporting options: eBook, Kindle, paperback. Easy, peasy!
And there’s a longer answer … read on for four more specific features which make Scrivener the go-to software for novel writing for me.
1: All in one place
I have just one file for each writing project, be it a novel or a series of blog posts, or a marketing campaign. So, for every NaNoWriMo, I start a new project file and within that, everything will be stored.
Ahead of 1 November, I focus on planning. I might have an idea for a central theme, but my novels tend to be character driven so that’s where I start.
- My character sketches prompt me to invent scenes and the synopses for my scenes provide prompts for what’s required when the writing starts for real.
- My character sketches, complete with images of actors I’ve chosen to play the part – when my novel’s a best seller and heading for the big screen – inspire me and provide a distinct voice for each character.
- My locations, complete with maps and photos, ground me, literally, into the location for my novel.
- All my research notes, with links to relevant web pages, give me necessary detail should I need it while writing apace.
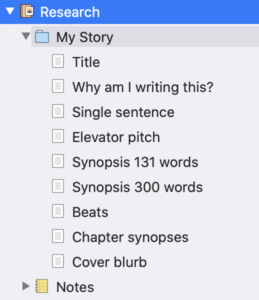
- A folder in the Research area called My Story, in which I write various ‘treatments’ reminds me of my intentions for the novel and will become even more useful when I decide to publish and the marketing starts.
Once I start on 1 November, I flesh out the manuscript itself, scene after scene, to create what will become the first draft. Then, when it’s time to work on draft two, I bundled scenes into chapters.
Because everything is on one place, I don’t waste time hunting for information. I stay within the Scrivener application and work on whatever aspect of the novel grabs me. All progress is progress!
2: I choose my workspace
Scrivener allows you to set up a workspace that suits you while you are writing, and another while you are editing. I explain the writing space here and the editing space here.
On my main screen, Scrivener offers an overview of the project.
- The Binder panel sits to the left of my screen, the main folder being the Manuscript and below that, my Research folder.
- In the middle, I have my Editing pane with a choice of three options: Scrivenings, Corkboard, and Outliner.
- To the right, I have the Inspector.
I can split the editing screen so that I can view the chapter I’m working on, at the same time as a character sketch or a scene, or a page on a website.
If I want, I can dive into composition mode, which clears the screen of everything but the piece I am writing. No distractions. Perfect NaNoWriMo conditions.
Scrivener also provides ways of labelling scenes, setting a status, colour coding, and creating metadata (data about data). So, I can keep track of what’s still to be done, which scenes are from whose point of view, and a load else besides.
3: I am free to write how I like
I never write a novel starting at the beginning and ending at THE END.
- Having set up my outline, I can choose what to work on next, which scenes to focus on today. That frees up my creativity.
- I am not chained to a schedule of writing: scene 1 followed by scene 2, etc. If I feel I’m drying up, I abandon that scene, turn tail and dive in somewhere else.
At the same time, I set myself goals and I achieve them.
- Knowing that I want to write at least 50K words during NaNoWriMo, when I create my outline, I set word targets for each scene. When I start writing, the Outliner shows my progress and it’s colour coded.
- I can also set a daily target.
There are no excuses for falling behind schedule! I explain how here.
Although I have a plan, I can change my mind.
- The Corkboard gives me an overview of scenes, one by one. If I want to alter the order or slip in an extra scene, it is so easy. So easy!
- Whatever occurs to me (on or off the plan) I type it up, and slot it in where it belongs straight away, or let it rest into ‘to-be-fitted-in-later’ folder.
- While I’m writing I can leave myself notes. When it comes to editing – which will not happen during November – I’ll work my way through these notes.
So, when my internal editor asks irritating comments, like ‘I thought Joanna was called Joanne’ I just make a note to check this detail later. There’s no break in the flow of my writing.
4: There’s loads of support
Learning how to use a sophisticated piece of software like Scrivener takes time and energy and, if you are like me, both can be in short supply!
It’s not just knowing what every item on every menu does, it’s also appreciating how this magnificent software, with all its buttons and bells, might help a writer – like you and me – to achieve what we need to do: write that novel.
For anyone new to Scrivener, there’s an abundance of support:
- Literature & Latte’s support options and their Scrivener Manual
- Online videos and tutorials
- Courses from Scrivener experts like Gwen Hernandez
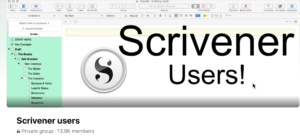
- Facebook groups like the Scrivener Users.
With nigh on 14K members in that FB group, there’s always someone on hand to answer any questions, myself included, day or night.
Questions? Need a helping hand? Want a demo?
To watch me go through the process of setting up new novel project or to ask any questions about features you might need during NaNo, book a Simply Scrivener Special.
To help me prepare, you could also complete this short questionnaire.
The ScrivenerVirgin blog is a journey of discovery:
a step-by-step exploration of how Scrivener can change how a writer writes.
To subscribe to this blog, click here.
Also … check out the Scrivener Tips
on my ScrivenerVirgin Facebook page.
No Comments