
Placeholders: Page Numbers
 I promised, for this series, to present the most useful placeholders first, and THE MOST useful is <$p> which is replaced with a page number when you compile.
Simply: page numbers
There are only three placeholders listed in the Page Numbers section.
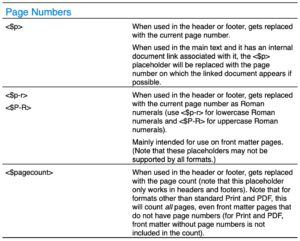
- <$p>
- <$p-r> or <$P-R>
- <$pagecount>
Should you be using one or more of these placeholders?
Yes!
For any document over two pages long, it’s essential to number the pages, at least for the main body of the text.
- If the document is printed but not bound (eg by a staple, or ring binding) it’s easy to muddle the pages.
- If you plan to cross refer within your document, page numbering is essential.
- If you plan to supply an index, page numbering is essential .
Having acknowledged the need for page numbers, you then have a number of decisions to make.
- What numbering system would you like? 1, 2, 3, … or i, ii, iii, iv, … ?
- Whereabouts on the page should the page number appear?
- Would you like to include ‘out of’ (or something similar) and a total page number?
Sounds straightforward … and achieving what you want requires a number of (simple!) settings in Scrivener. Read on.
Page numbering systems
Scrivener offers two options:
- Arabic = 1, 2, 3, 4, … (usually used for the body of a book)
- Roman = i, ii, iii, iv, … (usually used for the front matter)
Numbering starts from 1 (or i) and continues incrementally through the manuscript.
So, unlike one of my clients, don’t be tempted to set up multiple projects, one per chapter, as you might in Word. There is no option to start numbering Chapter 2 at (say) 33 having worked out that Chapter 1 needs 31 pages and then you want a blank page so that the new chapter starts on the right (recto). Scrivener does all the calculating for you, and includes blank pages as necessary. Keep it simple: one book goes in one project file! Rant over …
The placeholder you choose determines which numbering system you’ll see when you compile.
- <$p> gives you the Arabic numerals: 1, 2, 3, 4, …
- <$p-r> gives you the Roman numerals: i, ii, iii, iv, …
- <$P-R> is the capitalised version of <$p-r> and results in I, II, III, IV, …
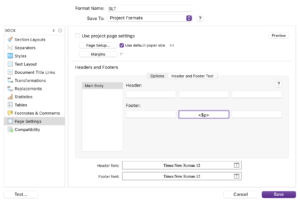
Positioning your page numbers: in a header or footer
When page numbers appear in the header or footer, there are three positions available:
- Left aligned
- Centred (as shown below, in the footer)
- Right aligned
If you are publishing a book, you really only have two options as it looks daft to have page numbers appearing in the gutter (the margin closest to the spine of the book):
- Centred (top, or bottom of page as shown above)
- On an outer edge (top or bottom) which then means you need to use the ‘facing pages’ setting!
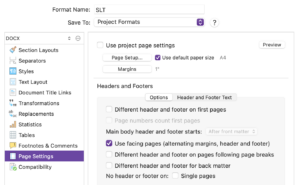
Having ticked that box, the ‘Header and Footer Text’ panel changes to include an additional entry: ‘Facing Pages’.
Put the page number placeholder on the left for the Main Body …
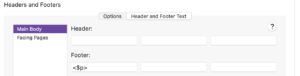
… and on the right for the Facing Pages.
The net result of this, when you compile, is for the page numbers to appear at the outer edges. Note that I’ve put them in the footer, but only as other more important information tends to appear in the header.

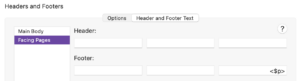
Formatting the Header/Footer text
The choice of font (style and point size) is decided at the bottom of the Compile pane.

Click on the T icon and this opens a pane from which you can decide what you want.
Ideally, the header/footer text will be smaller than the body text, but still legible.
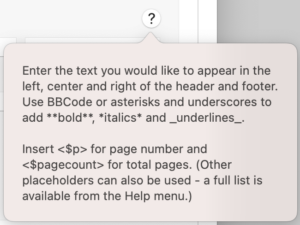
You can also add bold/italic/underline if you wish. Clicking on the ? button reveals the codes to use.
Including the total number of pages
If you want to include the total number of pages, set up the placeholder text as shown below. (I had to widen the window for you to see all that I had typed into that field.)

The result of this setting is then …

Notice that whatever I typed outside of the tag word is replicated. This is true for all such entries. So, if you see what you think is a tag word, odds are you mistyped it.
If you want the same information about total page count on the facing page, then amend your placeholder for that setting.
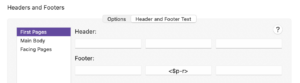
Page numbers for front matter and back matter
If you have front matter, again, it is advisable to include page numbers.
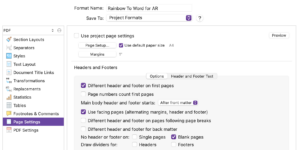
On the options tab, click the box: Different header and footer on first pages.

The ‘After front matter’ is the default, but if you click on the arrows, you can choose ‘On page 2’ instead. This would be appropriate if you are printing, for example, a report, and there’s just a cover page, rather than the front matter section you might need for a paperback..
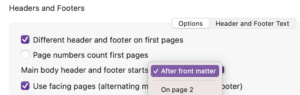
Notice also there’s a box which offers you the option to include the first pages in the overall page numbering. This would be unusual … but it’s an option in case you need it.
Moving on, if you have several pages of front matter, to avoid confusion with the main body of your book, Roman numerals are recommended. And, I would also position them in the centre …
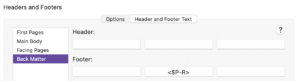
For back matter, it’s not so important to number the pages, and I would avoid doing so unless you intend to cross reference something from the body of the book. Even then, it depends on how much back matter sections you’ve included. It might suffice to refer, for example, to Appendix C and expect the reader to find that by looking at the header of each page where you might include the section title, rather than page numbers at the bottom of the page.
If you decide to number the back matter, tick the appropriate box in the Options tab.

And then set the placeholder. For now, I’ve set it as upper case Roman numerals.
You might prefer to include the page number with the title of the section in the header eg Appendix 1 – page 1. I’ll show you how to do that in the next post when we look at the other placeholders you might include in headers and footers.
Suppressing page numbers in headers/footers
What if you don’t want a page number to appear? This might be the case if the page is empty of text.
There is a box to tick, but you’ll only see this if you are exporting to PDF or print.
Indeed, not just here, but in all circumstances, Scrivener only displays options that relate to your choice of output. Which makes sense?
Page numbers elsewhere in your book
There are two circumstances where you might need the <$p> tag word.
- Table of Contents
- Cross referencing (using internal links)
Page numbers in a Table of Contents
For anything but an ebook, you will need to include the <$p> tag word for page numbers to appear in the contents list for your book. Achieving this involves one of two methods.
- Letting Scrivener set up the Table of Contents for you
- Creating a Table of Contents yourself (which gives you more control …)
Both options are explained in this blog post. (If you are preparing a book, rather than an e-book, leave the <$p> tag words in place.)
Cross referencing using page numbers
Scrivener offers internal links, but these are to documents, rather than to specific text within a document. So, cross referencing is to the page on which the document starts. You can, by splitting documents, engineer the page number cross reference to be as close as possible to the text you actually want to point the reader towards.
This post explains how to set up internal links. To display the page number, include <$p> as part of the link text. For example: (page <$p>) will compile as (page 47) where 47 is the page number of the linked document.
Note that this only works when outputting to Print or PDF …
Questions about Scrivener?
Need a helping hand with Scrivener tools? Want a demo? Book your own Simply Scrivener Special session with me, at a time to suit you.
And, if you need a steer on self-editing, check out my RedPen Editing courses. Join RedPen Editing and enjoy a 5-day editing taster course for free.
The ScrivenerVirgin blog is a journey of discovery:
a step-by-step exploration of how Scrivener can change how a writer writes.
To subscribe to this blog, click here.
Also … check out the Scrivener Tips
on my ScrivenerVirgin Facebook page.
No Comments