

Placeholders: Label, Status, Keywords and Synopsis
 This is the third of several blog posts which focus on Document Variables.
- Placeholders: Introduction to Document Variables considered the extent of these placeholders and provided an introduction to this topic.
- Placeholders: Title as a Document Variable looked at Title and ParentTitle.
This blog post focuses on four items of metadata.
- Label
- Status
- Keywords
- Synopsis
What is metadata?
Metadata is ‘data about data’. In the case of a novel, it’s anything you might write that it not the novel itself. I’ve blogged a lot about metadata …

If this is a new concept for you, I suggest you read Inspector Skills: Metadata as a starting point.
Here, for the purposes of placeholders, we’ll focus on the four in this section of the List of All Placeholders.
In truth, all the placeholders in this series of blogposts are ‘metadata’ … the title discussed in the previous post and all those that follow, but these four might be considered the most important, in that the serve to identify the most important information about the document.
What is Label?
Label provides a way of categorising your documents (scenes). You decide what categorisation will be most useful for you, set up a list of those categories, and then assign one of the listed items to each document. It’s a one-on-one relationship (one label per document/scene) – later in this blog post, we look at keywords which allow many-to-one ‘labelling’ (many keywords per document/scene).
The most common use, if you are writing a multi-POV novel, is POV, but there are other options ..
- Whose POV is used in this scene? This is a choice I’ve made on more than one occasion.
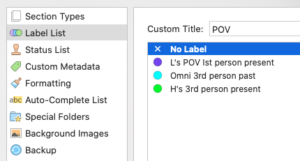
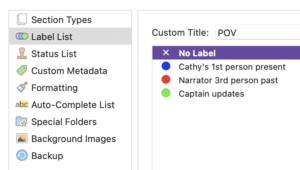
- Where is this scene location? For a single-POV novel, this can be useful.
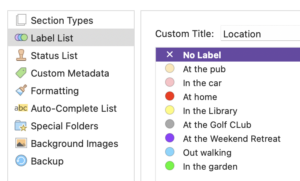
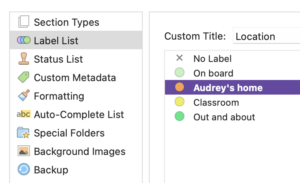
This blog post explains how to set up labels etc. Using the Label also opens up the option to view the Corkboard as threads, one per Label category; see this blog post for more details.
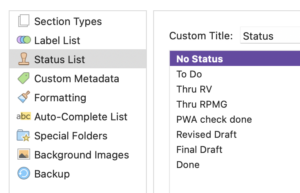
What is Status?
Status is another 0ne-on-one relationship and amending the Status is the same as for the Label: in the Inspector. Or, a right click option from the Binder selection.
The ‘standard’ use for Status is to assign a value which indicates your progress with this document/scene.
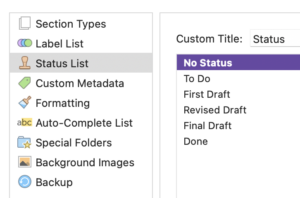
Like Label, you can customise it to suit your own purposes. Call it whatever makes sense for you. This is my take, which includes stages of checking where RV = Ria View review group; RPMG = RedPen Mentoring group; PWA = ProWritingAid.
One writer decided to have fun with Status.
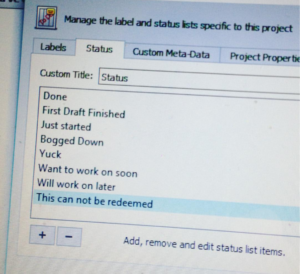
You can also re-purpose Status, for example, if you want to use it for one thing while writing and another while editing.
The Status appears in two places.
 On the Corkboard, the Status Stamp appears diagonally across the card if you choose View / Corkboard Options / Show Status Stamps. You can control not only the text that appears but also its colour.
- In the Inspector, the Status is a drop-down at the bottom of the pane, to the right of the Label field.
Check out this blog post for more details.
What are Keywords?
Keywords allow you to assign many ‘labels’ to a document (scene). You can use it to answer questions like:
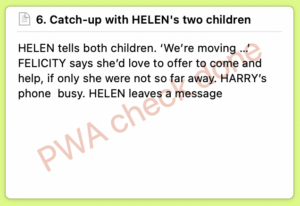
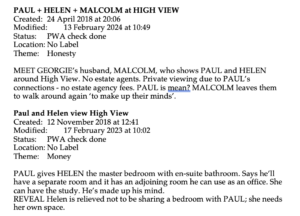
 Which character is in the scene? Answer: Helen, and Paul, and Georgie, and Malcolm
- What theme is addressed? Answer: Marriage, and Lying, and Control
When you select a folder or document in the Binder, its keywords can be seen in three places:
- In the Inspector, in the Metadata pane
- On the Corkboard, as coloured chips on the right-hand side of the card if you choose View / Corkboard Options / Show
- In the Outliner: there is an option to hide/reveal each keyword, and a choice of text or a coloured block
This blog post explains how to set up keywords, how to assign colours, how search on them, and includes examples of how and where they appear on screen.
What is the Synopsis?
 The term ‘synopsis’ may be used to describe an overview of an entire book. In Scrivener, the process of building/writing that full synopsis can be made easier by using the same approach but at lower levels.
- For each scene (document), record data that shows why that scene is included, what action happens, what ‘news’ the reader receives.
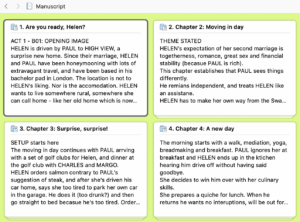
- Once you’ve grouped scenes into chapters (folders), reviewing those scene synopses gives you a good basis on which to write a chapter synopsis, as in the screen grab of my Chapter 1 of Dead Wood.
- Once all the chapters synopses are written, the creation of the full synopsis should be easier.
When you select a folder or document in the Binder, its synopsis can be seen (and amended) in three places: in the Inspector, in the Notes pane, as in the screen grab to the right; and on the Corkboard, on the face of the card, as shown below; or in the Outliner (NB: an icon in the bottom right corner of the Outliner provides an option to hide/reveal the synopsis.
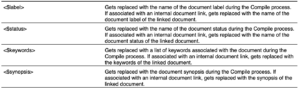
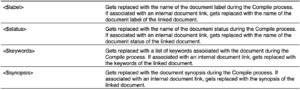
Placeholders for Label, Status, Keywords and Synopsis
Unsurprisingly, the tag words are <$label>, <$status>, <$keywords>, and <$synopsis>.
Having taken the trouble to set up this metadata, the placeholders can be included anywhere, apart from within headers/footers.
Scrivener also provides an option to export the synopsis via a tick box in Compile. I set up this project format to provide additional material to my Ria View review group members. If we would be looking at chapter 13, I’d compile a report all the synopses to date ie for chapters 1-12. This served as a refresher of the story-so-far.
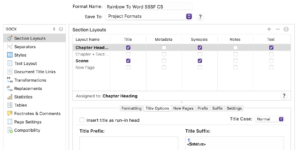
For my own use, I might need to see the metadata too. Scrivener provides it all, if you tick the Meta box.
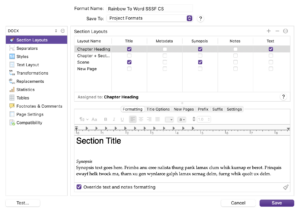
Or, if you only want to see selected items, include them as, eg, a title suffix.
This is the result.

Note the inclusion of a carriage return in the Title Suffix setting – otherwise the text runs on.
Next time, it’s all about statistics …
Questions about Scrivener?
Need a helping hand with placeholders?
Want a demo? Book a Simply Scrivener Special session at a time to suit you.
And, if you need a steer on self-editing,
check out my RedPen Editing courses.
Join RedPen Editing for a free 5-day editing taster course.
Did you notice?
No adverts.
An uninterrupted read.
To thank me for posting this blog
and helping you, you could always
buy me a virtual cup of coffee!

The ScrivenerVirgin blog is a journey of discovery
To subscribe to this blog, a step-by-step exploration
of how Scrivener can change how a writer writes, click here.
Also … check out the Scrivener Tips
on my ScrivenerVirgin Facebook page.
Not yet using Scrivener?
Click here to download your free trial.
No Comments