

10 Scrivener Terms You Need To Know
It’s November …
So I am thinking about novel writing, with chapters and scenes – and lots of notes and research to do. I’m using Scrivener and I hope you are too.
With every new piece of software, there are words – jargon, if you like – you need to understand.
Scrivener is no different. Let’s make sure we know what we are talking about!
Let’s make sure we understand these 10 terms
- The Binder
- The Manuscript folder
- The Research folder
- The Trash
- The Editor
- Scrivenings
- The Corkboard
- The Outliner
- The Inspector
- Compile
The Binder
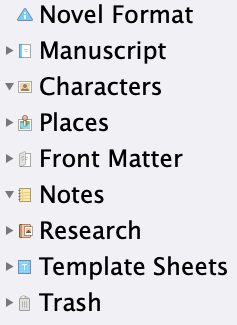
The Binder is the area to the left of the Scrivener window. Think of it like a physical ring binder; it holds everything – folders, and within those, documents – you need for your project.
Although there are eight items in the Novel Template, this Binder has three essential components.
- The Manuscript folder
- The Research folder
- The Trash
These ‘root folders’ are so important, Scrivener doesn’t let you delete them, although you can rename them, and the others if you wish. For more on the Binder … and the icons and levels, click here.
The Manuscript folder
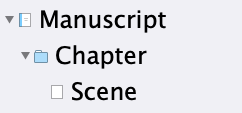 The Manuscript folder is where you put all the material you plan to export (using the Compile feature – see below!), making sure that any other material, not for export, is elsewhere.
The Novel format names the folders (blue icon) as Chapter, and the documents (page icon) as Scene. That suits me …
Scrivener expects the Manuscript folder – the chapters and the scenes – to contain text. You type it into the Editor pane, and there are also simple ways of pulling in text eg from a Word document.
You can include images in the Manuscript folder but they have to be brought into the Scrivener project outside of the Manuscript area, and then pulled into place within the appropriate documentation within the Manuscript folder.
The Research folder
The Research folder is where you keep all research material – images, audio files, videos, links to websites – so that you have it to hand when you are writing (or editing) your manuscript.
The Trash
The Trash is where you put anything (folders and documents) you think you don’t need anymore.
When you are sure you don’t need these items, you can empty the Trash – but there’s no hurry. You might decide, later, that a scene you cut might be crucial to your novel.
When you are good and ready, you can permanently delete the items using Project / Empty Trash.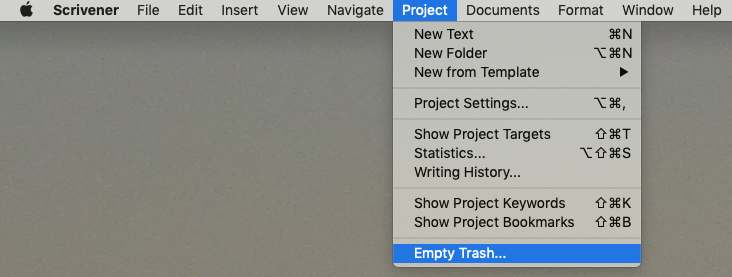
The Editor
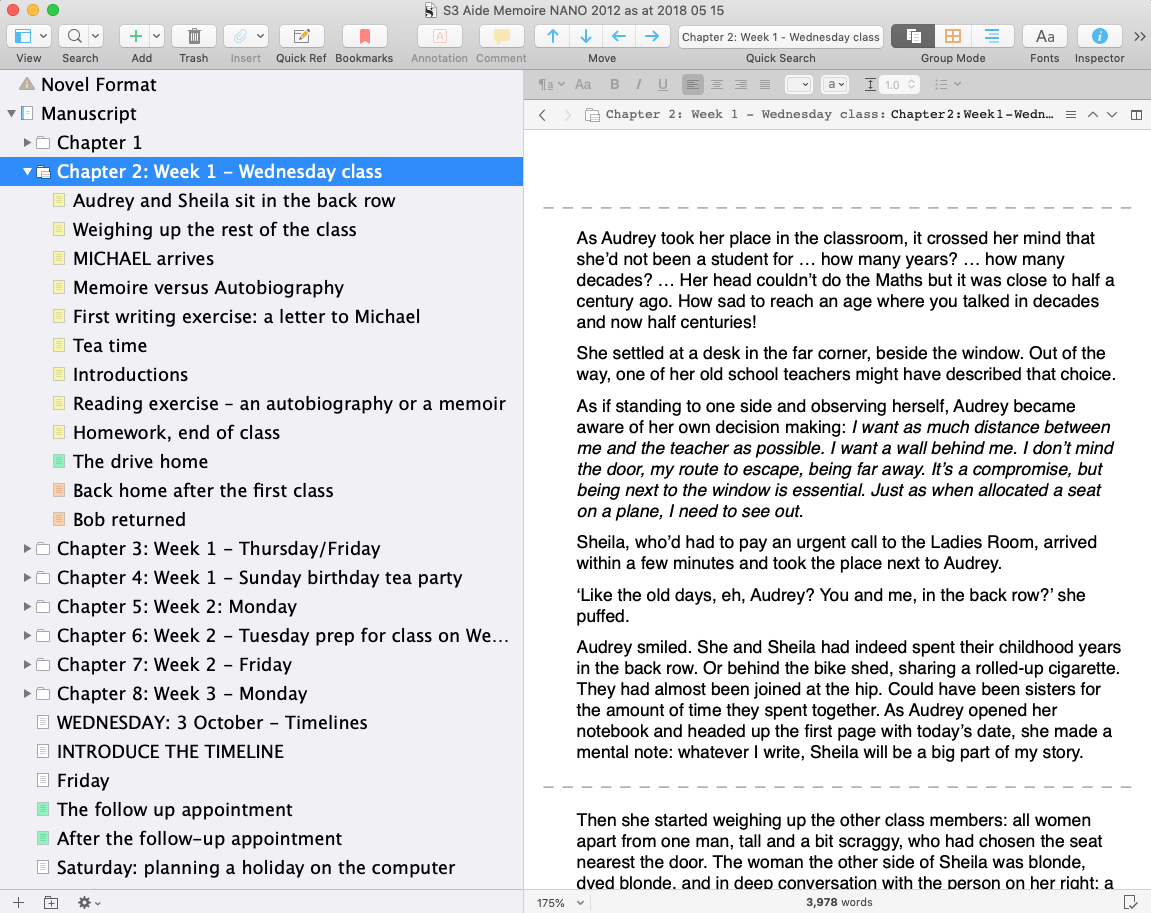
To the right of the Binder is the Editor pane. It’s here that you write/edit your novel.
Whatever you select in the Binder, you will see the relevant scenes in the Editor pane. I selected Chapter 2.
For more information on how to manage the workspace, click here.
Basically, though, there are three options as to how your novel appears within the Editor pane: Scrivenings, the Corkboard, and the Outliner.
Scrivenings
Scrivenings is Literature & Latte’s term for the ‘text’.
When you select a single document in the binder, the text of that document will appear in the Editor pane.
When you select a folder, or a selection of documents/folders, or the Manuscript folder itself, the Editor pane will show all of these, as a continuous stream of text, but with a dotted line to indicate the ‘joins’.
The dotted lines in Chapter 2 (above) show the breaks between scenes.
The Corkboard
The Corkboard looks just like the kind of cork board you stick on your office wall, with cards pinned to it.
When you select a folder (I chose Chapter 2), the Corkboard shows a card for each of the folders/documents /scenes within it.
Each card has a title (the same as the one in the binder) but you can add a synopsis (eg to explain what happens in that scene). This is not part of your text and is an example of ‘metadata’: data about the data.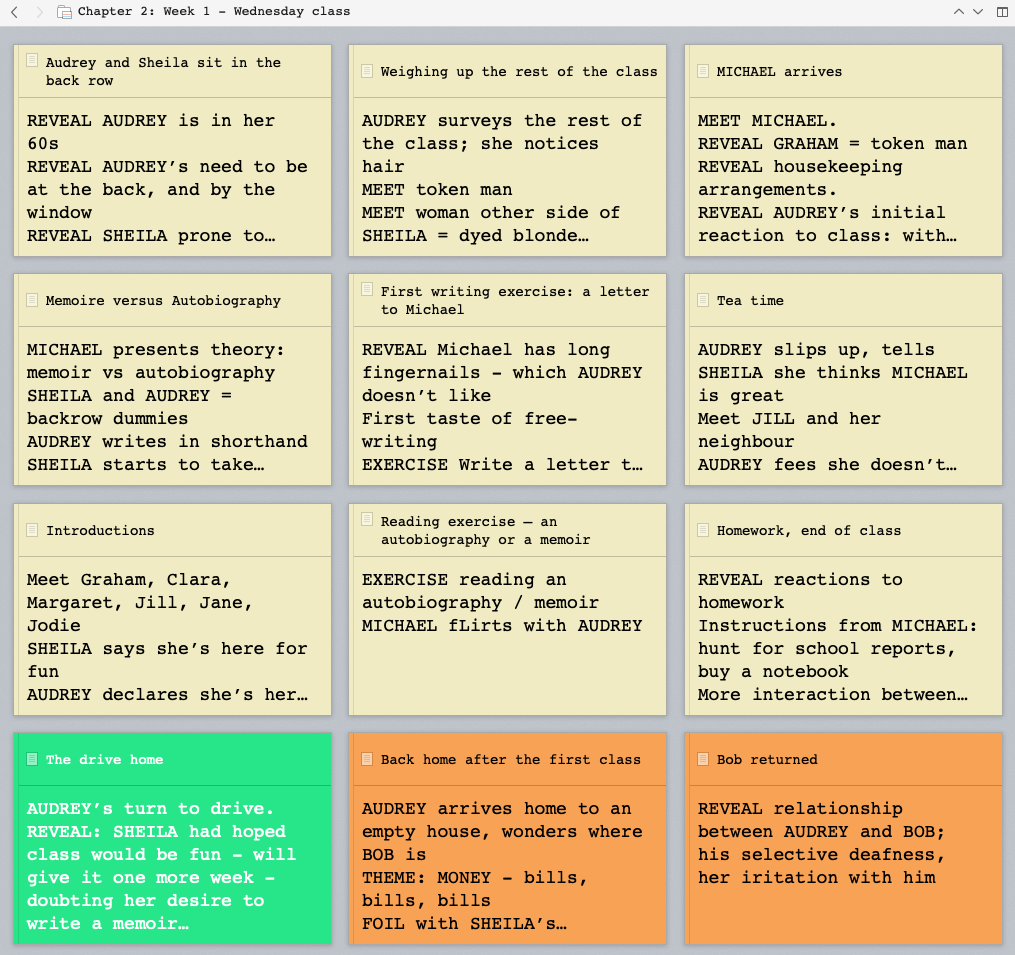
The corkboard provides a visual overview of your novel and lends itself to times when you are still plotting and maybe need to move cards around until you are happy with the order of your scenes. For more information about outlining using the Corkboard, click here.
The Outliner
The Outliner offers a listed version of the documents (similar to what appears in the Binder), but together with additional information, such as the synopsis, any metadata you have set up, statistics like word counts, and targets and your progress towards that target.
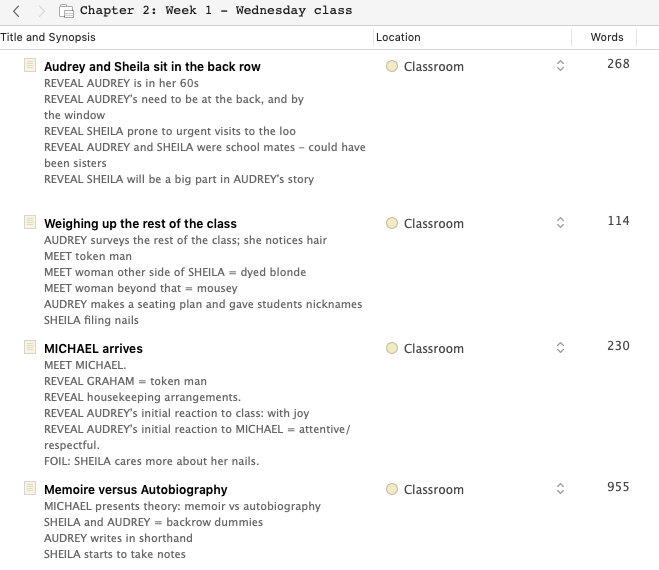
For me, the Outliner comes into its own when I’m halfway through writing a novel in NaNoWriMo and maybe beginning to flag. I’ll post my take on how useful the Outliner can be, then.
The Inspector
The Inspector appears on the right of the Scrivener window and provides lots of additional features, none of which are essential but many of which you will want to use when you have time to learn about them: things like snapshots, comments, and various metadata options.

This blog post explains the differences in the Inspector between Scrivener 2 and Scrivener 3 and summarises how useful this additional pane can be.
Compile
When you are ready to share your novel with others, you will export it using the Compile feature.
Scrivener offers many different export formats, and this is one of the strengths of Scrivener: you can take your novel from blank page to publication, and retain control over the manuscript throughout.
When you want to publish a revised version, you make the changes to the text and Compile again.
When you decide to produce an alternative format of the same material, you choose what you want and Compile again. Very simple.
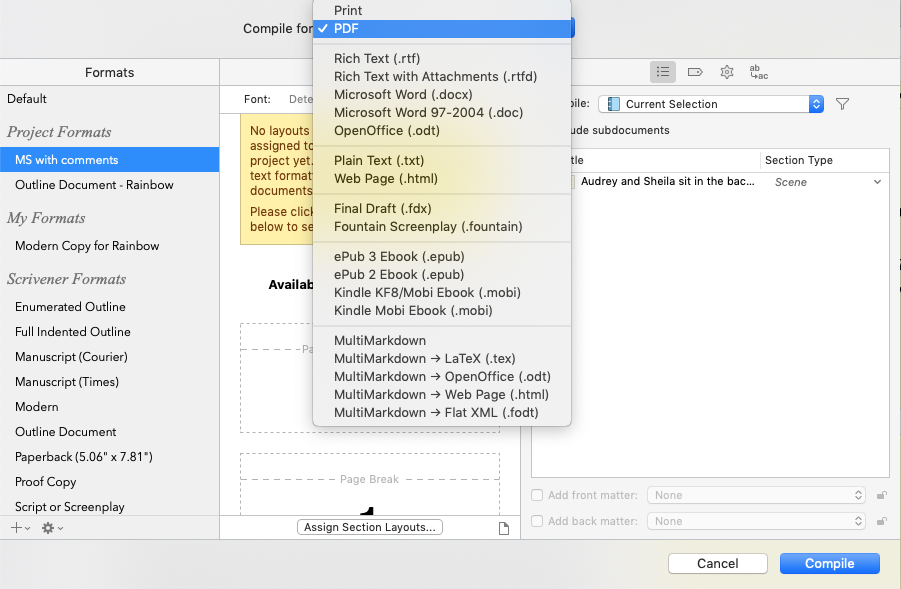
The route through Compile, to produce exactly what you want to see and share is a big topic. I’m relatively new to this (like you?) and have signed up for Gwen Hernandez’s course: Scrivener 3 Compile Mastery for the Mac. Like all other material produced by Gwen, it’s thorough and will take time for me to absorb. However, I’ll share my journey through this aspect of Scrivener as I become more adept myself.
More terms in the Scrivener vocabulary?
If there are other terms you are not sure about, let me know! I can explain them at a Simply Scrivener Special …
Next time: front matter, templates, metadata, labels, status stamps, keywords, snapshots, collections, bookmarks
Questions about Scrivener? Need a helping hand? Want a demo?
I’ll also be continuing the Simply Scrivener Special webinars during November.
To watch me go through the process of writing my NaNo novel or to ask any questions, book a Simply Scrivener Special.
To help me to prepare, you could also complete this short questionnaire.
The Scrivener Virgin blog is a journey of discovery:
a step-by-step exploration of how Scrivener can change how a writer writes.
To subscribe to this blog, click here.
Also … check out the Scrivener Tips
on my ScrivenerVirgin Facebook page.
No Comments