

Processing feedback from a professional editor
Feedback – where the fun starts!
Processing feedback. What’s the best strategy? How can you avoid editing overwhelm?
When your editor returns your Scrivener project file, where should you start? There may be feedback all over the place.
- In a covering letter
- As comments in the Inspector
- In the text itself, as Annotations or colouring (Revision mode, or highlighted words)
A strategy for processing feedback without editing overwhelm
It’s up to you what you do, in what order, but I recommend the following approach when processing feedback.
- Consider one piece of feedback at a time. Focus on that alone.
- Apply a triage approach.
- Recognise those tasks which are quick to do. You might as well do them straight away?
- Recognise those tasks which require a bit more thought. If you have time now, do them now. If not, leave them until your next editing session.
- Recognise those tasks which will require even more thought, and oodles of brain power, and a following wind. Definitely leave them for now. They can be tackled the next time you wake up bright eyed and bushy tailed!
You will make progress if you keep moving. One step at a time. One fix at a time.
But, always start with the covering letter. Reading that may save you time later.
Processing feedback: The covering letter
Yes, the first thing to read is any covering letter or email from your editor. I write mine straight into the Research folder, in a dated document within a Feedback folder. I remind the writer of this in the message sent with the Scrivener project via WeTransfer. Here’s an example.
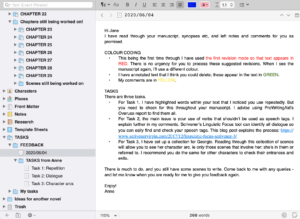
 For writers who are new to working with me, there’s an explanation of my colouring etc. For those who have been working with me for some time, I’ll include some words of encouragement and the tone becomes more relaxed. There are always three tasks though – that’s inherent in the RedPen Editing system that I’ve developed and use whenever I’m providing feedback. (It’s all explained in my book: Editing the RedPen Way: 10 Steps to Successful Self-Editing.)
What you do next depends on the contents of that covering letter, but I’d recommend you scan through the comments next.
Processing feedback in the Inspector: Comments
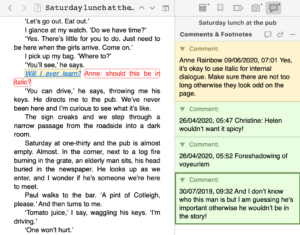
In this example, where I have left comments, they are in a yellow box, so they are easily distinguished from the writer’s which are in green.
Every document for which there are comments (the writer’s or mine) will have an asterisk next to the icon for comments.
However, you don’t need to go hunting for documents with this asterisk! Instead, follow this process.
- Click on the Manuscript in the Binder, and choose Scrivenings for the Editing pane.
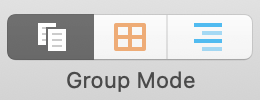 Notice that, because you have selected more than one document, this is now called Group Mode (rather than View Mode) and that the icon for Scrivenings indicates you are viewing more than one document.
 - Open the Inspector and click on the Comments icon.
 If you compare this row of five icons with those in the screen grab two above, there is no asterisk beside any of the icons. But there are plenty of comments, trust me.
 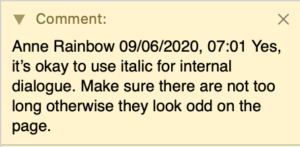 Scroll down through the Inspector comments, until you find one of mine – one of the yellow ones.
- Click on my comment and the text related to that comment will appear, highlighted in the Editing pane.
- Read the comment and decide how you will proceed. (This applies the triage approach again.)
- If the comment is not clear to you, and you need to ask me a question, for further information, or clarification, position your cursor within the comment, and type ASK ANNE: … with your query. I will see this next time I see your Scrivener project, or you can ask me verbally next time we have a catch-up. (Including ASK ANNE means you can search on this phrase when the time comes for us to speak.)
- If you understand the comment but it will be time-consuming to process, ignore the comment until another editing session.
- If you understand the comment and it will be quick to process, act on this comment now. Fix the text so it reads how you want. Then, delete the comment, by clicking on the X in the top right hand corner of the comment box.
- Scroll on to the next comment and repeat.
You may not have processed all the comments. It does not matter for now. You can address them during the next scan through your manuscript.
Processing feedback in the Editing pane
So, next, focus on the Editing pane. Your whole manuscript is there, in Scrivenings. Scroll back up to the top.
Separations between documents (scenes), will be indicated by something. Mine is a simple line, but you can change this setting if you want something different. (Explore Scrivener / Preferences / Appearance / Scrivenings / Options.)

Or, you might have opted for the document titles to appear in Scrivenings, in which case the title acts as a separator and is a useful reminder of where you are in the manuscript. (View / Text Editing / Show Titles in Scrivenings.)

Whichever version you have on screen, scroll down, looking out for annotations in the text.
Annotations in the text
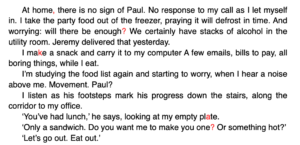
I will have turned your text into an annotation if I believe that word could be deleted to good effect. Here’s an example.

Your required action is very simple and should take only a matter of seconds.
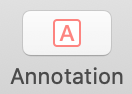 If you agree with me, click on the annotation, right click and select Cut. Move on.
- If you disagree with me and want to keep that word, click on the annotation, and click on the Annotation button (or use the keyboard combination: Cmd Shift A). This will remove the bubble and leave your word intact. Move on!
Revisions to the text
You might also see my revisions in the text.
These are corrections to punctuation, spelling and grammar. As with the deletions, it’s up to you to check you are happy with my suggestions. While you are working through the Scrivenings, it’s easy to highlight a block of text and accept my suggestions: Format / Revision Mode / Remove Revisions.
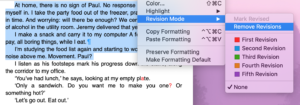
If you disagree with any of the suggestions, just fix the text how you want it to be.
Colouring
If there are words that you repeat and/or ones which I think maybe you could find a better word, I highlight those words in a colour. I use one colour for words you need to consider together. In this example, I also set up a collection (for me, as I am the writer!), for the word ‘think’. Clearly I need to use that word less often.
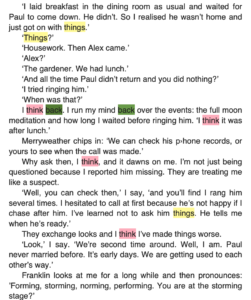
For you, faced with this colourful image, it’s a case of deciding what you might change (if anything at all), and then removing the highlighting when you are happy with the end result.
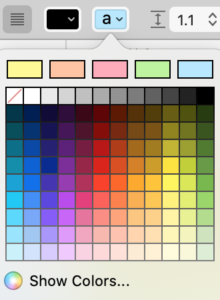
To remove the highlighting: select the text – you can select whole paragraphs – right click on the highlighting icon, and then choose the square with the red diagonal (which means NO HIGHLIGHTING).
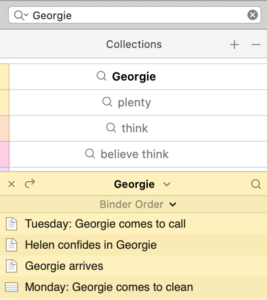
Collections
Collections are subsets of documents (scenes) which match a given search criteria. This saves you hunting through your whole manuscript over and over again – you need only look in these documents.
For more information on how to set up a collection for yourself, read this blogpost.
I will have set up a collection for you, for example, if there is a word you are overusing. Or to encourage you to check a character’s arc.
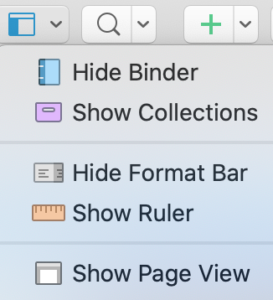
To see your collections, click on the Binder icon and select Show Collections. They will then be displayed in the Binder pane. Click on whichever collection you plan to work on and the documents in that collection will appear in the Binder. They are coloured so it’s clear you are looking at a collection, not at your manuscript. The one for Georgie is yellow.
Documents are removed from the collection when they no longer match the Search criteria that was used to set it up. So, for example, as you fix any overuse issue, the list of documents in the collection will shrink until it contains only those where you’ve decided not to replace the overused word. That’s fine. Job done. You can delete the collection by clicking on the minus sign in the top right of the Collections pane.
Then what happens?
Most of my writers need time to process the feedback, and to continue writing scenes, grouping into chapters, and self-editing.
When they reach the point they would like some more feedback, they can send me their Scrivener once again. I’ll still have my previous version, so I can see what scenes I read then and can pick up where I left off, or read whatever the writer asks me to read, eg the arc for one of their characters.
And so the process continues.
Any questions? Need a helping hand?
To watch me using any of these editing tools or to ask any questions about Scrivener, book a Simply Scrivener Special.
To help me to prepare for the webinar, please also complete this short questionnaire.
The ScrivenerVirgin blog is a journey of discovery:
a step-by-step exploration of how Scrivener can change how a writer writes.
To subscribe to this blog, click here.
You can also find links to blogs of specific topics in the Scrivener index.
Also … check out the Scrivener Tips.
No Comments