
Formatting with Scrivener 3
Formidable formatting made fun!
Formatting is one of the most misunderstood features of Scrivener. Second only to Compile!
I often hear of writers switching to Word or Vellum, rather than use the tools in Scrivener.
So this post explains the extent of formatting available. It’s the first of a series and I hope this series will persuade you to stay in Scrivener – and then, also, to stay with Scrivener for compiling … and self-publishing.
What is formatting?
Having chosen the perfect words to convey your message, formatting determines how you will present your material to your audience. It’s an art form, combining your material with white space to good effect.
Formatting therefore involves making decisions on layout and adjusting the default settings in Scrivener so that you achieve the end result you desire. Which particular default settings you need to tweak depends on what you are doing.
Scope of formatting
The first question regards the scope of your endeavours.
- Are you formatting for all your projects?
- Or just this project?
- Or just this document?
Once you’ve focused on which of those three you want to tweak (and I explain what to do for each in the next blog post), there are then more decisions to make.
- Are you trying to tweak how your material looks on the Editing Pane? (If so, you might like to read this blog post.)
- Or are you worrying about how your material will look on the page when output?
- Or are you outputting to an ebook or Kindle – in which case there aren’t any pages!
How your text appears on your screen is controlled separately from how it appears when you export it. Personally, while I am writing a piece, I don’t worry about the onscreen formatting. It’s what’s exported which matters to me. But, if you want to control what you see onscreen, in the Editing pane, you need to learn about onscreen formatting.
If your output is paged, you have a number of controls to set (or change from the default settings).
- Size of page
- Margins (the spaces between four edges of the page and your text)
- Padding (the space that appears – usually – at the start of a new chapter)
Levels: Characters and paragraphs
Wherever you are formatting – for the Editing pane or for the compiled output – there are two levels and many aspects which can be tweaked for each.
Character formatting
You can control how individual characters appear.
- Font style, size and colour
- Special formatting: italic, bold, underline
In the paragraph below, the words ‘New home? Wow! Where?’ have been italicised (as have all the words in this sentence).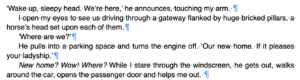
Paragraph formatting
Paragraphs are sequences of characters (any/all of which can be formatted using character formatting) which are terminated by the Return key. In the screen grab above, I’ve turned on Invisibles so you can see the pilcrow symbols (the backward Ps) which show the end of each paragraph.
For each paragraph, there are formatting choices to make.
- Justification (left-aligned, centred, right aligned, fully justified)
- Indentation (first line only, or blocked)
- Line spacing (between consecutive lines)
- Leading (space between one paragraph and the next)
It is possible to set up styles – and this is necessary if you want to achieve a professional finish. For example, in the screen grab above, the opening paragraph of the scene is full out and all other paragraphs are first-line-indented.
Customising formats for particular output options
One major benefit of Scrivener is that you can create a number of project formats so that the same manuscript can be compiled to produce output to serve a variety of needs.
- One project format could output the entire manuscript – ready to publish as an ebook.
- Another project format could send the same manuscript to PDF.
- A project format might only output the chapter titles and synopses – an outline of your book.
- Another project format might output your draft including your notes to yourself – so that you can read it on paper and handwrite more notes and revisions – away from your computer.
In this post, I’ve given an overview of what Scrivener’s formatting tools can provide, and, in the series of blogs that follow this one, all will be revealed …
Questions? Need a helping hand? Want a demo?
To discuss how to use Scrivener, or to ask any questions about Scrivener features, book a Simply Scrivener Special.
To help me to prepare, you could also complete this short questionnaire.
The ScrivenerVirgin blog is a journey of discovery:
a step-by-step exploration of how Scrivener can change how a writer writes.
To subscribe to this blog, click here.
Also … check out the Scrivener Tips
on my ScrivenerVirgin Facebook page.
Catherine
20 December 2022 at 12:04Thank you for this. I’m finding Scrivener a tough learning curve.
Anne Rainbow
20 December 2022 at 17:57Scrivener is a highly sophisticated tool. I started using it 7 years ago and still I learn new things about it on a regular basis. Just take things slowly. If you need more help, I’m happy to spend time with you in a Simply Scrivener Special. https://www.scrivenervirgin.com/simply-scrivener-specials/
Moira
16 July 2022 at 09:49How do I change the default format? Such that whenever I add a new text document, it’s already in MY format, not the default?
Anne Rainbow
16 July 2022 at 12:05There are three levels of formatting: all projects, this project, this document. This blog post explains: https://www.scrivenervirgin.com/2021/03/formatting-all-projects-this-project-this-document/ You can change the default to whatever you want for ALL your projects. OR, just for all new documents for THIS project. Good luck!
Michael Pantlin
1 March 2021 at 17:31This was a real help, thank you Anne.