
The Scrivener Mindset: Formatting via section layouts
Scrivener provides a palette of section layouts
Scrivener provides a palette of section layouts, so you have an array of formatting possibilities at your fingertips.
Once you have set up your sections types (or accepted Scrivener’s default settings) as per the previous post, then it’s time to assign a section layout to each section type.
From File / Compile, depending on the project format you chose when you first set up your project, and depending on the output route you are taking, you will see three panes. The middle one is where you’ll find the section layouts.
Section layouts for a Novel project format
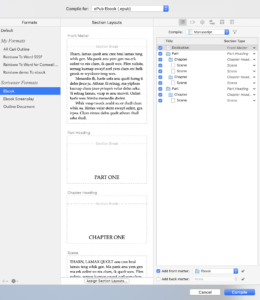
This is how the three panes look for a Novel format outputting to eBook.
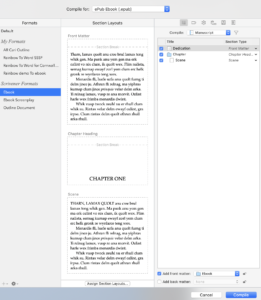
Change the output to PDF and Scrivener provides more Formats (left hand pane), defaults to Manuscript (Times) but still only offers three section layouts: Front Matter, Chapter Heading and Scene.
They look different (they are formatted differently), but only because the Scrivener defaults for the formatting take into account the output route. In any case, everything you see in that middle pane is a representation of the output, and you can change this to look the way you want, once we get to the Formatting pane. This is just the starting point …
Section layouts for a Novel with Parts project format
If, instead of the Novel project format, you’d started with the Novel with Parts project format, Scrivener’s longer list of default sections types allows for this, and so does the palette of section layouts. This is how the three panes look if you are outputting to ebook.
You can check for yourself how they look for a PDF output.
Section layouts for a General Non-Fiction project
Non-fiction projects have slightly different names for default section types, and a different look in the middle pane.

But like all the others, this is just a starting point. Let’s move on?
Assigning section layouts
Whichever project format, whichever output route, the next step is to select the ‘Assign Section Layouts’ option at the bottom on the middle pane.
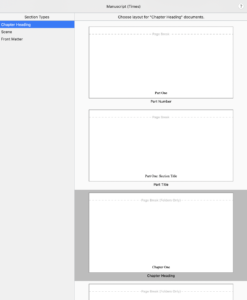
You then see another three-paned window. What follows is for the Novel project. Similar windows/panes exist for the other project formats.
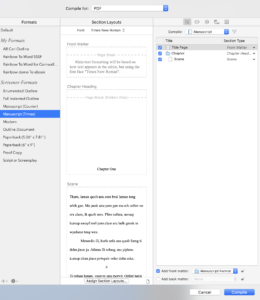
Assigning a section layout for the Chapter Heading section type
Notice that, in the left hand pane, the first section type (Chapter Heading) is selected by default. In the middle pane, the section layout called Chapter Heading is also selected by default.
Assigning this section layout will result in these default formatting settings:
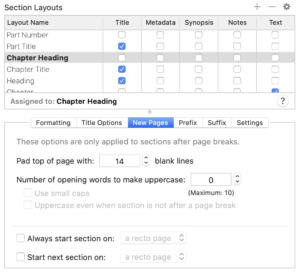
- Chapters starting on a new page – that dotted line guarantees the page break.

- Chapters to be numbered automatically: One, Two, Three, …. The placeholder <$t> creates this output

and what and how this appears is controlled on the Title Options tab.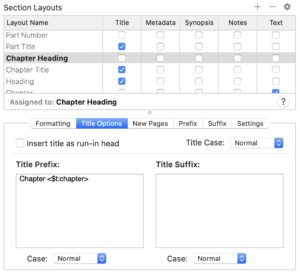
- A gap at the top of that first page – called padding. The default is set to 14 and can be seen on the New Pages tab.
If you’re happy with this format, clicking OK assigns that section layout to that section type. If you are not happy, click OK anyway and then, later, you can edit the formatting settings …
Clicking OK assigns that section layout to that section type and takes you back to an earlier window so you need to click on Assign section layouts again and then choose your next section type to which you will assign a section layout.
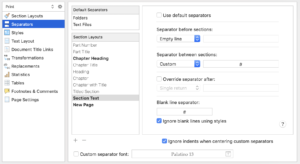
Assigning a section layout for the Scene section type
If you choose ‘Scene’, Scrivener offers as the default: Section Text.
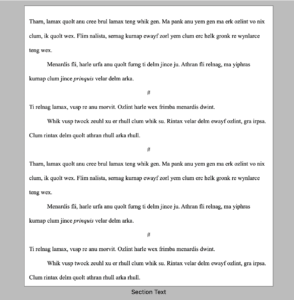
Assigning this section layout will result in these default formatting settings:
- First paragraph full out and subsequent paragraphs indented. This style of indentation is effected through two settings. First, in the Formatting tab, the Override box is ticked. Notice also that the paragraphs are indented. This is achieved by sliding the indentation marker across. (You can change this position if you think the indentation is too great – or too small.)
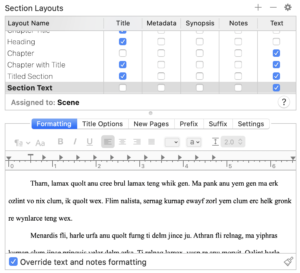 Second, the first paragraph is not indented; this is called flattened – or full out. Scrivener controls this through the Settings tab.
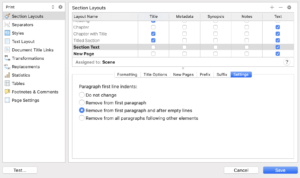
- Scenes separated by a single hashmark (#). If you look at the Separators tab, you’ll see the setting for this.
As with the Chapter Heading assignment, clicking Okay accepts Scrivener’s defaults (which provide a pretty good starting point) and you can always tweak the formatting once you’ve had a look at the output and decided what you want to change. Tweaking takes time, so if you are not unhappy with the defaults, it makes sense to run with those?
Assigning a section layout for the Front Matter section type
Scrivener provides a New Page section layout for the pages that appear at the front end of the book. Notice that because I started with the TNR (Times New Roman) project format, any font I used in the Editor will be appear in TNR instead.
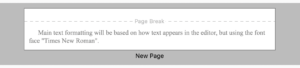
If you check the formatting settings, the font setting (only visible if you tick the Override box) show the choice 12pt TNR.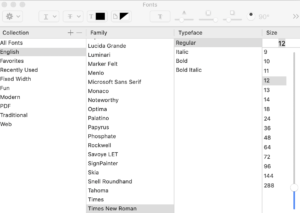
Section layouts as examples of formatting options
If you study the section layouts, you’ll find that the first few include a dotted line indicating that this section layout will start on a new page. There will be a page break before any heading or text that follows. In non-fiction, this is called a section break; the effect is the same.

Then, all the section layouts – as you have seen above – incorporate other features like automatic numbering, padding (space above the title), titles, separators, indentation, font choices …
Scrivener provides a smorgasbord of layouts for assignment and you might find that defaults serve you well. If they don’t, you can tweak them (more on that in a later post). You can also learn from them by studying the settings used to achieve the results shown in the middle pane – as we have done in this blog post.
Questions? Need a helping hand? Want a demo?
To discuss your section layout options, or to ask any questions about Scrivener features, book a Simply Scrivener Special.
To help me prepare, you could also complete this short questionnaire.
The ScrivenerVirgin blog is a journey of discovery:
a step-by-step exploration of how Scrivener can change how a writer writes.
To subscribe to this blog, click here.
Also … check out the Scrivener Tips
on my ScrivenerVirgin Facebook page.
No Comments