

The Scrivener mindset: The role of section types
 Section types glue the Binder to section layouts
I already published a blog post which explains the role of section types so why am I revisiting this topic?
In this post, I go further: to explain how section types provide the link between the Binder (which you have nailed as per this blog post!) and the section layouts (which are the topic of the next post in this series).
Section types provide the glue, if you like.
Levels in the Binder
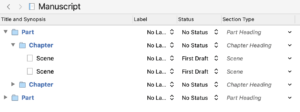
Within the Binder, the nailed Binder, there should be levels of indentation which illustrate your structure, as shown by the red lines in this example.
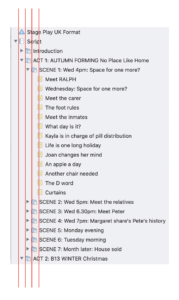 The first line indicates the entire manuscript (or script) – call it level 0. After that, I have three levels of indentation.
- At level 1: Introduction, ACT 1, ACT 2
- At level 2: Scene 1, Scene 2, etc
- At level 3: sub-scenes starting with ‘Meet RALPH’.
Along any one of these three red lines, you might have a single section type, provided all the items on that line have the same formatting requirements. In total, then, for my example, I might need just three section types.
It is possible though, for any of those vertical red lines to require more than one section type.
Why?
- At any given level, I might want some documents to start on a fresh page while others do not.
- At any given level, I might want the heading to be output for some of the folders/documents, but not for some others.
- At any given level, I might want auto numbering for some folders/document but not for all of them. This will be the case if I want my chapters numbered but have material before they start (eg a prologue) or after they finish (eg an epilogue) which I wouldn’t want to be included in the numbering.
- As I move through the levels (from left to right), the formatting of the document titles (whatever I typed in the Binder) will probably need to be graded, from larger to smaller fonts. So, for those section types with headings that are to be output, I’ll want to specify the point size. I might also want to change the font to make headings stand out better.
We shall see – in subsequent posts – how these effects might be achieved. But here, let’s learn more about section types and see what Scrivener offers as a default.
Where are the section types?
There are three places you can see the section types, and change them if you wish.
- In the Inspector
- In Outline view
- In the Binder via a right-click
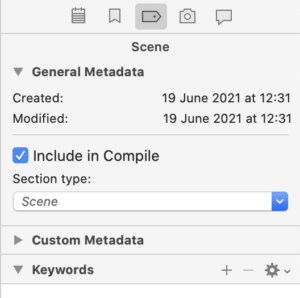
For every folder and document, within the Inspector, third icon across, you can see the metadata and the section type applied to that folder/document.
You can also see them in the Outliner, provided you choose to include Section Type as one of your columns.
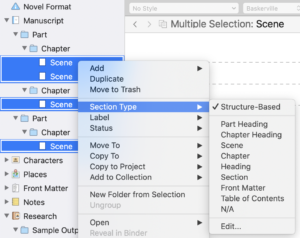
In both cases, clicking on the ∨ will reveal the options so you can manually change a section type for an individual document/folder.
To change several at once, use the right click option. In the Binder, select all the documents/folders for which you wish to amend the section type and right click.
I don’t recommend changing the section types! Often the default settings will provide you with the solution you need.
Default section types for the Scrivener templates
Scrivener provides default settings for just about everything and my advice is to run with them, see what they do and only customise when the default doesn’t quite suit you.
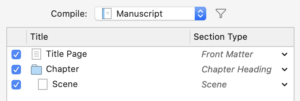
When you create a new project and choose the Novel format, this is what Scrivener provides as section types.
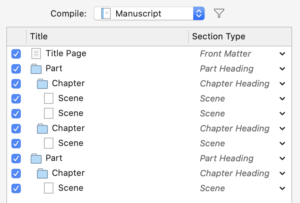
For the Novel with Parts, these are the default section types.
For the General Nonfiction, these are the default section types.
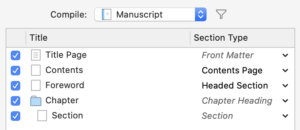
Notice that Scrivener uses the same terms for different project formats: Front Matter, Chapter Heading, Scene, and so on. These are standard terms used in publishing … and Scrivener sets the default projects with default section types that will probably fit your needs.
The purpose of section types
As explained in the earlier blogpost, section types provide a way of typifying components of your book; it’s a way of categorising elements of your work. The differentiating features are set within the section layouts, but you need to start with a list of these categories, these section types, before you can go through the process of setting up the format to suit your requirements.
In the Scrivener manual, on page 835, this note explains why we need section types.
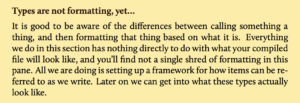
So, section types provide a framework for how items (folders/documents) can be referred to when we start to apply section layouts and fine tune the formatting. That’s all!
They give names to the various different types of material that require different formatting when you reach the compile stage.
They are ‘styles’ at folder/document level while Scrivener also provides styles that you can apply at paragraph and character level via the Editing pane, and tweak in Compile. More on that in a subsequent post.
Questions? Need a helping hand? Want a demo?
To discuss section types some more, or to ask any questions about Scrivener features, book a Simply Scrivener Special.
To help me prepare, you could also complete this short questionnaire.
The ScrivenerVirgin blog is a journey of discovery:
a step-by-step exploration of how Scrivener can change how a writer writes.
To subscribe to this blog, click here.
Also … check out the Scrivener Tips
on my ScrivenerVirgin Facebook page.
Pingback:Exploring Scrivener Compile - Lancy McCall
26 April 2022 at 21:44