

Compiling with Scrivener 3: An Introduction
Compiling is a straightforward process!
 Compiling is the final step in the self-publishing sequence. For many, it poses the greatest challenge – there are so many options, and the route to producing precisely what you want seems like a labyrinth at first sight.
However, Scrivener offers so much in the way of default settings, you could produce something that’s OKAY, without having to understand every nook and cranny of the options available to you.
How to Compile using Scrivener
In this series of posts, I explain how to come to grips with this powerful tool.
I’ll break the process down, one step at a time, so that you can achieve something straightaway, and then, with confidence and a following wind, shoot for the moon.
We will look at lots of topics and bring them together.
- Section types
- Pagination
- Formatting
- Chapter headings
- Running heads and page numbering
The list is almost endless! First though …
Decisions to be made before you click on File / Compile
You wouldn’t dream of going shopping without first deciding what you need to buy. This determines which shop(s) you need to visit: the fishmonger, the butcher, the grocer, the fruiterer. Of course, you could just go to the supermarket.
Scrivener’s Compile feature is like a supermarket – it provides everything you need for the final stage. But, before you click on File / Compile, ask yourself these four basic questions. Then, you’ll know which of the aisles you’ll need to visit.
Question 1: What will be compiled?
 Before you click on File /Compile, it will help if you have selected from the Binder what you want to compile. I call this ‘Selection’; getting your head in gear for what is ahead.
You can change your mind within Compile, but let’s start as we mean to go on!
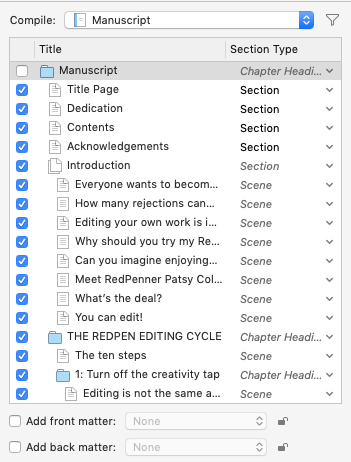
- Click on the Manuscript folder if you want the whole manuscript to be output.
- If you just want one chapter or a few chapters, highlight them.
If you are aiming for some creative compiling, eg to output synopses for the whole manuscript, click on the Manuscript folder.
You can change precisely what gets output once you are in Compile. Within the opening Compile pane, on the right-hand side, there is a list of what’s included … more on that in a later post.
Meanwhile, if what’s coming out is not as much as you expected, or different from what you expected, a first check is to make sure you have selected the material correctly.
Question 2: What output route will you take?
We see in the next post (and those that follow) how to direct your manuscript towards one of the many output options.
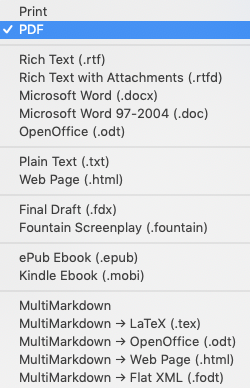
Scrivener provides all these options and ‘all’ you have to do is identify the one that suits you.
I say ‘the one’ because if you plan to output (say) in three different ways, you’d be best advised to set up three different compile settings. I’ll show you how.
After that, all other details are taken care of by the software.
Question 3: How will the material look after compiling?
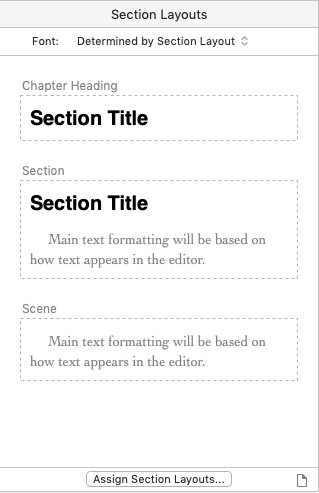
Scrivener uses terms like ‘chapter’, ‘section’, and ‘scene as ‘section types’. Think of these as a way of categorising elements of your work. Think of them as typifying components of your book.
Each component (section type) is given special treatment (its assigned layout) which determines how it will look when output:
- Does it start on a new page?
- Does it need the title to appear?
- How do you want the text to look? (As is, or determined through the Compile process?)
Assigning section types to documents
Categorising each folder and document in the manuscript by section type is an essential first step.
The Scrivener manual provides an example to show both how your manuscript might be structured in your Binder, and how each folder/document needs a section type to suit its position within the hierarchy. (If you attend a Simply Scrivener Special webinar, I’ll talk you through this image.)
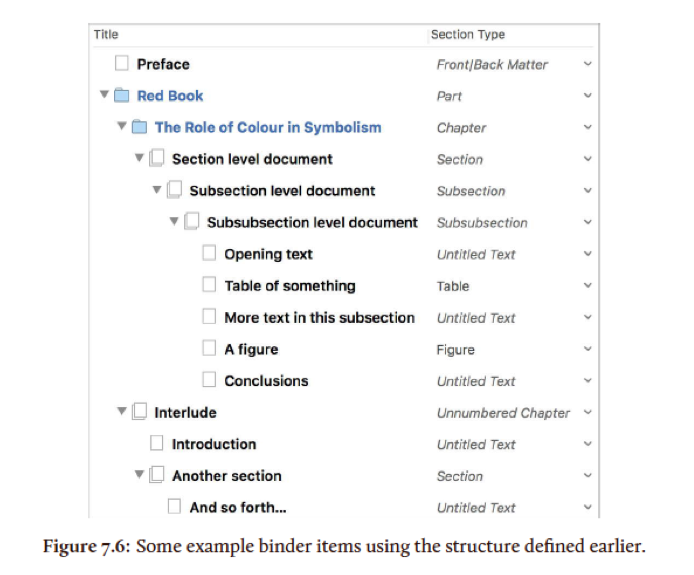
For each element of your book, the section type is shown in the Inspector.
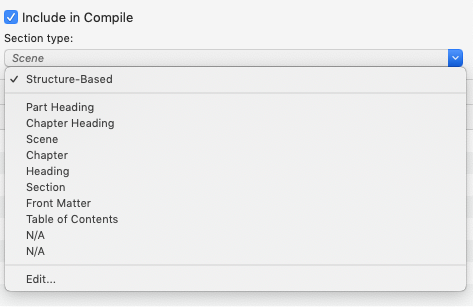
And, thanks to Scrivener, when you chose your template (a long time ago), your folders/chapters were by default given the section type of Chapter, and your scenes/documents were given the section type Scene. There are other defaults, many of which you won’t need to worry about.
Scrivener expects you to have identified these section types (by default or design) and to each of these, you can (within the Compile pane) assign one of many section layouts, and tweak them so that the presentation is exactly how you want it to be.
Within the list of defaults, there is a range of options:
- Some offer a page break before the section title; some don’t.
- Other include the section title; some don’t.
It will help if you have thought about this beforehand and have some idea of what you’d prefer.
Question 4: What automation do you want?
Scrivener provides options for automation.
- Numbered pages
- Numbered chapters
- Numbered lists
The defaults provided by Scrivener will probably suit you. But it’s also easy to tweak the compile settings to achieve whatever you want.
That topic can wait awhile! We have a lot else to do just to get a manuscript output …
Questions about Scrivener? Need a helping hand? Want a demo?
To watch me go through the compiling process, or to ask any questions, book a Simply Scrivener Special.
To help me to prepare, you could also complete this short questionnaire.
The Scrivener Virgin blog is a journey of discovery:
a step-by-step exploration of how Scrivener can change how a writer writes.
To subscribe to this blog, click here.
Also … check out the Scrivener Tips
on my ScrivenerVirgin Facebook page.
ID 69381737 © Planetfelicity | Dreamstime.com
Pingback:Scrivener Advent Calendar: C is for ... - ScrivenerVirgin
3 December 2024 at 11:02Dan S
2 December 2021 at 15:00When I compile, I am still seeing the Greater Than and Less Than symbols before and after my title and author name on the cover sheet. Any way around that?
Anne Rainbow
3 December 2021 at 10:57Hi Dan
It sounds like Scrivener is not recognising these as placeholders (and replacing them with whatever you have set up to replace them). If you can email me a screen grab of what’s appearing in the compiled output, I’ll have a look at that and get back to you with more detailed guidance. Email: an**********@********et.com
George Garrigues
13 April 2021 at 19:24I have Scriv 3.2.2. Your instructions say to highlight the chapter if I just want only it to be compiled. I did so, for .pdf, but Scriv insists on outputting the whole darned book! What am I doing wrong?
Anne Rainbow
13 April 2021 at 19:33Hi George. When you get to compile, there is an option in the top right where you confirm what you want to compile. There is also a window which lists all the documents/folders that Scrivener intends to compile, based on your settings. Refer to the image to the right of section 1 in the blog post. Make sure yours doesn’t say Manuscript. Instead choose ‘Selected text’ if you selected one chapter (its folder and all the subdocs). Failing that, tick what you want in the pane below that. Good luck!