

The Scrivener Mindset: Formatting thru Section Layouts
 Specifying how your material will be formatted on output – the formatting controls – is achieved via Compile and, in the previous post, we examined all the panes apart from the first: Section Layouts. Brace yourselves!
Deciding your requirements
Before you select File / Compile, you need to have made a few decisions.
- What output route do I want?
- What do I want to output?
- What section layouts will I assign to my section types?
- For each section layout, how do I want my output to look?
Only then can you set up the formatting to achieve the desired result for each output route. Let’s start with …
What will you be outputting?
The default is the entire manuscript – regardless of what you’ve selected in the Binder.
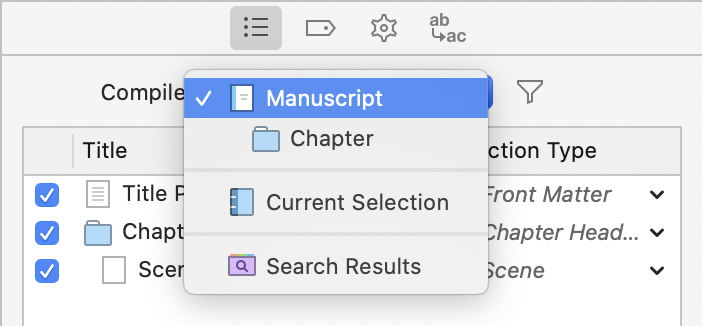
But you can change this if you have made a selection in the Binder already. For example, here, I selected just one scene to output.
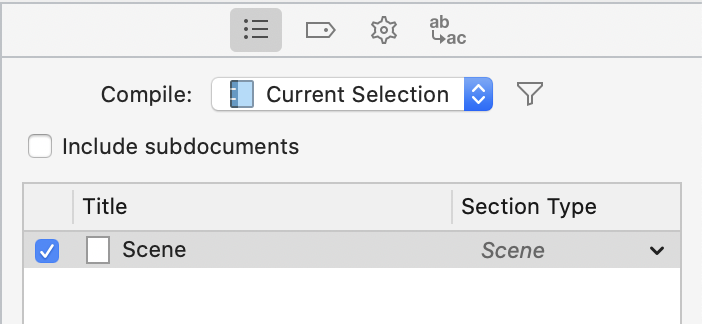
If what you selected has subdocuments, and you want them to be included, tick the box.
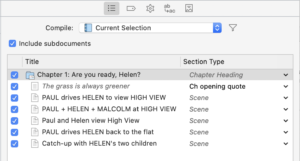
NB, you can also tick/untick individual documents/folders. And holding the Option key allows you to tick all or untick all.
Which elements will be output?
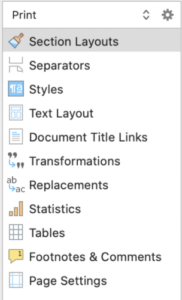
Scrivener also wants to know – for each section layout – which elements of those documents/folders you will (or will not) output:
![]()
- Title: the text you typed into the Binder area for the folder/document
- Metadata: the date created, date modified, status, label and any custom metadata fields
- Synopsis: the text you typed onto the Corkboard card and/or in the Inspector’s Notes pane
- Notes: the text you typed into the Notes section in the Inspector’s Notes pane
- Text: the text you typed into the Editing pane!
Let’s work through the section layouts one at a time.
Section Layouts: Tick boxes in the top pane
Focusing now on the Chapter Heading, for the default setting, none of the five tick boxes – Title, Metadata, Synopsis, Notes, Text – are ticked.
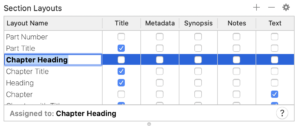
The fact that the Title box is NOT ticked means whatever I typed in the Binder for that section type will NOT appear in the output. Instead, this is controlled using the Title tab in the bottom pane; we’ll get to that in a minute.
While we are here though, note that you can change the Layout Name if you wish. Double click on it to highlight it in blue and then type whatever makes sense to you.
Formatting controls: Tabs in the bottom pane
There are six tabs in the bottom pane.
![]() If what you see in the Formatting pane looks okay to you – whether it’s just Scrivener’s defaults, or the result of your own tweaking, consider clicking on the Test … button. Have a look at the output and, if you are happy, then click on Save.
If what you see in the Formatting pane looks okay to you – whether it’s just Scrivener’s defaults, or the result of your own tweaking, consider clicking on the Test … button. Have a look at the output and, if you are happy, then click on Save.
![]()
Scrivener will then take you out of editing the format and you’ll have the option to Compile.

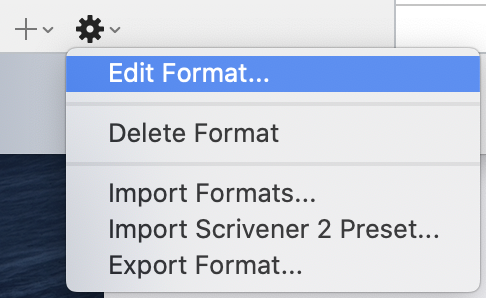
If you are still tweaking, click on the cog wheel to return to the editing pane.
Tweaking will involve visiting one or more of the other tabs – to control the content – and returning each time to the Formatting tab to check how it’s looking and set the format of that content.
So we will leave that first tab till last!
Formatting controls: Title Options tab
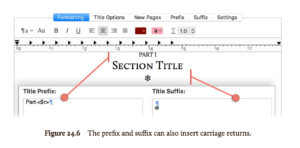
The second tab – Title Options – is your opportunity to incorporate any auto-numbering using placeholders, prefixes and suffixes.
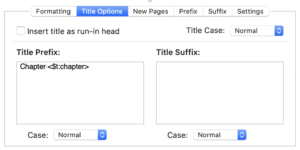
You can tick the box to have running/run-in heads: text that appears at the very top of each page. What you put here will apply only to this section layout; anything you specify in the Page Settings pane applies to the entire manuscript, ie all section layouts, as explained in the previous blog post. This option on the Title Options tab therefore gives you a finer level of control, should you want it.
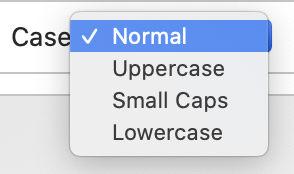
You can also control what case to use.
In the manual, Scrivener provides an example of what you might be trying to achieve with prefixes and suffixes, and how to do it.
Formatting controls: New Pages tab
The third tab – New Pages – is where you can control how the page that starts a new section/chapter looks.
The padding is the vertical white space above your heading. With paper-based output routes, this can create a special feel to the start of each chapter. If you are outputting to an electronic form, where the reader controls the font size and hence the number of lines per page, I recommend you opt for no padding.
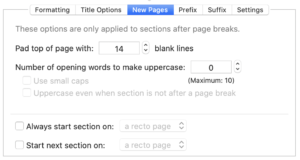
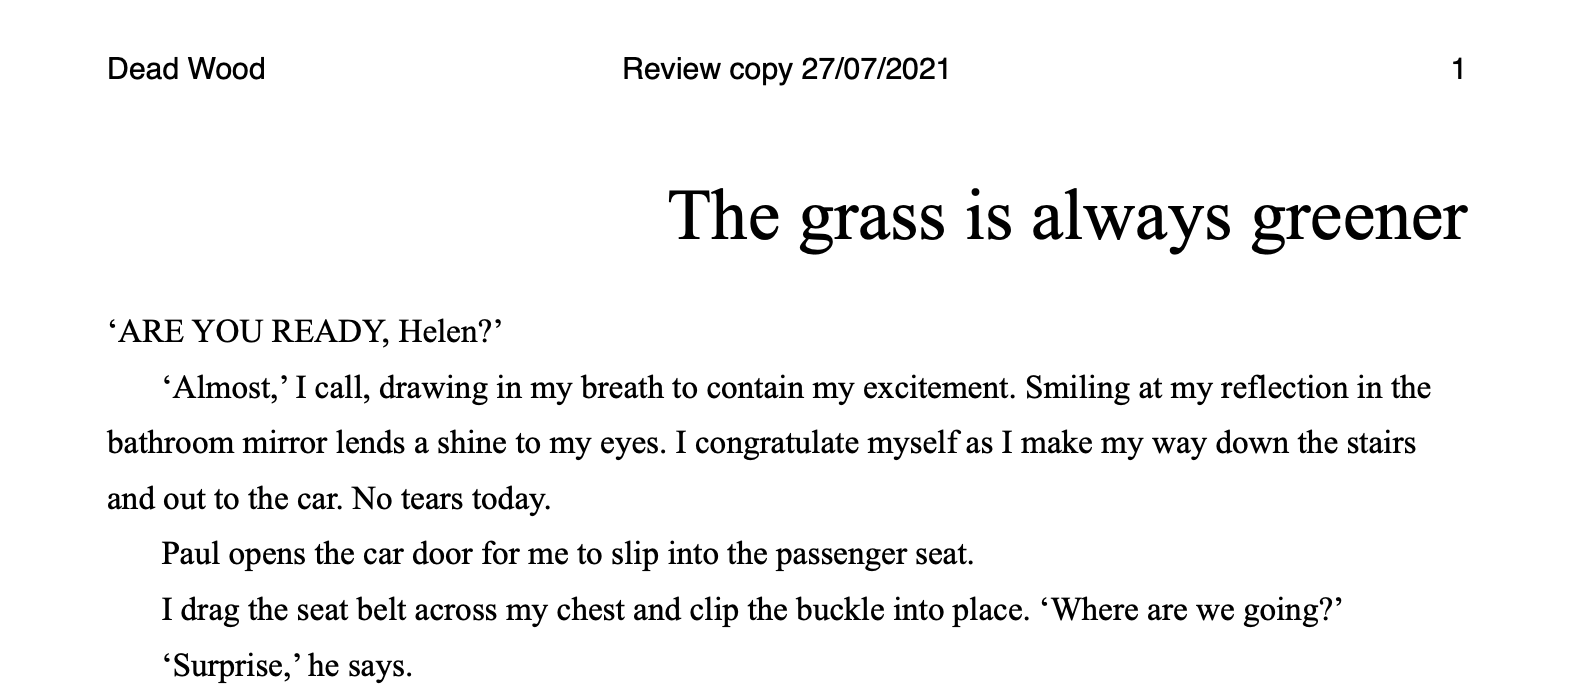
There’s also an option for opening words to be displayed in upper case. You choose how many. This example shows the result with a setting of 3.
Personally, I don’t think this works – or serves any purpose – for chapters that start with dialogue. So, since this setting is for a section layout, and hence the section type assigned to it, you need to check it looks sensible for all instances.
Note also that you can force the new page to start on a recto page (the right hand page) rather than a verso (the other side); and that there are two settings – always start section on, and start next section on. Choosing recto can mean there’s a blank verso before it; it will cost you a page every time this happens. So, check how many pages the manuscript fills and ask yourself how much cheaper it might be not to have the blank versos. For a book with 32 chapters, it might be as many as 31. NB the first chapter really should start on a recto!
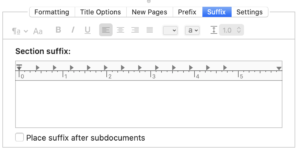
Formatting controls: Prefix / Suffix tabs
The next two tabs provide an opportunity to include whatever you might like to see ahead of, or after, the text of the section.
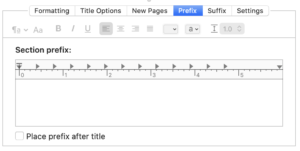
Notice that although a prefix usually precedes, there is a box to tick if you want it to appear after the title.
The Suffix also has an additional option: for the suffix to appear after any subdocuments.
Formatting controls: Settings tab
The final tab is called Settings and the options are self-explanatory. Remember that these relate to a particular section layout whereas you may have set the indents for your whole manuscript using the Styles panel as explained in the previous post.

Once again, Scrivener offers you a finer degree of control – at section type level rather than globally.
Formatting controls: Formatting tab
Back to that first tab, labelled ‘Formatting’. It shows how the output will look, taking into account your settings of all the other tabs. This is the default.
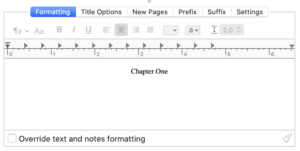
The word ‘Chapter’ is followed by the worded numbering ‘One’ and this is set up via the Title Options tab (see above).
The Chapter title is centred by default, but you have the option to tweak this, using the toolbar …

and a ruler.
![]()
The role of each icon on the formatting bar is explained here. And how to use the rule is explained here. So, it’s up to you how you format each section layout.
- Work through the section layouts one at a time.
- For each section layout, look at each of the six panes and choose your settings.
- Return to the Formatting tab and fine tune for that section layout.
Remember to use the Test … option, and to Save each time you make a change that works for you. And take breaks between tweaks …
Formatting controls for more than one output route?
I mentioned that you need to have decided which output route to take. What we’ve done above will provide the formatting for one output route.
If you want more than one – and this is another strength of Scrivener – it’s perfectly possible and very easily achievable. I explain how in the next blogpost.
Questions? Need a helping hand? Want a demo?
To watch me go through the process of formatting within Compile or to ask any questions, book a Simply Scrivener Special.
To help me prepare, you could also complete this short questionnaire.
The ScrivenerVirgin blog is a journey of discovery:
a step-by-step exploration of how Scrivener can change how a writer writes.
To subscribe to this blog, click here.
Also … check out the Scrivener Tips
on my ScrivenerVirgin Facebook page.
Pingback:Exploring Scrivener Compile - Lancy McCall
26 April 2022 at 21:45