
Second-fix self-editing with Scrivener: Balance and Structure
Scrivener has your back
How you structure your book depends on what you’re writing. Whatever you’re writing, and however you prefer to write, Scrivener will support your strategy.
- A bottom-up approach might suit you if you’re writing a novel. I tend to establish what scenes I need, based on my character sketches. Since I usually only start a new novel in September for that year’s NaNoWriMo, I aim for 100 scenes each of 500 words. That way, I’m in with a chance of writing 50,000 words in the month of November. I explain how/why I use Scrivener to write my novels here. And, in today’s post, I explain which features of Scrivener serve me well at the second-fix editing stage.
- A top-down approach as described here might suit non-fiction writers. You tend to start knowing the scope of your book and ‘just’ need to fill in the text under pre-determined headings.
- A hybrid approach might suit memoir writers. I explain in this post how you might create scenes in date order initially (bottom-up approach) but then start to establish the structure of your memoir (top-down approach) and end up moving scenes out of your date-order folder into chapters which relate to particular themes.
Whatever approach you adopt, once the manuscript is in first draft form, and you’ve completed the first-fix editing, the next stage, the second-fix, includes looking at the structure you’ve achieved and the balance within the various sections of the book.
Step 7: Check structure and balance
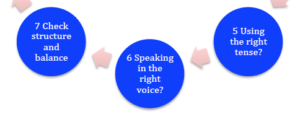
So, within my RedPen editing cycle, I’m now at step 7. I am still happy with my choice of tense (present) and voice (first person) – phew! – but aware that my initial creation of chapters might need attention.
While I’ve been reading through my hard copy, I’ve checked where (and how) each chapter ends and where (and how) the next one starts.
Since my chapters comprise a number of scenes, if I want to make a change, it might be as simple as moving one scene to the next or previous chapter. Moving documents within the Binder is easy, but it can go wrong. I explain one technique which can help to avoid such problems later in this post.
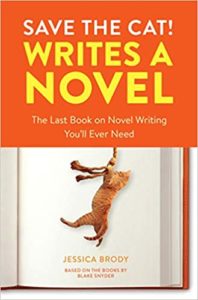
I’ve also been aware of the structure of my novel inasmuch as, although I used to adopt the three-act structure, for Dead Wood, I decided to try the 15-beat structure of Save the Cat.
Now that I have the entire novel, I can examine the length of each beat and see how that compares with the percentages suggested by Jessica Brody. 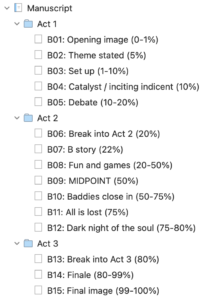
Later in this post, I explain how, using the Outliner, I can identify the word count for various sections of my novel.
Then, with regard to balance, I’m also aware that I’ll not achieve balance of fiction modes until the next draft. This is mostly because I write so little description in the original draft. I’m always dialogue heavy, and that imbalance is something I can only address once I’m on second-fix editing. As mentioned in the previous post, I’m using styles to identify two particular fiction modes.
- For myself, the compiled output is colour coded: black, red and blue.
- For my beta readers, I want it all to be black.
I explain below how to achieve these two different outputs.
Three Scrivener tools for this stage
I share here specific examples of how Scrivener serves me at this second-fix stage of self-editing.
Moving documents within the Binder
Documents sit within your Binder and how you arrange them is crucial. In this post, I explain how to ‘nail your Binder’.
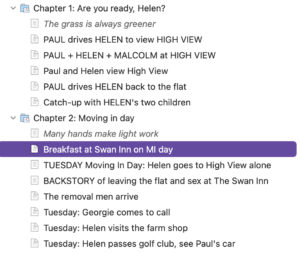
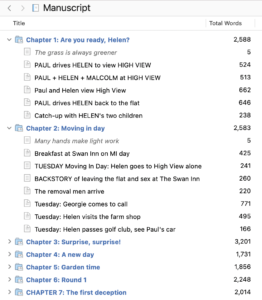
You may decide to group your scenes differently within your chapters. To move a scene (document) from one chapter (folder) to another, you can drag it into place.
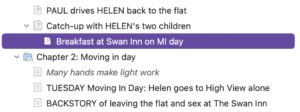
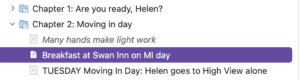
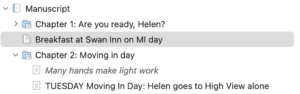
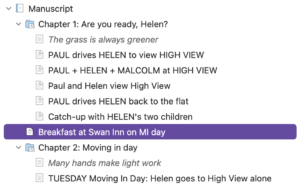
For example, if I decide to move ‘Breakfast at Swan Inn on MI day’ from the start of Chapter 2 to the end of Chapter 1, I can highlight the scene I want to move and drag it upwards.
As I drag, Scrivener reveals the current position either with a line with a circle at the left-hand end, or by highlighting a folder or document over which I am positioned.
Moving a scene should be straightforward but two things can go wrong.
- The moved scene might land within another document or folder.
- The moved scene might not land at the required level.
As I reach the scene ‘Catch up with HELEN’s two children’, that document is highlighted and, if I let go of the drag while it is highlighted, my scene lands within that document, rather than below it which is where I wanted it to be.
To avoid this happening, I hold the Option key while dragging. This prevents the highlighting of anything on my way past and makes placement of the scene easier.
Having prevented that possibility, the next thing to notice is the circle at the left-hand end of the line. This indicates the level at which the dragged scene will land. I want mine to be at the same level as the other scenes in Chapter 1.
If, when I start this process, the Chapter 1 folder is not showing all the scenes within it …
… when I drag, Scrivener is not to know the level required, and I might drop it at folder level rather than scene level.
Expanding the Chapter 1 folder shows more clearly the problem I’ve caused.
This is easily fixed! Expand the folder before you drag … or, reposition the document after you’ve moved it to the wrong level.
The Move icon offers the option to shift a document (or folder) left to a higher level or right to a lower level.
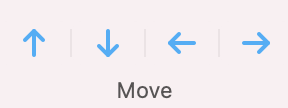
(Notice it also offers up/down arrows; but I prefer to drag.) If you don’t already have the Move icon in your Toolbar, you can customise your toolbar to include it. I explain how here. (I publish a Scrivener tip every day – topics that don’t warrant a blog post …)
Identifying total word counts of beats using the Outliner
For my Dead Wood novel, I’m experimenting with using the Save the Cat 15-beat structure. At this stage, my novel is 105,040 words long. Too long! But, for simplicity sake, I’m examining the structure assuming a word count of 100K.
I’ve taken my Save The Cat Scrivener project and, in Outline view, assigned word count targets for each beat. If you’ve not played with Outline view, check out this blogpost. I don’t use it for outlining (I prefer the Corkboard), but it’s great for keeping track of progress.
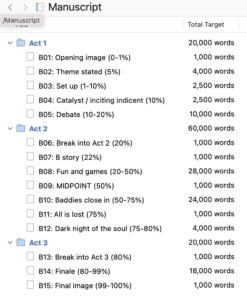
Then, in the Dead Wood manuscript, I have the current word count by scene and chapter.
At this stage, aware that I will do a lot of pruning, I’m not worrying too much about exact word counts, but I have, as a first ‘stab’, grouped chapters to create the three acts, to gauge how the structure looks right now.
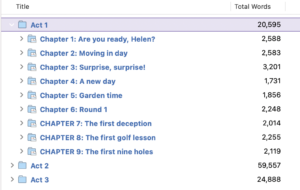
I did this by selecting enough chapters to reach the recommended word count for each act, and then creating a new folder from that selection. At this stage, it’s just in three acts. Once I’ve completed the read/edit, and revised the word count, I can check how close my structure is to the one recommended by Jessica Brody.
Creating project formats: one for the author; another for beta readers
I’ve a few close friends (writers!) who have offered to read this early draft of Dead Wood and to provide feedback. They are not beta readers as such because my novel is not at that stage yet. But their input will be valuable.
My manuscript is colour coded for fiction modes and it’s useful for me to see that coloration on my hardcopy. I don’t want coloured text on the versions I will prepare for my readers. Therefore, I need two different project formats.
- With colour
- Without colour
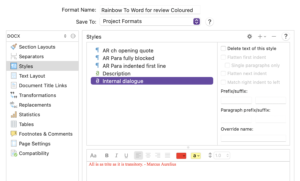
I already have a project format that shows my fiction modes in colour. It used to be called ‘Rainbow to Word for review’ but I renamed it.
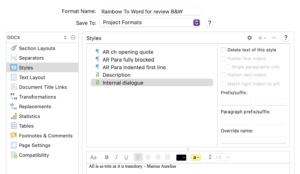
Then I duplicated that project format, changed the styles I’ve used for fiction modes to black, and renamed it.
Job done! A step-by-step guide on how to set up project formats using the Scrivener default templates is explained in this blogpost. The same approach applies to amending your own project formats. Enjoy!
Also, some of my readers have asked for an electronic copy; others prefer a hardcopy. I’ll compile to Word, email that electronically to those happy to work onscreen, and print from the Word file for those that need a hard copy.
Questions about Scrivener?
Need a helping hand with Scrivener tools? Want a demo? Book your own Simply Scrivener Special session with me, at a time to suit you.
Need a helping hand with pruning or other editing tasks? Check out my online self-editing courses. Join RedPen Editing and enjoy a 5-day editing taster course for free.
The ScrivenerVirgin blog is a journey of discovery:
a step-by-step exploration of how Scrivener can change how a writer writes.
To subscribe to this blog, click here.
Also … check out the Scrivener Tips
on my ScrivenerVirgin Facebook page.
No Comments