
Second-fix self-editing with Scrivener: Dialogue
 With dialogue, less is always more
Steps 5-7 of my RedPen editing cycle required me to check on two fundamental decisions I’ve taken while writing Dead Wood.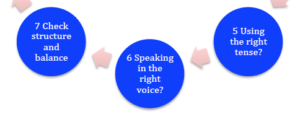
- My choice of tense (present)
- My choice of voice (first person)
And then to see how well I’ve structured the book.
Having identified issues with the structure and balance, I have a number of options.
- I can add new material, filling any plot holes, providing more detail about characters, improving any foreshadowing …
- I can delete material if sections are too long.
The net result has to be fewer words than I have at present. I already pruned once as explained in this blog post. I managed to lose 1300 words but that still leaves me with 104K – too long!
One of the easiest targets for this next prune is the dialogue. I’d need to examine the dialogue anyway, to make sure my characters are distinguishable through their sentence length, vocabulary and tone. While I’m doing that, I’ll be looking for opportunities to trim.
Using Scrivener for second-fix editing of dialogue
Three Scrivener tools will make this exercise easier for me.
- Collections – to identify scenes for an individual character, topic, location, etc
- Linguistic focus – to identify dialogue as opposed to non-dialogue within those scenes
- Split screens – so I can reference other material while working on any scene within my collection
Collections
A collection is a way of viewing a subset of the Binder documents; this ‘view’ can be created using a Project search. (Save Search As Collection… is the last item on the menu.) Indeed, having done a Project search, it makes sense to save the found documents as a collection. You can then set aside time to work on this collection, without reference to the rest of the scenes in your manuscript.
You can create many collections for a single project. When you select Save Search As Collection, Scrivener offers you the search key as the name for the collection and it makes sense to accept this suggestion. Scrivener also assigns a different colour to each collection, so you can easily identify which particular subset of documents you are working on: the whole manuscript (ie the Binder) or one of the subsets (ie a collection).
During second-fix self-editing, I use collections mostly to check for continuity. At this stage, focusing on dialogue, it’s useful to create collections that relate to individual characters, or topics of conversation, or locations where discussions take place.
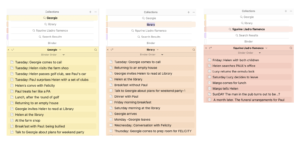
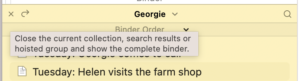
- The yellow collection has all the scenes in which Georgie appears or gets a mention. I use this collection (together with Linguistic Focus explained below) to check what Georgie says – and note what she doesn’t say, and questions she dodges.
- The next collection includes all the scenes which mention the library. Not all of these will happen at the library but they will include relevant discussions about Helen’s involvement with the library.
- The final collection is for scenes involving discussion about the figurine Charles and Margo sold to Paul and which Helen gifts back to Margo after Paul’s death.
Where are the collections?
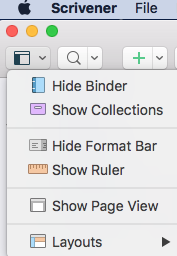
The list of collections appear above the Manuscript, in the Binder, but you have to ‘Show’ them, to see them
In Scrivener 2, there are two separate icons on the far left of the toolbar. Each toggles between Show and Hide.
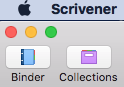
In Scrivener 3, these two separate icons are combined into one drop-down option. You can still Show/Hide as you wish, but there are other features incorporates into this dropdown.
Having ‘shown’ the collections, clicking on one of them results in all the documents for that collection appearing in the Binder (as seen above). To return to the binder, click on the X on the left of the header for the collection.
For more information on Searching and Collections, read this blog post.
Linguistic focus: identifying dialogue
Having identified scenes of interest using Collections, I can focus on the dialogue. The Linguistic Focus tool is applied, one chunk of text at a time. So, you can select a single document (for me, that’s a scene) or as much or as little of your manuscript as you wish.
Click anywhere within your chosen text within the Editing pane, and select Edit / Writing Tools / Linguistic Focus. This opens a floating pane – which means you can move it – with options to filter specific types of words from your chosen text, and to highlight them for you.
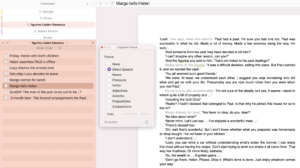
If you click on the radio button for Direct Speech, the dialogue stands out – and you can control the amount of Fade on the slider on the floating pane. This scene is dialogue heavy; I need maybe to add more description and/or prune the dialogue.
NB Scrivener relies on your placement of opening and closing quote marks to identify dialogue, so if you’ve missed typing them, you won’t see that stretch of dialogue!
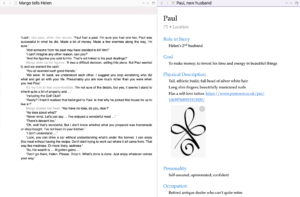
Split screens
Having set up a collection, as I work my way through the various scenes within that collection, I might need to refer to additional information. So, I use split screens. On the left is the scene I’m working on; on the right, I have the character sketch for Paul. There are lots of other combinations, with text on one side and maybe the Corkboard or Outliner on the other.
(If you’ve never used split screens before, read this post for how to split/un-split/re-split differently.)
And, if you need to reference even more material, there’s the option to open a Quick Reference pane or, for even more material to hand, use a copyholder.
Note that when a document in the collection is edited, the same changes are made to the one you might view from the Binder. Magic! (Not really magic. The Collection is simply an alternative view of the documents.)
Questions about Scrivener?
Need a helping hand with Scrivener tools? Want a demo? Book your own Simply Scrivener Special session with me, at a time to suit you.
Need a helping hand with pruning or other editing tasks? Check out my online self-editing courses. Join RedPen Editing and enjoy a 5-day editing taster course for free.
And, if you need a steer on how to write and edit dialogue, check out my RedPen Editing course.
The ScrivenerVirgin blog is a journey of discovery:
a step-by-step exploration of how Scrivener can change how a writer writes.
To subscribe to this blog, click here.
Also … check out the Scrivener Tips
on my ScrivenerVirgin Facebook page.
No Comments