

Second-fix self-editing with Scrivener: People, Places and Props

People, places and props deserve equal status
In a previous blog post, I explained why I give places and props the same (if not more) attention than the people in my stories. I also introduced several tools that I use while writing.
- Split screens
- The Search function
- Collections
- Metadata
Now that I’ve reached the second-fix stage of editing, metadata becomes even more valuable in allowing me to focus only on those scenes which relate to particular people, places, props and themes in my novel.
Using Scrivener for second-fix editing of people, places and props
I’m still using split panes and collections, of course, but three additional tools come into their own when I focus on my people, places and props.
- Structuring within the Binder
- Reference panes
- Copyholders
Structuring within the Binder
Within my manuscript, I’ve already ‘nailed the Binder‘ so the structure of my book is how I want it.
But there’s also mileage in using structure elsewhere in the Binder.
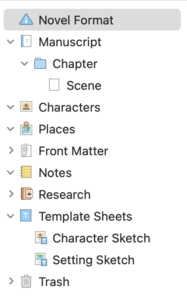
Prop Sketches
First, notice that although the novel template provides for Characters and Places, there’s no folder for props.
Nor is there a Prop Sketch template within the Template Sheets folder.
However, you can duplicate one of the others and, in the same way as I customised the default character sketch, you can customise the Prop Sketch to suit your own requirements.
Open the default, customise it, and then use ‘File/Save as Template …’.

While prop sketches are great for my novel, they are even more important for the play I’m writing: Waving not Drowning. As I’m learning through my CityLit course, drama requires more props … and they play a more important role. Here’s my current list.
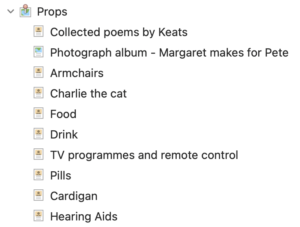
NB I didn’t create the Prop default all over again. I just dragged it from my novel project file into my play project file.
Character Sketches
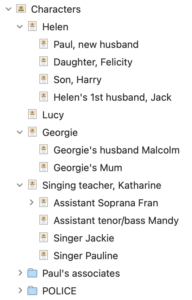
While the prop list, and the location list for that matter, tends to be a simple list, the list of characters can quickly become unmanageable.
Should you list them alphabetically? That wouldn’t work for me because I often forget what names I chose!
A better solution for me is to group them according to family ties, work associations, etc. That way, I can create a hierarchy and there’s clarity as to who is linked to whom.
If/when the list grows even longer I group them into folders.
Here I have one for Paul’s associates, and I’ve also lumped the police into one folder.

To create the hierarchy, I simply drag the sketch documents into place. If they don’t land quite where I want them eg at the correct level, I use the Move icons for final adjustments.

If you don’t have this option in your toolbar like I do, right click on the toolbar and opt for Customise Toolbar.

You can then drag the Move icon to the toolbar.
Reference panes
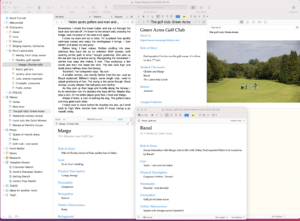
I use split panes a lot, with the text of a scene on the left and some other material on the right: a character sketch, a location sketch or a prop sketch.
Since a scene usually has more than one character, is set in a location and might involve several props, only have two panes can sometimes become limiting. Scrivener to the rescue!
My first option is to use a reference pane.

The net result is a separate window which I can place anywhere on my screen.
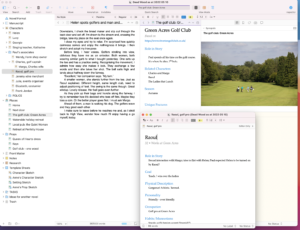
For the purposes of this blog, I’ve placed mine overlapping, rather than within the other window. This is because if I click on the main window, the reference pane slips behind it. Having an overlap means I can easily pull it to the front again. Normally, I have no overlap and place them side by side, so I can click from one to the other easily, and make changes wherever I need to.
Using a reference pane means I can now see three aspects at a time. In the example above, it’s the text document (left pane), location (right pane) and character (reference pane). If that’s not enough (!) I have to resort to using copyholders. Read on!
(BTW: to close the reference pane, click on the red dot in the top left of the window.)
Copyholders
A copyholder is a subsidiary editor. To pull in a copyholder, select it in the Binder, hold down the Option key and drag the item into the header for that Editor. I’ve done this for Margo’s character sketch.
The copyholder behaves like any Editing pane, except you only have the option to view that document; you can’t change the mode to Scrivenings (to view subdocuments too) or Corkboard or Outliner.
Dragging is the easiest way, but there’s also a menu route to set up a copyholder.

- Select the Editing pane where you want the copyholder to land. (The colour of the header changes to show it’s the active pane.)
- Select the document in the Binder. (It will appear in the Editor! But click on the < in the header to go back to whatever was there already.)
- Select Navigate / Open / Copyholder.
Yes, use the drag option! Either way, the net result is: I now have five panes on view.
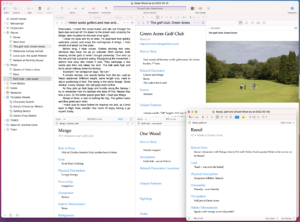
Frankly, it’s rare I’d need to see so much all at once, but the option’s there. To close the copyholder, click on the X in the header pane for that copyholder.
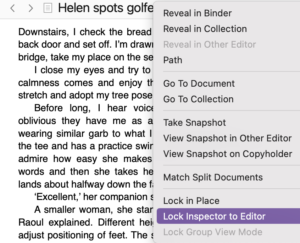
PS Although in the image above, the Inspector is linked to the right hand editing pane, when I’m editing, I ‘lock the Inspector’ to the left hand pane (I always have my text on the left!) so I can see the metadata for that scenes as well.
Questions about Scrivener?
Need a helping hand with Scrivener tools? Want a demo? Book your own Simply Scrivener Special session with me, at a time to suit you.
Need a helping hand with pruning or other editing tasks? Check out my online self-editing courses. Join RedPen Editing and enjoy a 5-day editing taster course for free.
And, if you need a steer on how to work on your people places and props, check out my RedPen Editing course.

The ScrivenerVirgin blog is a journey of discovery:
a step-by-step exploration of how Scrivener can change how a writer writes.
To subscribe to this blog, click here.
Also … check out the Scrivener Tips
on my ScrivenerVirgin Facebook page.
Pingback:Scrivener Advent Calendar: Q is for ... - ScrivenerVirgin
17 December 2024 at 11:00