

DIY Book Formatting with Scrivener: Final tweaks
This is the final post in this series, and now is the time to make any final tweaks to the decisions you’ve made so far in this book formatting journey.
Your objective, up till now, has been to create the best product, one that your audience will enjoy reading. You put a lot of effort into choosing the right words, so you could ‘tell your story’ to best effect.
The focus now, having also gone through the process of making lots of small (but important) decisions about page size (trim size), white space, font style and size, etc., etc. is to finalise all those settings to create the most effective printed version of your book.
Save a page – save a tree!
When you compile your manuscript, you’ll discover the number of pages that will need to be printed, based on all those decisions you already made. Your aim now is to make that number as small as possible (to minimise costs) and to make it a multiple of 16.
Why a multiple of 16? When the book is professionally printed, large sheets of paper – much larger than the trim size you decided upon – are used to print groups of 16 pages of your book. This process is called imposition and you can read all about it on this Wikipedia page.
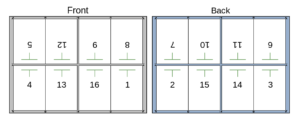 These large sheets, once printed as per the plan above, are folded and trimmed (hence the term trim size) to form a booklet. Many of these booklets can then be bound to form your book, either stitched or glued, or held together using a spiral fastening.
The large sheets using to form the batches of 16 pages come in standard sizes, so it makes sense to adopt standard sizes for your page trim.
It also makes sense to aim for a multiple of 16 as the total number of pages in your book. Otherwise, you’ll be paying for 1-15 surplus pages (blank pages!) that you don’t need.
When should we not ‘lose’ blank pages?
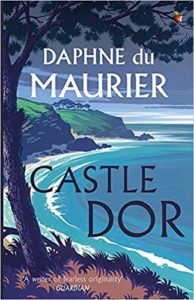 Consider this example. A library book, plucked at random from my bookshelf, Daphne DuMaurier’s Castle Dor has 12 pages of front matter, and 274 of body text, plus 2 pages of endmatter.
12 + 274 + 2 = 288.
288 = 18 x 16. A multiple of 16!
To make this book any cheaper to produce, it would need to lose 16 pages. Let’s count the blank pages?
- There is a blank page xii. Unavoidable as the decision was taken to start the body of the book on a recto.
- There are 19 blank pages (2, 6, 12, 22, 40, 56, 78, 88, 90, 98, 102, 112, 146, 170, 184, 222, 240, 250, 270) due to new chapters starting on a recto.
- Page 275 is blank due to final page being an ad for the publisher.
So, 21 blank pages in total … but if the decision had been to start new chapters on the next page (rather than a recto) that would have ‘saved’ 19 pages, giving a total page count of 288 – 19 = 269. 269 = 17 x 16 – 3. The net result would have been a continuous run of printed pages, with 3 blank pages at the end. And a saving on paper costs.
However, such a design decision would have given a poor image of the publishing house – one that wouldn’t normally be entertained. So, the lesson is: don’t try to save costs by making poor design decisions!
How can we reduce the page count then?
You’ve already made decision that (hopefully) you wouldn’t want to change. However, I suggest you revisit them as a small tweak could reduce the page count enough to make your total page count fit the multiple-of-16 rule.
Tweaks that reduce page count – but you might not want to do these …
- Choosing a greater trim size will reduce the page count, but the book might not then comply with other books on a bookshelf … standard sizing is important. Read this blog post again.
- Choose narrower margins? Might make the page look overfull. Read this blog post again.
- Choose a smaller font (point size)? Might make the print too small for comfort for the reader. Read this blog post again.
- Reduce the leading? Might make the page look crowed? Read this blog post again.
- Using indented style rather than blocked might affect the page count. Try both and see what happens? Read this blog post again.
- Revisiting the material you’ve put in your frontmatter and endmatter could result in a page count reduction. Read this blog post again.
Reducing page count – two strategies
Two tweaks are more likely to serve you well: reducing the padding and cutting text (!).
Reducing the padding
Consider this tweak first as it takes less time than the ‘cutting text’ option and might provide a solution straight away.
The spacing above (and below) the chapter title is one of balance. Scrivener’s default for the Courier template is 12 lines of padding; for the Modern template, it’s zero lines.
So, it’s up to you to decide how many lines of padding you ‘need’ and it would only take a few minutes to experiment with less padding on New Pages.
- Try 10 – see how many pages that produces and see how it looks on the page.
- Try 0. That’s the greatest saving …
- Pitch for a value somewhere between the extremes … one that looks okay on the page to you.
To remind yourself of how to tweak padding, read this blog post again.
Cutting text – to minimise blank pages between chapters
 If you were to lose one or two words here and there, you could reduce the page count. But which words?
I don’t expect you to read your entire manuscript again and try to identify words you could delete without affecting the content … Instead a targeted approach can be adopted.
As an example, I’ve compiled the latest draft of my Dead Wood novel to PDF using a paperback trim size of 6″x9″ (one of Scrivener’s default templates). Including frontmatter, it runs to 387 pages.
24 x 16 = 384
If I could lose just 3 pages, I’ll have a multiple of 16 – which is my goal.
First, I look for chapters that are preceded by a blank page and, before that, a page with only a few lines of text.
My chapter 3 has three lines on page 31. There’s then a blank page so that chapter 4 starts on a recto. If I were to cut the text in chapter 3 – I only need to lose three lines of text – I’ll save two pages.
- The same happens for my chapter 6! Three lines of text at the end of chapter 5 take up a page.
- The end of chapter 21 – five lines – use a whole page …
- The end of chapter 29 – 8 lines …
- The end of chapter 32 – 7 lines …
- The end of chapter 35 – 3 lines …
- The end of chapter 40 – 1 line …
- The end of chapter 41 – 5 lines
- The end of chapter 44 – 8 lines
In total then, with a bit of pruning of those chapters, I could save 18 pages. Bringing the page count down to 23×16= 368 saves 1/24 of my paper costs … 4%. Worth having?
Cutting text – to avoid widows and orphans
Another good reason to prune your text to lose lines is to avoid widows and orphans.
While it’s good practice to tick the widows and orphans box, it can push up the page count.
- Rather than have a line at the bottom of a page (a widow) that line is moved onto the next page and that has a knock on effect on subsequent pages. Seeing where these split paragraphs are, and tweaking the text before it, can avoid the widow in the first place …
- With orphans (the final line of a paragraph that appears on the next page), the effect is to move some or all of the paragraph onto the next page, which has an even greater impact on subsequent pagination. Orphans can be avoided if you prune the text of that paragraph.
Because pruning affects the pagination of what follows, always prune working from the beginning of a book / chapter / page / paragraph. One early fix might inadvertently fix something further through the book and will save you effort later.
Finding lines to cut
Having identified candidate chapters for pruning, I wouldn’t expect to read the whole chapter. Instead, I’d scan for paragraphs where the final line has only one word.

It would be easy to identify something to cut from this paragraph …
Here’s another example.
BTW Those single words are called ‘runts’. See this article for more information of the terms used in typography.
Going to print?
Having got this far, you’d think it’d be an easy step to get your book printed. It’s beyond the scope of this blog to go into details but you might like to read this article about the trials and tribulations of one author.
Questions about Scrivener?
Need a helping hand with Scrivener tools? Want a demo? Book your own Simply Scrivener Special session with me, at a time to suit you.
And, if you need a steer on self-editing, check out my RedPen Editing course. Join RedPen Editing and enjoy a 5-day editing taster course for free.
The ScrivenerVirgin blog is a journey of discovery:
a step-by-step exploration of how Scrivener can change how a writer writes.
To subscribe to this blog, click here.
Also … check out the Scrivener Tips
on my ScrivenerVirgin Facebook page.
rms
12 March 2023 at 06:30Nice. And Great Series
Anne Rainbow
12 March 2023 at 07:31Thanks!