

DIY Book Formatting with Scrivener: Headings, Headers and Footers

This is the fifth in this series on DIY Book formatting. The previous four
- DIY Book Formatting with Scrivener: An Introduction
- DIY Book Formatting with Scrivener: Page Settings
- DIY Book Formatting with Scrivener: Body Text 1
- DIY Book Formatting with Scrivener: Body Text 2
covered most of the 20 items identified in the Introduction: all the ones in red below.
- The size of the page (width and height)
- The white space above the header
- The content of the header, its position (centred), font style and size
- The white space at the top of the page between the header and the story title
- The position (left aligned), font style and size of the story title
- The use of capitals in the story title
- The white space after the story title and before the text starts
- The paragraph style: indentation for the second paragraph, but none for the first
- The large W on the first line of the opening paragraph
- The use of capitals for the first five words in the opening paragraph
- The font style and size of the body text
- The line spacing of the body text
- The justification of the body text (fully justified)
- The widow at the bottom of the page (single line of text separated from the rest of that paragraph which falls on the next page)
- The white space between the final line of body text and the page number
- The position (centred), style and size of the page number
- The white space between the page number and the footer
- The content, position (centred), text style and size of the footer
- The white space below the footer
- The width of the left and right margins (they differ!)
In this post, the items in blue (3, 5, 6, 16 and 18) remain to be discussed.
Headers and Footers, with Page Numbers
In the paperback Dress Your Family in Denim and Corduroy by David Sedaris, a book I have on my bookshelf, because it’s a collection of short stories, the story title is in the header on the right hand side (called the recto) for all but the opening page of a story. On the left hand page (called the verso), it says DAVID SEDARIS (again!) unless it’s the opening page of a story.
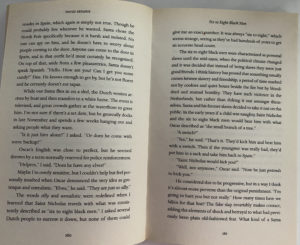
Many novels just have the page number in the footer, centred.
What you want to appear is entirely up to you and may change as you develop your material.
- Initially, if you are outputting a hard copy for yourself to read, you might need a date to identify which draft you are editing and a page number.
- Once you decide to output for others to read your material, as well as page numbering, you ought to include the title of your work and a copyright line which names you as the author. You might also include a message such as ‘DRAFT – not for circulation’.
- Once you reach publication stage, it might only be the page number that’s needed.
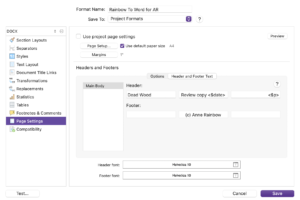
Whatever you decide, in Scrivener, items 3 (header), 16 (page number) and 18 (footer) are all determined in the Header and Footer Text pane in the Page Settings tab. Notice that the header and footer each have three fields: a left justified field, a centred field and a right justified field.
 How to reach this pane, and what to do once you get there, is explained in detail in this blog post where I also explain the use of placeholders like <$p> used to generate page numbers automatically for you. Plus all the options for a date which might prove useful while you are still drafting your manuscript.
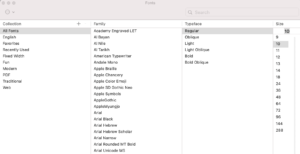
Notice that, in the Header and Footer Text pane in the Page Settings tab, towards the bottom of the pane, you have the opportunity to determine the font family, style and size – separately for the header and for the footer. Clicking on the icon with the T reveals the complete list of fonts available.
I would recommend you choose, for the header and footer, a font size smaller than the body text (but still legible!) and maybe use a style which is different from your body text. For example, in the Sedaris paperback:
- The verso page has DAVID SEDARIS in all caps.
- The story title on the recto is in italic.
Scrivener doesn’t offer this level of complexity for formatting the header/footer fields. In the Options tab, where you specify what settings you’d like for the header/footer, this style of text formatting will apply to all pages.
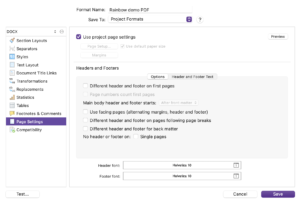
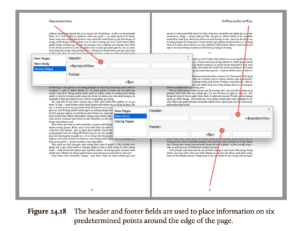
If you tick ‘Use facing pages’ and ‘Different header and footer on pages following page breaks’, when you go back to the Header and Footer Text tab, you have separate settings for New Pages, Main Body and Facing Pages. This image from the Scrivener Manual (available via the Help menu in Scrivener) explains how to set up each field for Facing Pages.
You can also set up different header/footer fields for New Pages (ie those at the start of a chapter/story). Most likely, you’d leave the header blank on new pages?
Anyway, for the simplest effect, in the Header and Footer Text pane in the Page Settings tab, just make sure the middle entry for the footer is <$p>.
And remember, if you are outputting to ebook, there are no ‘pages’ as such so no page numbers, or headers or footers.
Chapter Headings
For the chapter headings , you have two choices.
- Use the document/folder title you’ve used in the Binder. Tick the Title box for the section layout for Chapter Heading. And leave the Title Prefix blank.
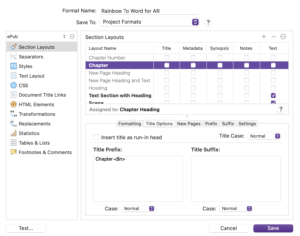
- Instruct Scrivener to generate the heading, including automatic numbering. As shown below, specify this in the Title Prefix field (using a placeholder) and don’t tick the Title box for the section layout for Chapter Heading.
[If you have both settings, you’ll get both the title as per the Binder and the automatic numbering version!]
Then, items 5 and 6
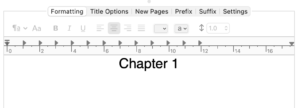
- the position (left aligned), font style and size of the story title
- the use of capitals in the story title
are displayed in the Formatting tab.
This is one of many places where the Formatting Bar is used to control the appearance of your text and headings. This blogpost explains how. Next time, we will consider FrontMatter, EndMatter and how to tweak all the settings to arrive at a point where you are ready to publish.
Questions about Scrivener?
Need a helping hand with Scrivener tools? Want a demo? Book your own Simply Scrivener Special session with me, at a time to suit you.
And, if you need a steer on self-editing, check out my RedPen Editing courses. Join RedPen Editing and enjoy a 5-day editing taster course for free.
The ScrivenerVirgin blog is a journey of discovery:
a step-by-step exploration of how Scrivener can change how a writer writes.
To subscribe to this blog, click here.
Also … check out the Scrivener Tips
on my ScrivenerVirgin Facebook page.
Pingback:Scrivener Advent Calendar: H is for ... - ScrivenerVirgin
8 December 2024 at 18:00