

Compiling: Placeholders, headers and footers
 In this mini-series of posts. I focus on three aspects of compiling:
- First, it was output options.
- Last time: section types
- This time: placeholders, headers and footers
I’ve already published a series of posts on compiling with Scrivener 3, that I recommend you read:
- Compiling with Scrivener 3: An Introduction
- Compiling with Scrivener 3: Outputting to PDF
- Compiling with Scrivener 3: Section layout assignment
- Compiling with Scrivener 3: Text tidying of spacing
- Compiling with Scrivener 3: Outputting an eBook
- Compiling with Scrivener 3: Creating a Cover
- Compiling with Scrivener 3: Contents page for an eBook
- Compiling with Scrivener 3: Style tweaking
- Compiling with Scrivener 3: Outputting to Kindle
- Compiling with Scrivener 3: Autonumbering
I explain in Compiling with Scrivener 3: An Introduction that there are three decisions to make:
- What will be compiled? (which was covered in the first post of that series)
- What output route will you take?’ (and that’s what I focused on in the first of this mini-series)
- How will the material look after compiling? (which was the focus of the previous post)
Today’s blog post goes onto greater detail for that third question: what will the material look like on the page?
Placeholders
 Placeholders take the place of something that is not available right now but can be supplied later.
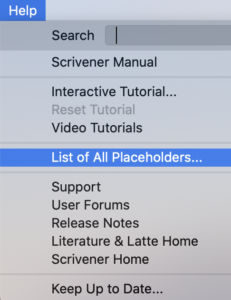
In Scrivener, these placeholders are tags – strings of text which start with <$ and end with >. You can see them all, by selecting List of All Placeholders from the Help menu.
In previous blog posts, I’ve explained how placeholders are essential for any auto-numbering and cross-referencing of figures and tables. I’ve also shown how placeholders might be used when writing plays.
In this post, the focus is on headers and footers. Typically, you might want to see these items of data on every page of your outputted manuscript.
- Project data such as your name (as the author) and the title of your novel
- Today’s date
- The page number
It’s up to you whether these appear in a header or in a footer.
For each item of information, there is a placeholder (a tag) which will result in the required data appearing in the compiled manuscript.
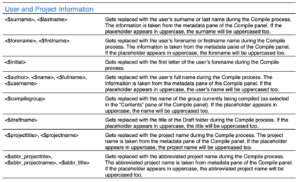
User and project information
Scrivener offers a number of placeholders that relate to the user or to the project itself. Once set up (within Compile) , these can be used anywhere in your project but are especially useful for headers and footers.
In the example of headers/footers in my own project, below, I show how to set these up.
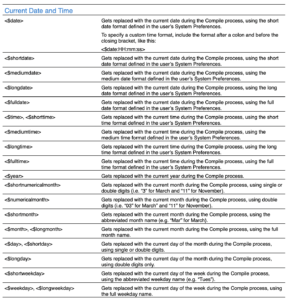
Date and time
Scrivener offers a range of date/time formats.
Several of these refer to ‘the user’s System Preferences’. I’m on a Mac and my route to this pane was via the Apple menu: System Preferences / Date & Time / Language and Region preferences / General / Advanced / Dates. Phew!
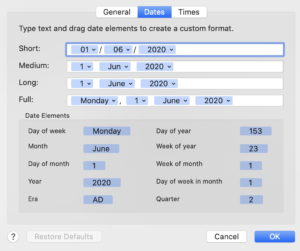
This can be tailored to suit your own preferences. I’m more than happy with the settings and am leaving mine alone.
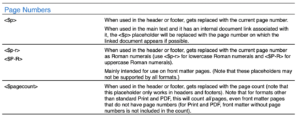
Page numbering
Scrivener offers a number of ways of numbering your pages.
- 1, 2, 3, …
- i, ii, iii, iv, …
- I, II, III, IV, …
You can also have the page count included: page 1 of 17.
Whatever you want is achieved by using the corresponding tag as specified in the List of All Placeholders.
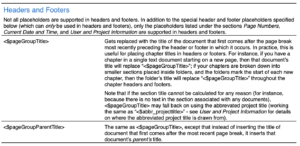
Headers and footers
What appears in the header and footer of a page is determined within Compile.
- Select File / Compile and then select the Format you want to use for this output.
- Click on the cog wheel (bottom right of the left hand pane) and select Edit format.
- Select Page Settings in the left hand pane, and Header and Footer Text within the body of the pane.
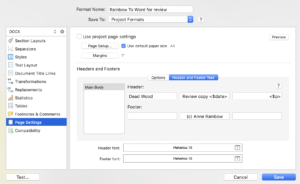
For both the header and footer, there are three areas that can be populated with material: left aligned, centred and right aligned. Type into those fields whatever you’d like for your output.
The placeholder tags will be replaced at compile time with the relevant values.
In my header
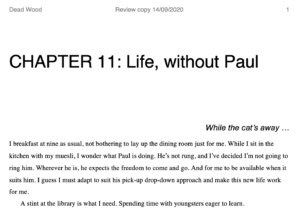
This is how my header looks: Dead Wood / Review copy [date] / [page number]
Notice that Scrivener reproduces any text you type, and replaces the placeholder tags with current information.
Title
The header has my title left aligned. I could have used the <$projecttitle> placeholder …
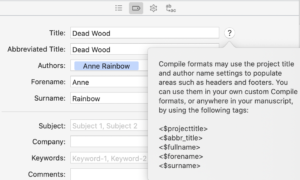
… in which case, I would have needed to set up this data – Scrivener can’t second guess my title!
This can be done within Compile; the second icon (luggage tag) gives you space to enter this information.
Actually, if you don’t provide this information, Scrivener uses your filename …
Date
I’ve included the text ‘Review copy’ to remind myself where this output is going. It also serves as a heading for those who receive it.
The date is the date I compiled it. Not today!
Page number
I’ve opted for 1, 2, 3 … and used the tag <$p> to achieve that effect. It’s on the right hand side of every page.
It is possible to mirror left (verso) and right (recto) hand pages. This is achieved in the Options tab.
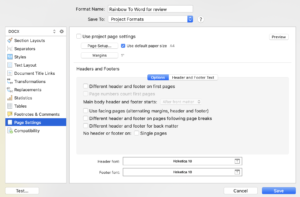
Notice also that you can have different numbering for the FrontMatter eg if you have a preface or introduction. And you can treat BackMatter differently too.
In my footer
I always include a copyright line. Not that I expect anyone to want to use my writing without permission – it’s just good practice … professional!
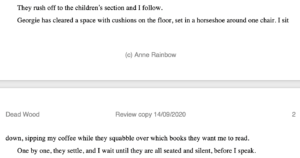
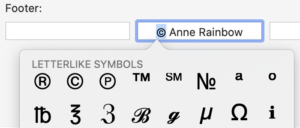 Notice that I typed (c) and Scrivener reproduced those three characters.
If, instead, you prefer to see the copyright symbol – a c within a circle – select Edit / Emoji & Symbols and © is within the LETTERLIKE SYMBOLS section.
Notice also that the next page has page number 2. Scrivener automatically calculates the page numbers for you.
Scrivener can also automatically number your chapters; see this blog post.
What else can go in a header / footer line?
There are restrictions of what can be included. The Placeholders pane explains all …
Questions? Need a helping hand? Want a demo?
To watch me demonstrating how to set up headers and footers or to ask any questions, book a Simply Scrivener Special.
To help me to prepare, you could also complete this short questionnaire.
The ScrivenerVirgin blog is a journey of discovery:
a step-by-step exploration of how Scrivener can change how a writer writes.
To subscribe to this blog, click here.
Also … check out the Scrivener Tips
on my ScrivenerVirgin Facebook page.
Pingback:DIY Book Formatting with Scrivener: Headings, Headers and Footers - ScrivenerVirgin
19 February 2025 at 22:55Pingback:Scrivener Advent Calendar: U is for ... - ScrivenerVirgin
21 December 2024 at 11:02WB
25 August 2024 at 02:33I’ve been looking all over the place, but I give up. I can’t find a placeholder that actually subs in the information from either the compile menu’s, or the project settings menu’s, “e-mail” field. I want this for my title page, as well as for either header or footer information to go onto each page.
… I should mention I know how to work headers and footers.
Yet any time I do anything other than hard-code this information, it doesn’t work. How’s about pointing me in the right DIR?
Anne Rainbow
25 August 2024 at 07:49Good question! There is a template tag <$template_email> but I’m not sure where it picks up the data, and couldn’t see how to get it ‘out’. One workaround might be to use one of the fields available in compile: eg provided you don’t need it already. Enter the email address in that field and then use the tag on your title page? Hope this helps!
Pingback:Navigating Your Word Document after Compiling from Scrivener - Lancy McCall
26 April 2022 at 22:35