

The Scrivener Mindset: What goes in the Editing pane?
In the Scrivener Mindset series so far, I’ve focused on what goes in the Binder, and how your decisions can be carried through to Compile to achieve whatever formatting you want for the various output routes you need. If you’ve not read and absorbed this information, I recommend you check out these blog posts. You’ll then be ready for what I am now going to address: what goes in the Editing pane.
- Adopting the Scrivener Mindset: a guide for writers
- The Scrivener Mindset: Nailing the Binder structure
- The Scrivener Mindset: Binder text output options
- The Scrivener mindset: The role of section types
- The Scrivener Mindset: Formatting via section layouts
- The Scrivener Mindset: Formatting via Compile
- The Scrivener Mindset: Formatting thru Section Layouts
- The Scrivener Mindset: The role of Project Formats
What goes in the Editing pane?
If you’ve read The Scrivener Mindset: Nailing the Binder structure, you know that all your headings go in the Binder as document titles. What’s left, your text, goes in the Editing pane?
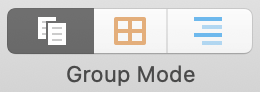
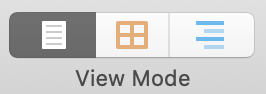
Yes, but it’s not that simple. There are three different Group/View modes available for the Editing pane.
- Scrivenings
- Corkboard
- Outliner
Note that, for Scrivenings, there are two different icons: a single page or a stack of two pages. With the single page, you only see the content of the selected document/folder. If, as I’ve suggested elsewhere, you don’t put text in folders, you might have a scare when you see no text in the Editing pane for a selected folder. Instead, make sure you have the stack-of-papers icon lit up; then you’ll see all the text for all the documents within that folder.
I’ll explain below what you see in each mode – Scrivenings, Corkboard and Outliner – but note also that there is an option to split the Editing pane into two. This means you can view one mode in one pane and another (same or different mode) in the other pane.
This blogpost explains how you can split panes and how to lock the Inspector to one or other of the two panes.
What do you see in the Editing pane in Scrivenings?
Scrivener is not WYSIWYG (what you see is what you get). Much as you might want to see in the Editing pane a representation of what will be output, that’s not how Scrivener works. You can, however, control how the pane is set up (width of margins, etc) via Scrivener / Preferences / Appearance.
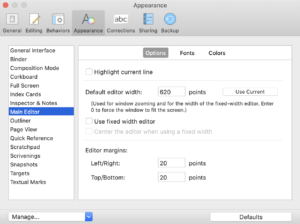
Frankly, I leave well alone … the default settings work well enough for me. I just write the words that I need to include in my novel / play / etc.
So, in simplest terms, with a single Editing pane, your writing workspace might look like this: Binder on the left with the selected scene highlighted; and text of that scene in the Editing pane.

If you just want to focus on your text, you can close the Binder (this post explains how) or use Page View which simulates how your text might look when on the printed page …
… or Composition mode which removes all distractions.
When you first start writing, you can free write, or if you’ve created a structure within the Binder already, you can write your text within the scenes you’ve set up. It’s easy to split a long scene into two (this post explains how) and rearrange scenes within the Binder, group them into chapters and so on.
So, there’s no need to feel you have to get everything right before you begin. Just write – in the Editing pane, in Scrivenings!
What’s on view in Corkboard mode?
The Corkboard offers an overview of the structure of your manuscript, with each document/folder represented as a card, or a stack of cards. I explain this option here.
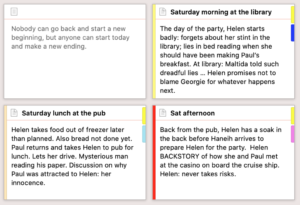
It is possible for the text at the start of the scene to appear on the card (as in the top left card above), but this is not the best place to ‘write’ (or edit) your text. Instead, this is where you might enter the synopsis for a scene, or for a chapter (as seen in the other three cards).
And you might make use of the Label (shown as the colour strips on the left hand side of the cards above) and Status metadata options. And, keywords (shown as coloured chops on the image above)…
All of these options are explained in various previous blog posts. Try these:
- Editing pane options: Corkboard
- NaNo2018: Outlining using the corkboard
- Scrivener user interface: Corkboard Customising
- Scrivener 3’s revised user interface – The corkboard options
- Metadata: Using the Label field for Location
- Scrivener: Using the Status field to track progress
- Metadata: Project keywords
But, the bottom line is: the Corkboard is not for entering text …
What’s on view in Outliner mode?
The Outliner mode is also not the place to enter text, but it might provide you with enough information to decide where to start writing next, or which scenes to focus on today. This is how it looks for a brand new project – a novel. I’ve right-clicked on the header area to reveal the drop down menu with all the options.

I go into great detail about how to make best use of the Outliner in this blogpost, but, in essence, this is what’s on offer.
- The Outliner provides a tabulated list of your Binder contents.
- There is an option to view/hide the synopses for documents/folders.
- Columns can be included (by ticking that drop down menu) to reveal metadata for each document/folder.
- The order of the columns can be rearranged.
- You can sort on data within the columns …
- And loads more; see section 8.3 of the Scrivener manual for the complete lowdown.
But, as with the Corkboard, the Outliner in not where you enter your text.
Questions? Need a helping hand? Want a demo?
To watch me go through the process of entering text in the Editing pane or to ask any questions, book a Simply Scrivener Special.
To help me prepare, you could also complete this short questionnaire.
The ScrivenerVirgin blog is a journey of discovery:
a step-by-step exploration of how Scrivener can change how a writer writes.
To subscribe to this blog, click here.
Also … check out the Scrivener Tips
on my ScrivenerVirgin Facebook page.
No Comments